Migrate from other services
Learn how to export and import users from your own data store.
The WorkOS AuthKit API allows you to migrate your existing user data from a variety of sources. In this guide, we’ll walk through the steps to export, and then import users from your own data store.
While moving authentication related metadata to WorkOS, most applications will continue to store certain user information in their data store. This common subset of data will usually be the following:
| Field | Description | Status |
|---|---|---|
| The user’s email address. Used for various authentication and verification purposes. | Required | |
| First Name | The user’s first, or given name. | Optional |
| Last Name | The user’s last, or family name. | Optional |
| Verification Status | The user’s email verification status if they have gone through a verification flow. Assumed as “not verified” unless supplied. | Optional |
| Password | The user’s password hash, if they use password-based authentication. | Optional |
While preparing the migration, you’ll want to ensure this information is programmatically available for use in the import step, this can mean:
- Exporting the relevant data to a file such as JSON or CSV.
- Allowing the data to be queried from the data store directly.
After the data is accessible, we can configure the import.
Now that the User data is available, we can import it into WorkOS.
If you have webhook endpoints configured, temporarily disable delivery for the duration of the bulk import to avoid overwhelming your webhook consumers with high volumes of user.created, organization.created, and organization_membership.created events.
You can disable a webhook endpoint using the Update Webhook Endpoint API:
Re-enable the endpoint after the import is complete by setting status back to "enabled".
The WorkOS CLI includes a migrations tool that can import users from a CSV file:
For a guided, interactive experience:
The CLI handles batching and rate limiting automatically.
For each of your users, you can call the WorkOS Create User API. This will create a matching User object within WorkOS.
A successful response will include a new WorkOS user ID, most apps will want to persist this WorkOS user ID alongside the application-local user object.
There are now several options on how to proceed, depending on your application’s needs:
If your users currently use password-based authentication, you can import existing password hashes during the users creation process, or later using the WorkOS Update User API.
WorkOS currently supports the following password hashing algorithms:
bcryptscryptfirebase-scryptsshassha256pbkdf2argon2
For scrypt and pbkdf2 passwords, use the PHC string format.
The hash and salt should be B64 encoded: trim the = characters that represent Base64 padding. Using a PHC-formatting library, like
Node’s @phc/format, should handle this for you.
The following table shows how to map the scrypt and pbkdf2 parameters to the PHC parameters.
scrypt
Scrypt value |
PHC hash parameter | |
|---|---|---|
key length |
→ | kl |
cost |
→ | n |
rounds |
→ | r |
parallelization |
→ | p |
A valid scrypt PHC formatted string looks like this:
pbkdf2
pbkdf2 value |
PHC hash parameter | |
|---|---|---|
digest |
→ | d |
iterations |
→ | i |
For pbkdf2 allowed values for digest are sha1, sha256, or sha512. The value for iterations is dependent on digest. For sha256 there is a minimum of 600,000 iterations and a max of 1,000,000. For sha512 there is a minimum of 210,000 and a max of 1,000,000. For sha1 there is a minimum of 1,000 iterations and a max of 1,000,000, and the derived key must be between 20 and 36 bytes long.
A valid pbkdf2 PHC formatted string looks like this:
sha1 iteration counts in the field are far below the OWASP recommendation of 1,300,000, so pbkdf2 hashes using the sha1 digest are not stored as provided. They are re-hashed with bcrypt at import, which strengthens the stored hash without requiring your users to reset their passwords. Sign-in is unaffected: users continue to authenticate with their existing passwords.
argon2
argon2 value |
PHC hash parameter | |
|---|---|---|
variant |
→ | algorithm id |
version |
→ | v |
memory |
→ | m |
time |
→ | t |
parallelism |
→ | p |
The variant should be argon2id, but older supported variants include argon2d and argon2i. The version must be 19. The following memory, time (iterations), and parallelism settings are based on OWASP recommendations. Memory is specified in KiB with a minimum of 4,096 KiB (4 MiB) and maximum of 262,144 KiB (256 MiB). For time, there is a minimum of 1 iteration and a maximum of 5 iterations, except for argon2i which has a minimum of 3 iterations. Parallelism ranges from 1 to 8 threads. If your requirements fall outside of these guidelines, please contact support.
A valid argon2 PHC formatted string looks like this:
For firebase-scrypt passwords, refer to the Firebase Migration guide for an example of how to format the password_hash.
For ssha passwords, use the following algorithm:
- Generate a
salt: random bytes - Hash the user’s password and the
saltusing the SHA1 algorithm - Base64 encode the hash followed by the salt
- Prepend the string with
{SSHA}
A high-level representation is: {SSHA}base64(sha1(password + salt) + salt).
For ssha256 passwords, use the same algorithm as ssha but with SHA256:
- Generate a
salt: random bytes - Hash the user’s password and the
saltusing the SHA256 algorithm - Base64 encode the hash followed by the salt
- Prepend the string with
{SSHA256}
A high-level representation is: {SSHA256}base64(sha256(password + salt) + salt).
By default, ssha256 digests are verified as sha256(password + salt) – the salt appended to the password. If your legacy system placed the salt before the password instead (sha256(salt + password)), pass password_salt_position: "prefix" alongside password_hash_type when importing. The string format above is unchanged: the salt still follows the digest inside the base64 payload, and only the digest computation differs.
A mismatched salt position cannot be detected at import time – it surfaces later as failed sign-ins – so always confirm that a test account can sign in with its existing password after importing.
Once imported, users can continue to sign-in with their existing password, without having to go through a password reset flow.
If you are unable to export passwords from your existing data store, whether for security reasons or other limitations, you can programmatically trigger a password reset flow using the WorkOS Password Reset API.
This process can be initiated at any time, and doesn’t need to happen during the user import process.
Some applications may want to remove password-based authentication when switching to WorkOS, in favor of another method like Magic Auth. If this is the case for your application, you can skip dealing with passwords entirely.
If you have users who previously signed in using social auth providers, such as Google or Microsoft, those users can continue to sign in with those providers after you’ve migrated to WorkOS.
Check out our integrations page for guidance on configuring the relevant provider’s client credentials in WorkOS.
After your provider is configured in WorkOS, users can sign in with their provider credentials and will be automatically linked to a WorkOS user. WorkOS uses the email address from the social auth provider to determine this match.
Email verification behavior varies depending on whether the provider is known to verify email addresses. For example, users signing in using Google OAuth and a gmail.com email domain will not need to perform the extra verification step.
If your application uses enterprise SAML or OIDC connections for SSO, you can migrate them to WorkOS. The migration is almost entirely self-serve: once WorkOS enables the Connections API migration capabilities for your environment, you create and update connections yourself with the Connections API or the WorkOS CLI. Contact support@workos.com to start the migration process – the capabilities are enabled per environment, and the endpoints return a 404 until then.
The best strategy depends on how many connections you have and whether you control the existing SSO infrastructure.
For smaller deployments, the simplest path is to recreate each connection in WorkOS and coordinate with each customer’s IT team to update their Identity Provider configuration. You can use the Admin Portal to let customers self-service their SSO setup, reducing the coordination burden.
For each connection:
- Create or identify the WorkOS organization matching the existing organization
- Share the Admin Portal link with the customer’s IT team so they can update their IdP configuration to point to WorkOS
- Watch for the
connection.activatedwebhook to roll out the customer to the WorkOS connection
For larger deployments, coordinating with every customer’s IT team is impractical. Instead, you can perform a transparent migration so that IT admins do not need to reconfigure anything on their end. The approach depends on whether you are migrating from an external identity service or from a homegrown SSO implementation.
Route 1: Migrating from an external service (proxy approach)
If you are migrating from an external identity provider (such as Auth0, or another third-party service), you can place a proxy in front of the service’s custom domain to route IdP callback traffic to WorkOS.
This approach requires that you have a custom domain configured with your current provider (e.g., auth.your-domain.com) so that you control the domain routing.
Requirements
- You have contacted support@workos.com to enable the Connections API migration capabilities – the connection create and update endpoints, the
external_idfilter, and thecallback_endpointfield – for your environment - You have a custom domain configured with your current identity provider
- Your SAML enterprise connections do not use SAML Request Signing with the provider’s tenant global key pairs
- Your SAML enterprise connections do not use SAML Response Encryption with the provider’s tenant global key pairs
Configuring the callback proxy
Once your connections exist in WorkOS, configure a proxy in front of your custom domain to route IdP callback traffic to WorkOS. The proxy intercepts callbacks at your custom domain’s callback path and redirects them to each connection’s WorkOS callback endpoint.
Create each connection in WorkOS with the Create Connection API or the CLI’s workos connection create, preserving the identifier you already use for it as the connection’s external_id – see Importing connections with the API and CLI below for the full workflow. The proxy uses that identifier to determine where to send each callback: look up the connection with the Connections API filtered by external_id, then read its callback_endpoint – the immutable URL where WorkOS receives that connection’s IdP response.
The response includes the connection’s callback_endpoint. Redirect the IdP callback to that URL to complete authentication through WorkOS.
external_id filter and the callback_endpoint field are part of the Connections API migration capabilities. Contact support@workos.com to enable them for your environment.
The proxy flow works as follows:
- A user authenticates with their IdP, which posts the SAML response or OIDC callback to your custom domain
- The proxy looks up the connection by
external_idand redirects the callback to the connection’scallback_endpoint - WorkOS attempts to find a matching connection:
- If found, it processes the response and redirects to your application’s WorkOS callback
- If not found, it redirects back with a
fallbackquery parameter, and the proxy forwards the original callback to your existing provider
This fallback mechanism ensures zero downtime – connections that haven’t been migrated yet continue to work through your existing provider.
The proxy can be implemented using Cloudflare redirect and transform rules, a Cloudflare Worker, or any reverse proxy you control. Contact support@workos.com for a reference implementation.
Route 2: Migrating from a homegrown solution (callback modification)
If your application has its own SSO implementation where you directly handle IdP callbacks, you already control the callback endpoints. Instead of a proxy, you can modify your existing callback handlers to forward IdP responses to WorkOS using a feature flag mechanism.
Preparing connection data
Create your existing connections in WorkOS with the Create Connection API or the WorkOS CLI, preserving each connection’s identifier from your previous provider as its external_id. Storing the same identifier on the WorkOS connection lets your callback handler map an incoming IdP response to the correct WorkOS connection without any additional bookkeeping. You can look up a connection at any time with the Connections API filtered by external_id.
external_id field are part of the Connections API migration capabilities. Contact support@workos.com to enable them for your environment.
Or call the endpoint directly:
Creating is idempotent on external_id, so a migration script can safely be re-run after a partial failure. To correct a connection’s configuration afterwards, use the Update Connection API or workos connection update. See Importing connections with the API and CLI below for the full workflow, including SAML manual configuration, OIDC secrets, and attribute mappings.
How it works
- Create your connections in WorkOS with the Connections API or CLI, setting
external_idto your existing connection identifier - Modify your existing callback endpoint to check a WorkOS Feature Flag before processing the IdP response
- For organizations flagged for WorkOS, forward the IdP response (SAMLResponse or authorization code) to WorkOS for processing
- For organizations not yet migrated, continue processing through your existing flow
This gives you per-organization control over the migration without requiring IdP reconfiguration.
Regardless of which route you use, the authorization URL piece works the same way. You can use WorkOS Feature Flags to control which organizations use WorkOS SSO versus your existing provider during the migration. Create a feature flag (e.g., workos-sso-enabled) and target it to specific organizations as you migrate them.
This lets you gradually migrate organizations to WorkOS SSO, verify each one works correctly, and roll back individual organizations if needed – all without code deployments.
Whichever route you take, the import itself works the same way: export each connection’s configuration from your existing provider, then create it in WorkOS with the Create Connection API or the WorkOS CLI.
Export connection data from your existing provider
For each connection, collect the organization it belongs to and its protocol configuration.
For SAML connections:
| Field | Description | Required |
|---|---|---|
| IdP metadata URL | The Identity Provider’s metadata document URL | Either this or the manual IdP fields |
| IdP Entity ID | The Identity Provider’s Entity ID | With manual IdP fields |
| IdP SSO URL | The Identity Provider’s SSO URL | With manual IdP fields |
| IdP signing certificates | X.509 certificates used to verify signed SAML responses | With manual IdP fields |
| ACS URL | A custom Assertion Consumer Service URL, if your provider used one | Optional |
| SP Entity ID | A custom Service Provider Entity ID (audience), if your provider used one | Optional |
| Request signing key pair | Customer-owned key pair used to sign SAML requests | Optional |
| Response encryption key pairs | Customer-owned key pairs used to decrypt encrypted SAML responses | Optional |
For OIDC connections:
| Field | Description | Required |
|---|---|---|
| Discovery endpoint | The OpenID Connect discovery URL | Yes |
| Client ID | The OIDC client ID registered with the IdP | Yes |
| Client secret | The OIDC client secret (not needed for private_key_jwt) |
Usually |
| Redirect URI | A custom OAuth callback URL, if your provider used one | Optional |
Also record each connection’s identifier in your existing provider. You’ll preserve it as the WorkOS connection’s external_id, which keeps imports idempotent and lets you correlate WorkOS connections back to your existing system. If your users’ IdP attributes don’t match the WorkOS defaults, export the attribute or claim mappings too.
Create or locate WorkOS organizations
Every connection belongs to an organization. For each connection, find the matching WorkOS organization or create one with the Create Organization API:
Persist the returned organization ID – you’ll need it to create the connection.
Create connections
Create each connection with the Create Connection API, or with the WorkOS CLI:
Or call the endpoint directly:
SAML connections
If your existing provider exposes an IdP metadata URL for the connection, provide it and WorkOS imports the IdP configuration from the metadata document:
Otherwise, provide the IdP fields manually. The metadata URL and the manual IdP fields are mutually exclusive:
To avoid IdP-side reconfiguration, carry over the connection’s existing service provider settings: pass the ACS URL and SP Entity ID the IdP is already configured with as acs_url and sp_entity_id, and import customer-owned key pairs with sp_signing_key_pair (request signing) and sp_encryption_key_pairs (response encryption). When omitted, WorkOS generates and manages these values.
OIDC connections
The client secret is write-only: it is stored encrypted and never returned by the API. For IdPs that authenticate with private_key_jwt instead of a client secret, set token_authentication_method to private_key_jwt and omit client_secret; WorkOS generates a signing key pair and returns its certificate in oidc_options.jwt_signing_certs for you to register at the IdP, or you can import an existing key pair with jwt_signing_key_pair.
Attribute mappings
If the IdP’s attributes or claims don’t match the defaults for the connection type, map them with attribute_maps:
Custom attributes must already be defined in the WorkOS dashboard.
Idempotency with external_id
Set external_id to the connection’s identifier in your existing provider. Creating is idempotent on it: if a connection with the same external_id already exists in the organization, the API returns the existing connection instead of creating a duplicate, so a migration script can safely be re-run after a partial failure. Create does not apply changed fields to an existing connection; use the Update Connection API below to correct its configuration. If the external_id is already used by a connection in a different organization, the API responds with an external_id_already_in_use error.
Update connections
Correct or evolve imported connections with the Update Connection API, or with the CLI:
Or call the endpoint directly:
Updates are partial: only the fields you provide are changed. Fields that accept null can be set to null to clear an override and revert to the WorkOS-generated default – for example, setting saml_options.acs_url to null reverts to the standard WorkOS ACS URL, and setting external_id to null stops tracking one.
You can look up a connection by its external_id at any time with the List Connections API:
SAML connections involve up to three kinds of certificates, each with its own lifecycle. Customer-owned key pairs can only be imported when the connection is created – after that, WorkOS generates and holds every new key pair, and the API only ever returns public certificates, never private keys.
IdP signing certificates
The Identity Provider signs SAML responses; WorkOS verifies them against the connection’s IdP signing certificates, so WorkOS never holds a private key for these. You import them at creation with saml_options.idp_signing_certs (or via the metadata URL), and can add more later – for example, ahead of an IdP-side rotation – with the IdP signing certificate endpoints:
Existing certificates keep working until they are deleted or expire, so add the new certificate before the IdP starts signing with it. The last remaining certificate cannot be deleted (cannot_delete_last_certificate), and a deleted certificate that is still published in the connection’s IdP metadata may be restored by a later metadata refresh – remove it from the metadata document too.
SP signing certificate
The connection’s request signing key pair signs SAML requests sent to the IdP. Import a customer-owned pair at creation with saml_options.sp_signing_key_pair; afterwards, the SP signing certificate endpoints manage a WorkOS-generated key pair instead – creating with a key/cert body is rejected with key_pair_not_accepted.
A connection signs with one key pair at a time, so creating a second is rejected with sp_signing_cert_already_exists. To rotate, delete the active certificate, create its replacement, then register the new public certificate with the IdP:
SP encryption certificates
The connection’s encryption key pairs decrypt encrypted SAML responses. Import customer-owned pairs at creation with saml_options.sp_encryption_key_pairs; afterwards, the SP encryption certificate endpoints generate WorkOS-held key pairs – as with signing, a key/cert body is rejected with key_pair_not_accepted.
Unlike signing, several encryption key pairs can be active at once: every active private key is tried when decrypting, so rotations overlap. Creating appends a new key pair rather than replacing the old one:
To rotate: create the new certificate, register it with the IdP, then delete the old one once the IdP has stopped encrypting with it. At most three key pairs can be active at once – creating beyond the cap is rejected with too_many_sp_encryption_certs.
Before routing production traffic, test a sign-in against each migrated connection, or at least one connection per IdP type. For connections that need IdP-side changes, share an Admin Portal link so the customer’s IT team can finish the setup themselves.
Many applications allow users to sign up at any time. If your app offers this feature, then you should consider the timing of your migration. If any users sign up after you’ve completed importing users into WorkOS, but before you’ve switched to WorkOS for authentication, then those users will have been omitted from the migration process.
There are two main strategies to handle this:
The simplest solution is to schedule an appropriate time for the migration and disable signup while in progress. This may be done using temporary code added to your application and controlled by a feature flagging system.
After the migration is complete, your application should be updated to perform authentication using WorkOS, and the signup flag block disabled. This helps to ensure the export/import process captures all active users.
For applications that want to avoid disabling signups, a “dual-write” strategy can be used.
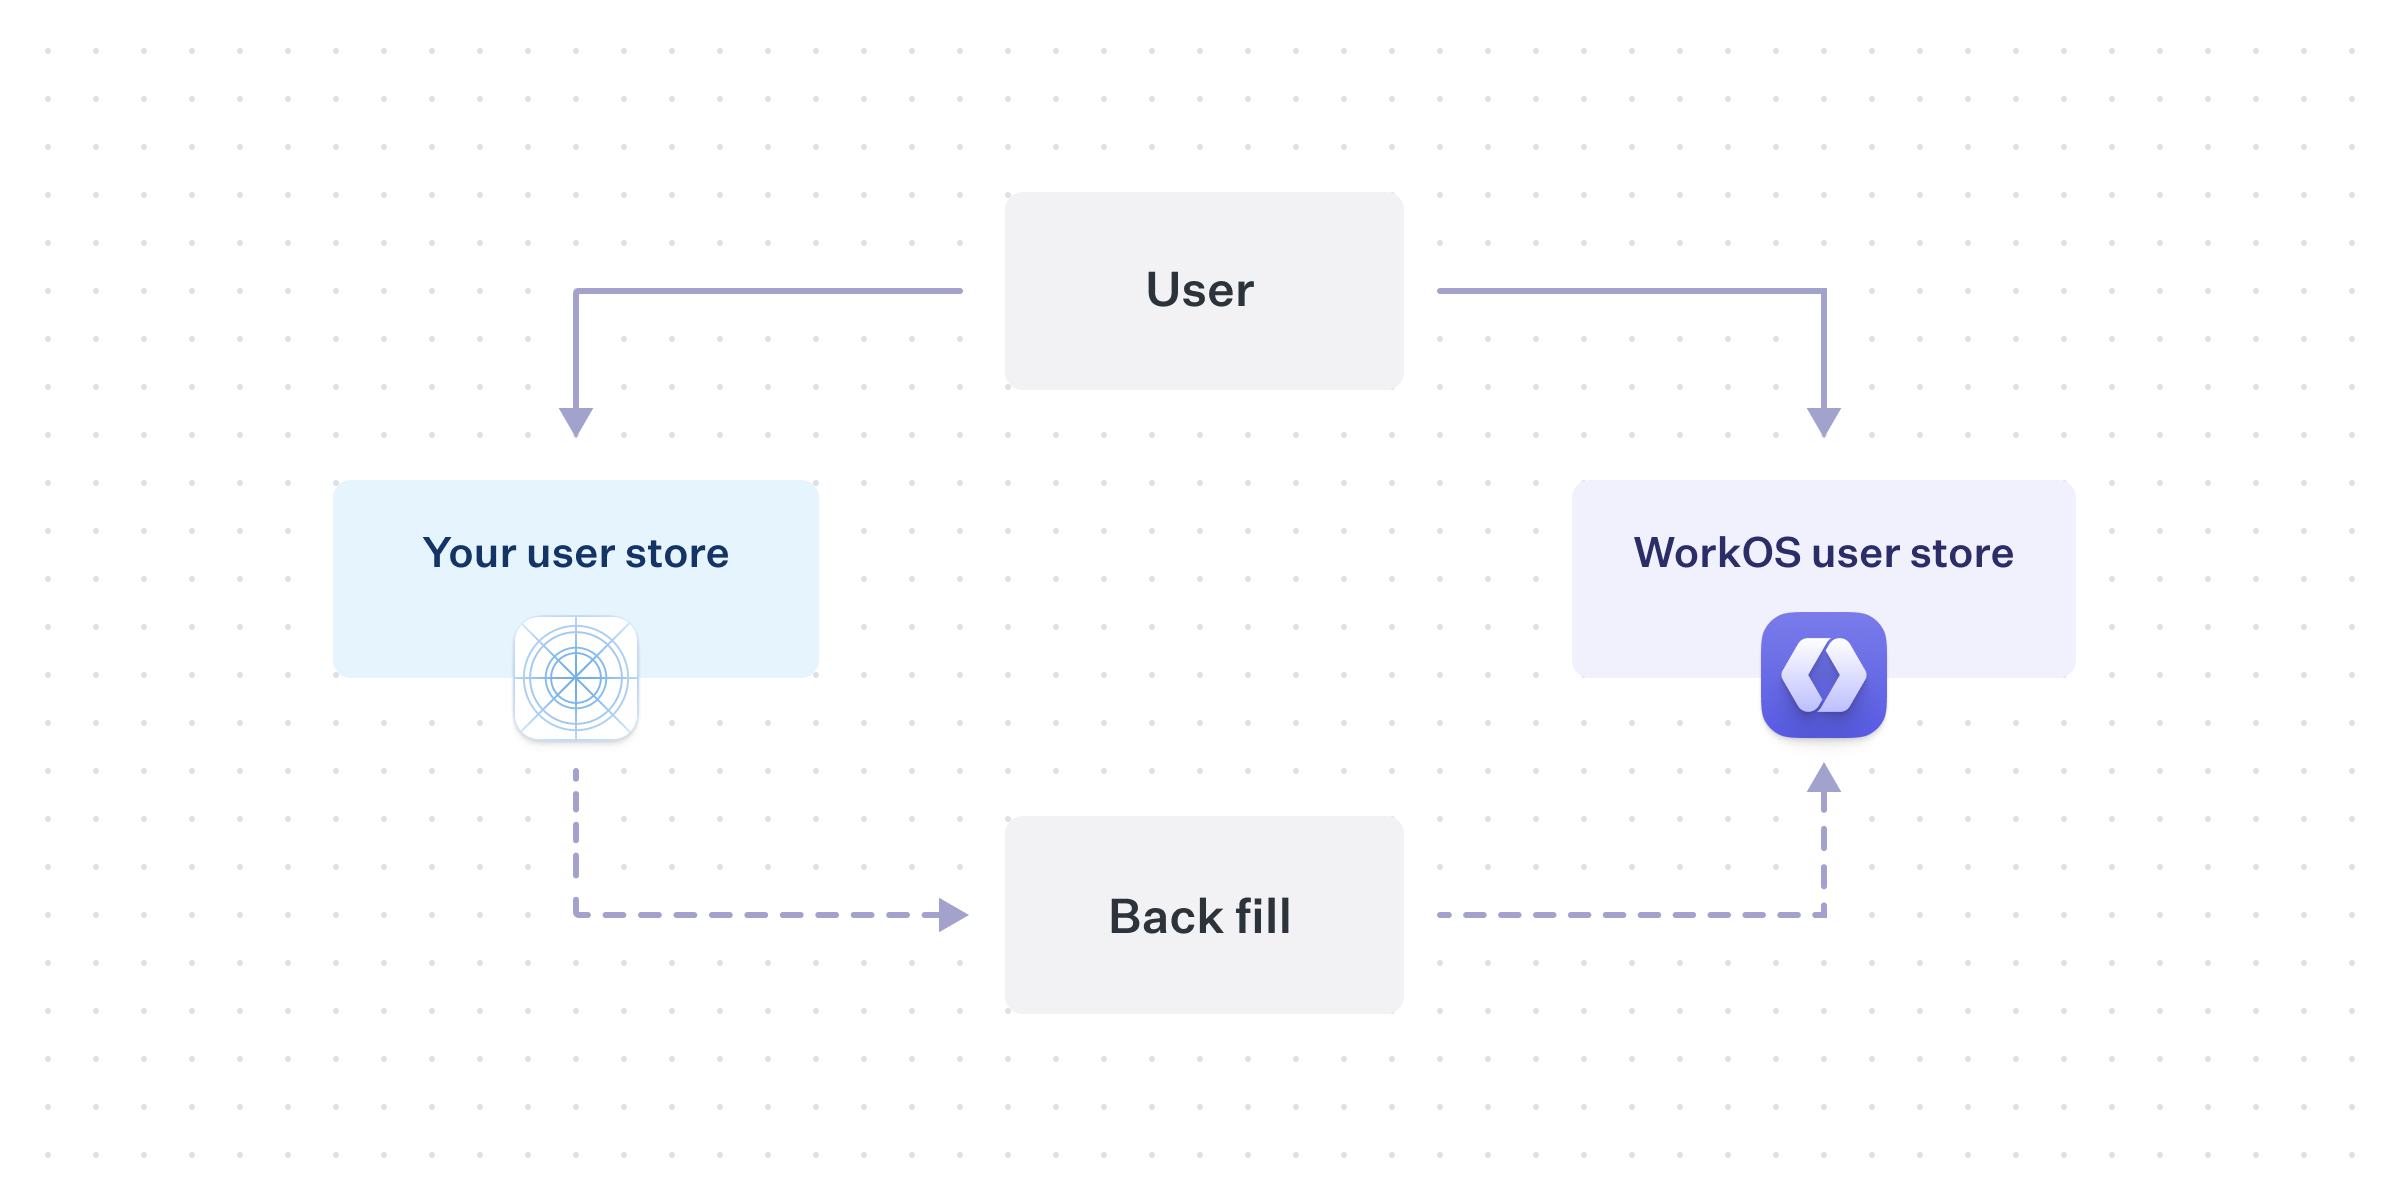
When a new user signs-up, in addition to creating a user record in the existing user store, the application should also create a matching record in WorkOS using the Create User API. As time passes, WorkOS will stay consistent with future new users, but a migration will still need to be performed for the historical set of users.
You will need to perform the same export and import process into WorkOS, but keeping in mind that some users will already exist in WorkOS as a result from the “dual-write”.
While this minimizes forms of downtime for your application, there are other complications. For example, if a user updates their email or authentication method, you will need to perform the same update in WorkOS, at least until the migration process is complete.
Which to choose?
Your timeline for completing the migration, along with your user’s tolerances for disruption, will affect which strategy makes more sense for your application.
Disabling signups, or even sign-in entirely, and doing a “big-bang” migration by moving all users at the same time, could be reasonable for a smaller application. However, larger applications that are on the critical path for their customers may need a more careful path in order to provide consistent access.
User management migration complexity can vary, so it is important to consider how existing application constraints will transfer to WorkOS. If you have any questions, reach out to support@workos.com or via your team’s WorkOS Slack channel for more help planning your migration.