How to add authentication to Next.js without creating an account
Run one command to add sign-in to a Next.js app. The WorkOS CLI creates a temporary environment and writes your keys. Claim it when you want to keep it.

To add authentication to a Next.js app without creating an account, run npx workos@latest install in your project. The WorkOS CLI provisions an unclaimed AuthKit environment, writes its credentials to .env.local, and adds sign-in, sign-out, and session handling to your code. When you want to keep the environment, you claim it into a WorkOS account with one more command.
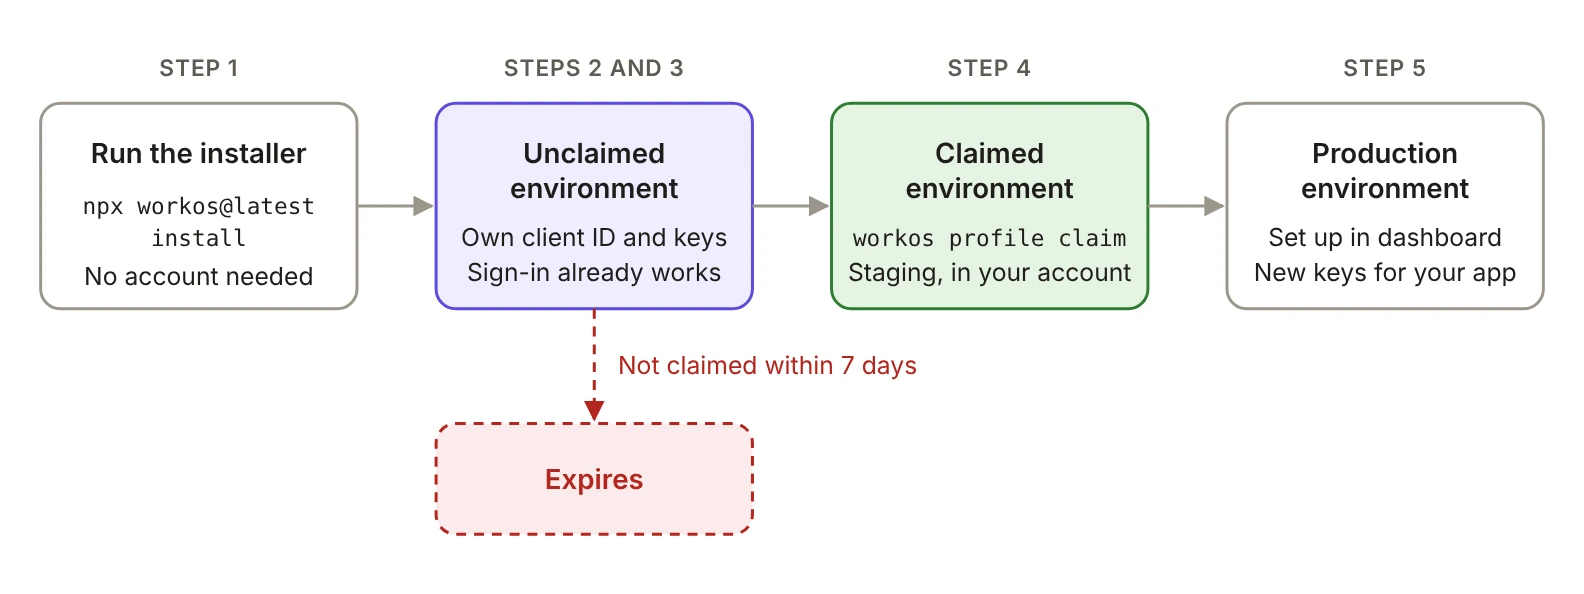
This tutorial walks through it in five steps: run the installer, review the changes, sign in, claim the environment, and finish setup. It also covers how coding agents can run the whole flow without a human signing up first.
Why does adding auth usually start with an account?
Until now, setting up AuthKit meant five steps in a browser: create an account, set up an environment, copy an API key and client ID, set a redirect URI, and generate a cookie password.
Each step is a place to drop off when you're only trying something out. For a coding agent it's a hard stop. An agent can write the integration, but it can't sign up for an account or click through a dashboard, so it stalls at the first missing key and hands the task back to you.
Accountless setup moves the account to the end. You get a working integration first and decide whether to keep it after.
What is an unclaimed environment?
An unclaimed environment is a WorkOS environment that the CLI creates without an account. It has its own client ID, API key, and hosted AuthKit domain, so sign-in works the same way it would in any other environment. It just isn't attached to anyone's WorkOS account yet.
Unclaimed environments are for building and trying things out. They expire after 7 days unless you claim them.
What do you need before you start?
- A Next.js app on version 15.3 or later. No app yet? Create one with
npx create-next-app@latest, which also sets up Git with a first commit. - A clean Git working tree. The installer checks for uncommitted changes and offers to put its edits on a new branch, so commit or stash your work first.
- No WorkOS account and no API keys.
Step 1: Run the installer
From the root of your Next.js app, run:
Behind the scenes, the installer:
- Checks for existing keys. If any env file in the project already has a
WORKOS_API_KEY, it keeps that key and doesn't create a new environment. - Provisions an unclaimed environment. With no keys found, it asks WorkOS for a new environment and gets back a client ID, an API key, an AuthKit domain, and a claim token.
- Integrates AuthKit. It detects your Next.js version and router, installs
@workos-inc/authkit-nextjs, and makes the code changes. It reads the current SDK docs as it works, so the code matches the SDK version it installs.
If WorkOS can't provision an environment, the installer falls back to the usual login flow, so you're never stuck.
Step 2: Review what changed
The installer never stages, commits, or pushes anything. Review its branch like any other change. You'll find four kinds of changes.
Environment variables in .env.local. The credentials for your unclaimed environment, plus a generated cookie password for encrypting sessions:
A callback route. This is where AuthKit sends users after they sign in:
Session handling. authkitProxy() in proxy.ts on Next.js 16 and later, or authkitMiddleware() in middleware.ts on Next.js 15:
Auth in your UI. <AuthKitProvider> wraps the root layout, and pages that need the current user call withAuth(). Sign-in and sign-out are wired into the UI.
Exact file paths depend on your app's structure. These are the same changes you'd make by hand from the AuthKit Next.js docs.
Step 3: Start the app and sign in
Start the dev server:
Open http://localhost:3000 and click sign in. You land on the hosted AuthKit page for your unclaimed environment. Create a test user, and AuthKit redirects you back to /callback, signed in.
That's working authentication, and you still haven't created an account.
Step 4: Claim the environment
Unclaimed environments expire after 7 days. When you want to keep yours, run:
The CLI opens a claim page in the WorkOS dashboard. Sign in or create an account there and confirm the claim. The CLI waits up to 5 minutes for the claim to finish.
Claiming is permanent: once an environment is linked to an account, it can't be unlinked. Until you claim, management commands show a reminder, and workos profile list shows the active environment and whether it's claimed.
Step 5: Finish setup
After the claim, three small things are left:
- Connect the CLI to your account. Run
npx workos@latest auth loginso management commands run as you. - Delete the claim token. Remove
WORKOS_CLAIM_TOKENfrom.env.local. It's only used for claiming. - Plan for production. A claimed environment is a staging environment. When you're ready to ship, set up a production environment in the WorkOS dashboard and use its keys in your deployed app.
Can a coding agent run the whole setup?
Yes. Accountless setup removes the one step an agent couldn't do on its own, and the rest of the CLI is built for agents to drive. We covered the broader approach in Agent Experience: build without leaving your terminal.
- No prompts in agent mode. With
WORKOS_MODE=agent, the CLI never waits for input. A missing argument returns a structured error instead of a question. - Machine-readable output. Outside a terminal, output defaults to JSON. Installs stream progress as NDJSON, and errors go to stderr as JSON.
- Clear exit codes.
0for success,1for a general error,2for canceled, and4when authentication is required. - A claim link instead of a browser. In JSON mode, the claim command returns the claim URL, so the agent can hand it to you and keep working.
- A doctor for when things break.
workos doctor --json --skip-aichecks the integration and reports what's wrong. - Skills and MCP.
workos setupinstalls WorkOS agent skills and the WorkOS MCP server into your coding agent. Nothing is installed without your opt-in.
An agent can go from an empty folder to a Next.js app with working sign-in, then give you a claim link. You decide whether to keep it.
Where do you go from here?
To try it, open a Next.js project and run npx workos@latest install. The CLI docs list every command and flag, and the AuthKit Next.js docs cover what to customize once sign-in works, from redirect URIs to session settings.