Decoding and solving the five most common SAML errors
Discover how to solve the top five SAML errors, complete with practical troubleshooting tips.

SAML-based SSO is prone to errors that can confuse IT admins during configuration and lead to authentication issues for end users.
In this post, we'll explain what a SAML error is and take a deep dive into the five most common SAML errors in order of the frequency they are seen:
- Missing attribute errors
- Signature validation errors
- URL not found errors
- Expired response errors
- IdP-initiated specific errors
We'll explain what causes these problems and how to resolve them.
5 most common SAML errors
A SAML error occurs during the SAML (Security Assertion Markup Language) process, which is used for Single Sign-On (SSO) between an Identity Provider (IdP) and a Service Provider (SP).
These errors can disrupt the authentication and authorization process, preventing users from accessing services that rely on SAML-based SSO to log in.
Below are the 5 most common SAML errors, plus how to fix them.
1. Missing attribute errors
Missing attribute errors occur when the attributes defined by the IdP don't match those expected by the SP. In these cases, while attempting to authenticate via SSO, users may encounter an error message like "missing required attributes."
There are two primary underlying reasons for missing attribute errors that we'll cover:
- The mapping between attributes defined in the IdP and the SP is incorrect
- There is missing attribute data in the IdP profile
Fixing missing attribute errors caused by incorrect attribute mapping
During SSO authentication, the IdP returns an XML SAML response containing AttributeStatements. These elements contain Attribute elements with a Name property defined by the IdP. A missing attribute error may surface when the SP expects a Name pattern that differs from the one defined in the IdP. Keep in mind that these mappings are case-sensitive.
For example, the SP expects id, email, firstName, and lastName attributes. Here’s how this is mapped and configured in both Okta and Azure.
Okta
This is how the SP attributes map to Okta attributes:
id → user.id
email → user.email
firstName → user.firstName
lastName → user.lastName
In Okta, configure Attribute Statements id, firstName, lastName and email:
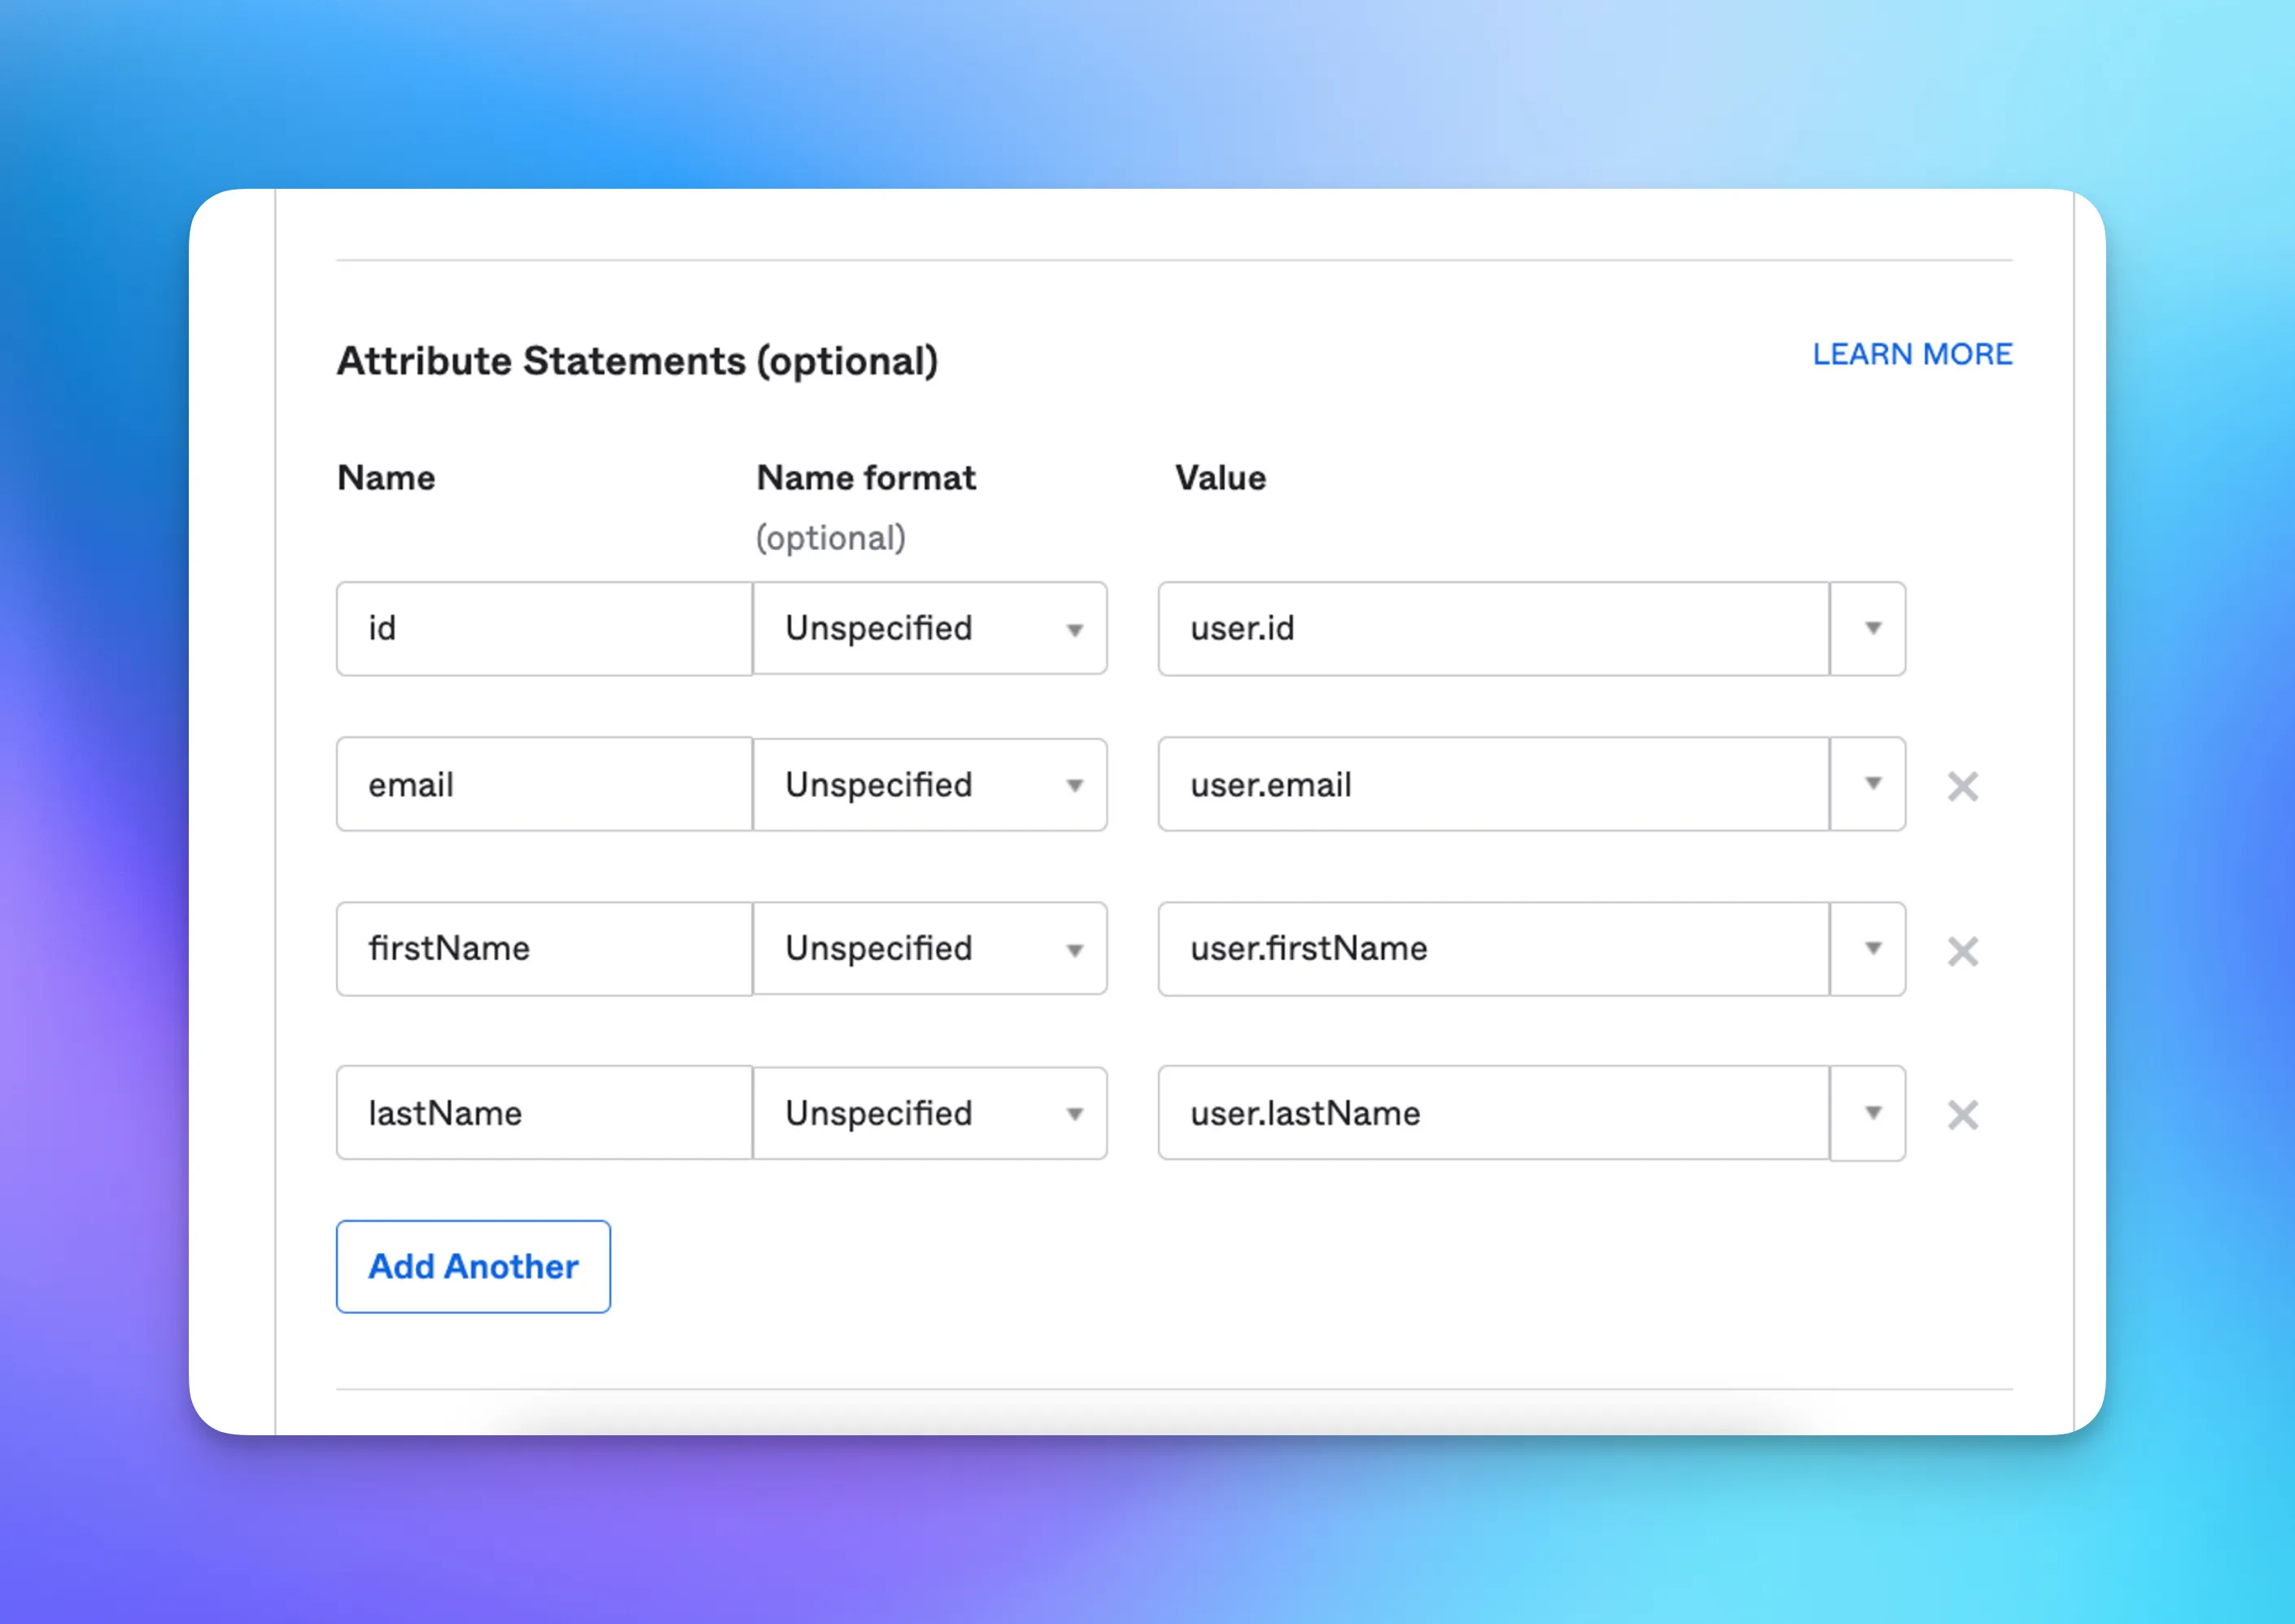
Once configured, the AttributeStatement in Okta’s SAML response will look something like this:
Azure
In Azure, those attributes are mapped to different names than Okta. You can configure Attribute Statements for givenname, surname, emailaddress, and objectidentifier.
This is how SP attributes map to Azure profile attributes (note that attribute names in Azure are defined with a namespace by default):
http://schemas.microsoft.com/identity/claims/objectidentifier → user.userprincipalname
http://schemas.xmlsoap.org/ws/2005/05/identity/claims/emailaddress → user.mail
http://schemas.xmlsoap.org/ws/2005/05/identity/claims/givenname → user.givenname
http://schemas.xmlsoap.org/ws/2005/05/identity/claims/surname → user.surname
Ensure that the claims are configured according to the defined mapping:

Once configured, the AttributeStatement in Azure’s SAML response will look something like this:
It is critical to ensure that the attributes are mapped precisely between the IdP and SP, but it's also possible to see these errors when data is missing.
Fixing missing attribute errors caused by missing data
Sometimes, the missing attribute error may result from missing attributes in the user's identity data. The user's identity data must be updated to include the required attributes in such cases.
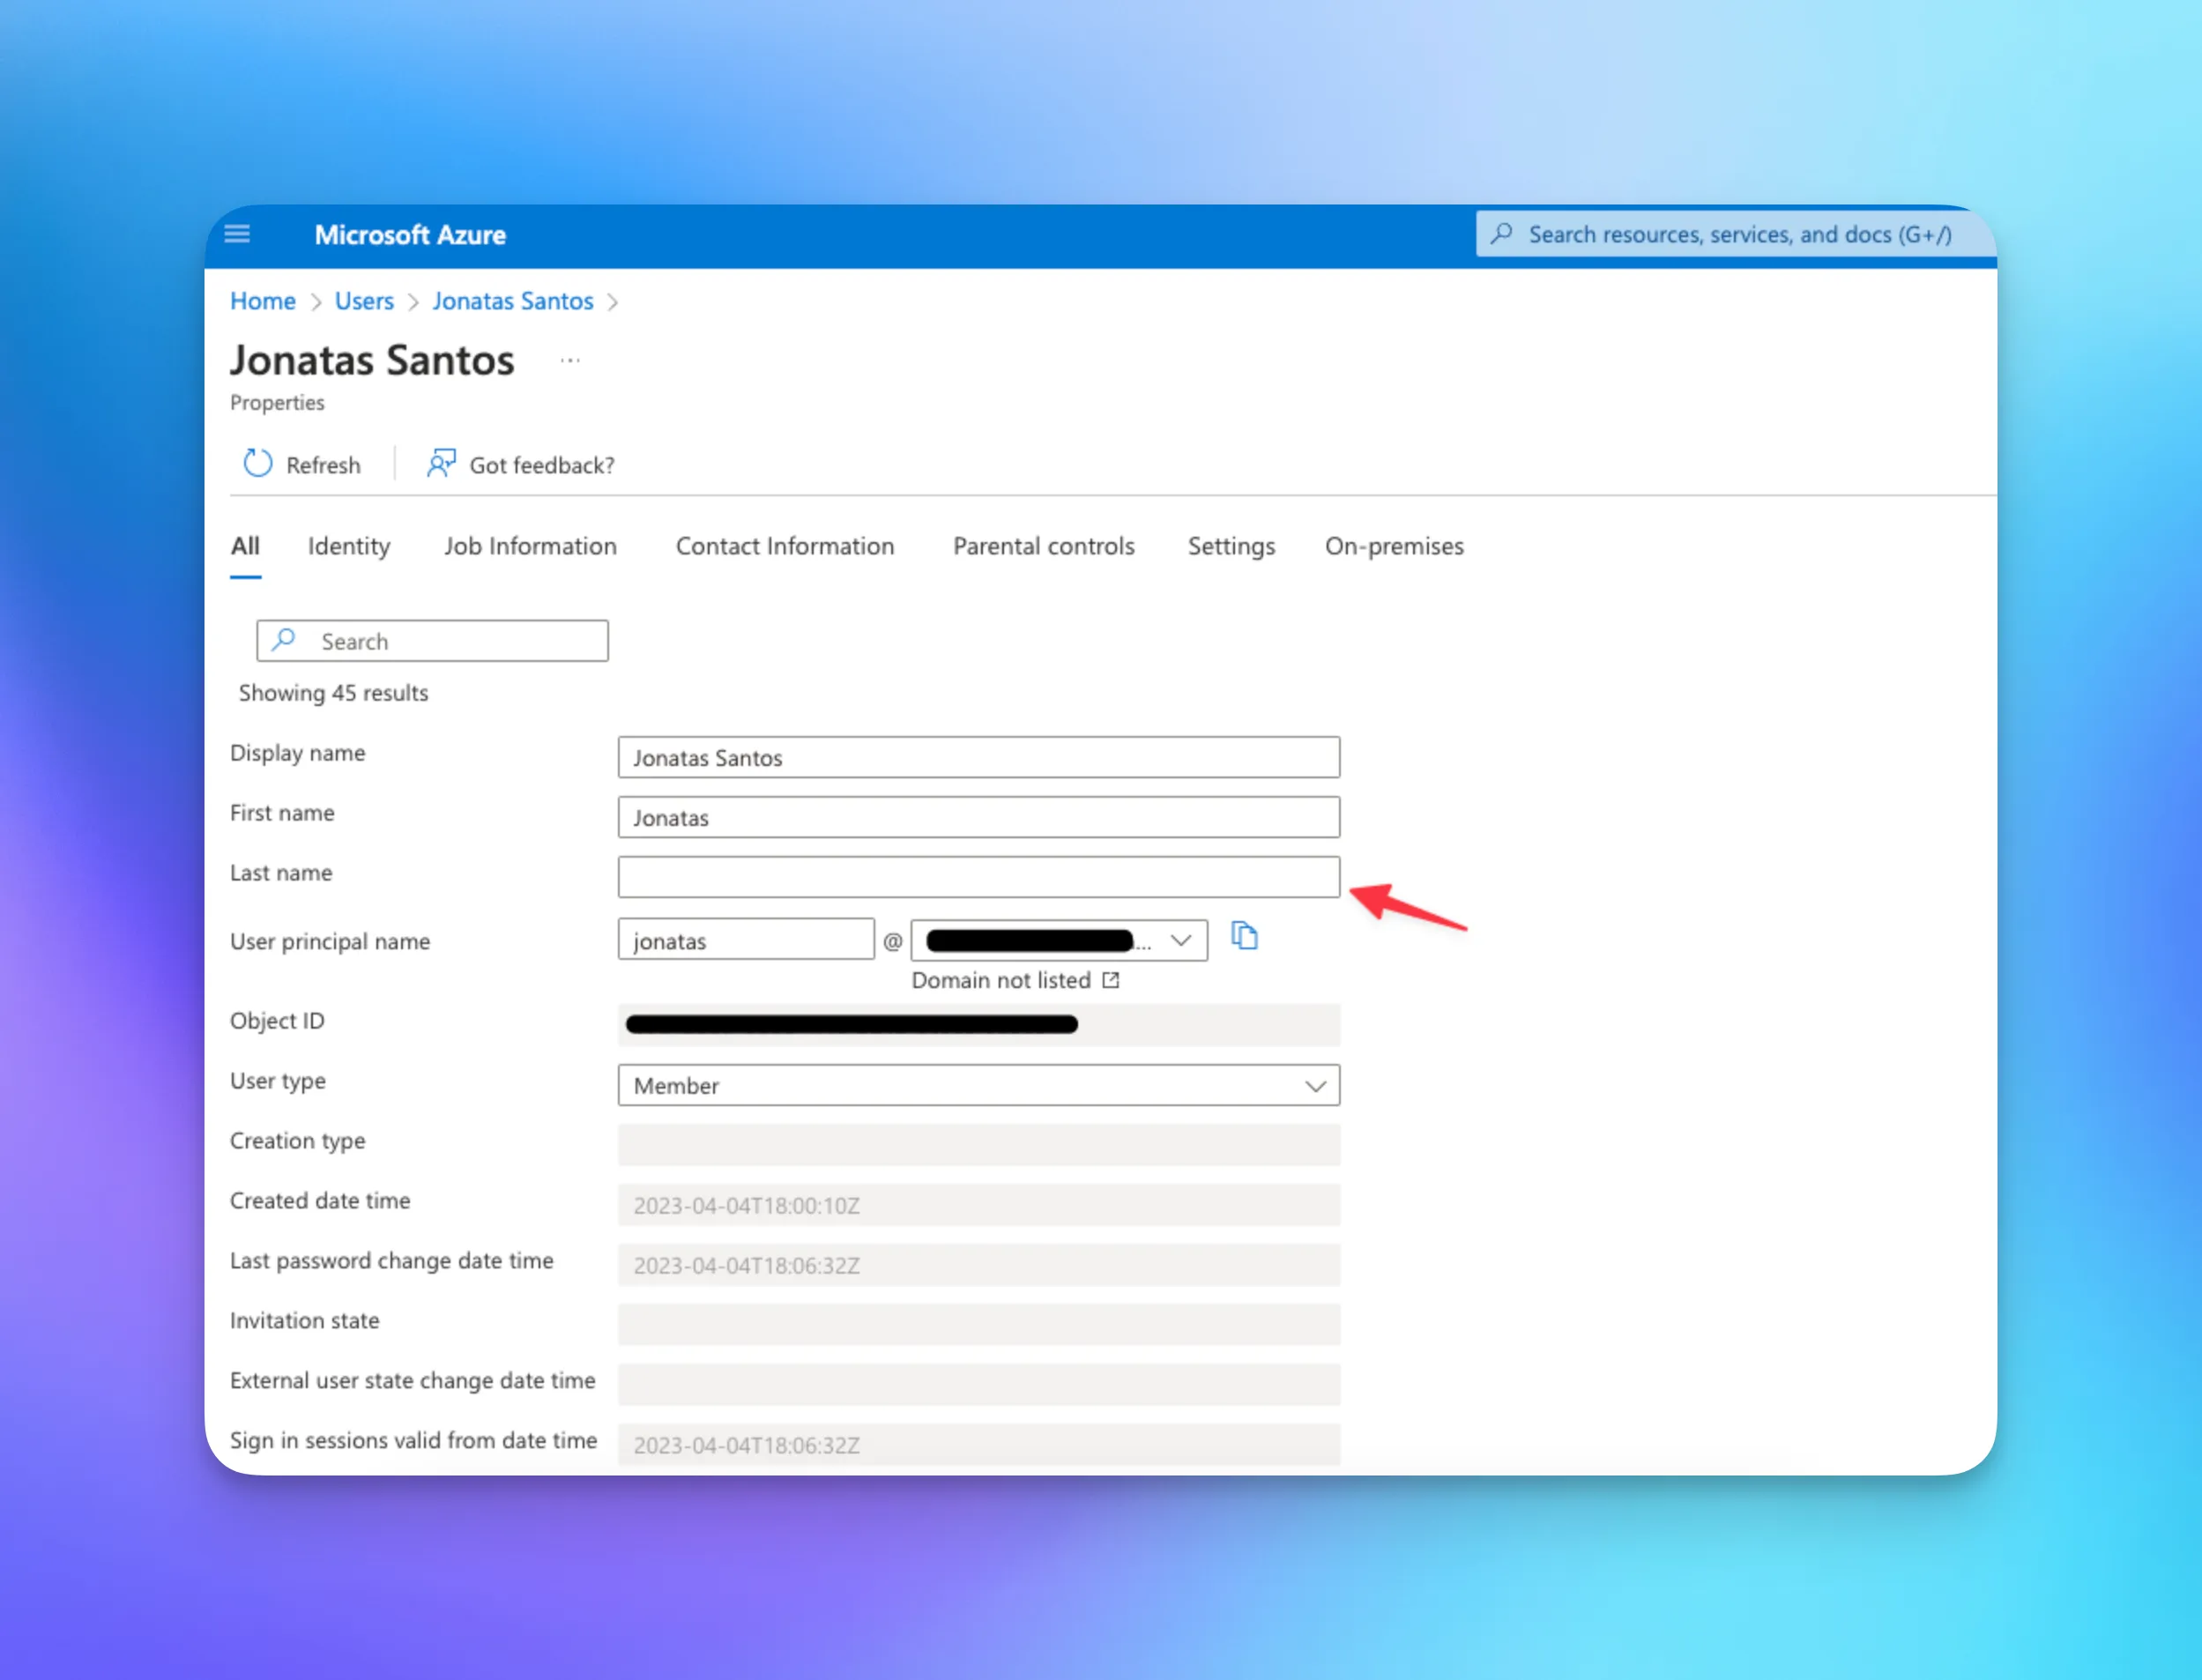
For example, in Azure, the last name is always mapped to the surname claim. Notice that the Azure user in the following screenshot is missing the last name attribute. If the SP requires the surname attribute, this may be the cause of the missing attribute error, and the missing data should be added:
Missing attribute errors usually result from discrepancies in attribute mapping between the IdP and the SP or missing attribute data in the IdP. It's critical for Service Providers to keep their attribute mapping configuration up-to-date to prevent these errors from surfacing.
2. Signature validation errors
A SAML signature validation error occurs when the SAML assertion signature from an IdP cannot be verified.The IdP generates the SAML assertion signature using a private key. Once the SP receives a response from the IdP, it will verify the signature using the corresponding public key, typically an X.509 certificate. This process ensures the integrity of the SAML response — that it hasn't been tampered with during transit.The most common causes of a signature validation error are:
- The IdP's public key certificate that the Service Provider has is missing, expired, or incorrect.
- The SAML response or assertion was altered during transit.
- The IdP's SAML response is signed in a way that the SP is not expecting.
- The part of the IdP’s SAML response that is signed is different than expected.

Here’s how to fix SAML signature validation errors:
- Update the IdP's public certificate: Verify the public certificate configured in your SP matches the one currently used by your IdP. Update it in your SP's SAML configuration if it has been updated or is incorrect
- Check the signature location: Validate whether the SAML assertion or the entire response is signed as per your SP’s expectation. Mismatches in expected and actual signed sections can lead to validation errors.
- Ensure the SAML response is not altered: Confirm that the SAML response or assertion hasn’t been changed during transit. Even minor alterations can invalidate a signature. Investigate the network route, including any proxies, firewalls, or other components to rule out interference.
- Check the certificate expiry: Check if the IdP’s public key certificate has expired. Replace expired certificates with current, valid ones.
- Verify configuration settings: Double-check the SP and IdP configurations for compatibility and correctness. This includes checking entity IDs, endpoints (like Assertion Consumer Service URL), NameID formats, and other SAML settings.
!!Read more: How SAML certificate renewal works — and what happens when it fails!!
3. URL not found errors
A URL not found or 404 error usually indicates a resource is not found on the server. In the context of SAML, it may occur when the IdP or the SP is trying to reach a URL or endpoint that does not exist or is not properly configured. This could be the Single Sign-On URL, Single Logout URL, or another service URL.
Here’s how to fix URL not found errors:
- Check Your URL/endpoint configuration: Make sure all URLs or endpoints in your SAML configuration are correctly configured in both the IdP and the SP. This includes the Assertion Consumer Service (ACS) URL, Single Logout Service (SLS) URL, Entity ID, and others. The ACS URL could also be referred to under other names: Single Sign-on URL, Reply URL, SAML Assertion Endpoint, SAML Response Endpoint, SAML Callback URL, SP Assertion Consumer URI
- Ensure URLs are properly formatted: A small typo or formatting error can lead to a 404 error. Double-check each URL for typos, improper formatting, or incorrect protocol (http vs. https).
- Verify server accessibility: Ensure the server hosting the IdP or SP is accessible from the public Internet if required. There may be a network or server configuration issue if it's inaccessible.
- Check server routing and redirection rules: Ensure the server's routing rules are correctly set up to handle the SAML requests and responses.
- Inspect the IdP and SP Logs: The logs may provide more details about where and why the 404 error occurs. They might point you to a specific misconfiguration or a part of the failing process.
Always be careful when modifying any security settings or configurations, as misconfigurations can create new vulnerabilities.
4. Expired response errors
An expired response error in a SAML configuration typically refers to an issue with the SAML assertion's timing values, specifically the NotBefore and NotOnOrAfter conditions.
These conditions are found in <saml:Conditions> in the IdPs SAML assertion. They define the time window during which the assertion is valid. Here's an example:
If the SP receives the assertion outside this time window, it will reject the assertion and may display an Expired Response Error.
Here’s how to fix expired response errors:
- Check time synchronization: The most common cause of this issue is clock skew between the IdP and the SP. Both systems should synchronize their clocks with a reliable time source, via Network Time Protocol, for example, to ensure they agree on the current time.
- Increase assertion lifetime: If your users frequently experience this issue, it could be due to the assertion's short validity period. In this case, you might need to increase the duration in the IdP's settings. Be aware, however, that expanding the assertion's lifetime potentially increases the risk of replay attacks.
- Reduce network latency: If there's significant network latency between the IdP and the SP, the assertion might expire before it reaches the SP. Look for ways to reduce this latency, which might involve network engineering outside the scope of the SAML configuration.
- Handle clock skew in SAML libraries: Some SAML libraries allow you to specify a "clock skew" value. This is the amount of time the library will allow for differences in the clocks of the two systems. Increasing this value can help if you're experiencing this issue but, like increasing the assertion's lifetime, it may also increase the risk of replay attacks.
5. IdP-initiated specific errors
IdP-initiated SSO is a SAML flow in which the IdP initiates the authentication process, typically by providing a link that automatically authenticates a user and takes them to the specific SP.
Here’s how to fix IdP-initiated specific errors:
- Incorrect RelayState parameter: The RelayState parameter in IdP-initiated SSO directs where users should go after authentication. If misconfigured, it can redirect users to the wrong location or fail the redirection. Verify that this parameter is correctly set up in your IdP.
- InResponseTo attribute included on IdP-initiated SSO: This attribute should only appear in SP-initiated SSO, linking the response to the originating SAML request. Its presence in IdP-initiated SSO suggests a setup error, as no preceding SAML request exists. Ensure your IdP is not configured to send this attribute during IdP-initiated SSO.
- SP not configured for IdP-Initiated SSO: Some Service Providers (SPs) may not support IdP-initiated SSO or require specific settings to enable it. Check if your SP is configured to accept IdP-initiated SSO, and ensure it is correctly enabled.
- Incorrect entity ID or issuer: Ensure the issuer or entity ID provided in the IdP's SAML response matches the one expected by the SP. If there’s a mismatch, the SP might not recognize the IdP, leading to an error validating the SAML response.
- Mismatch in SAML version: Ensure your IdP and SP use the same SAML version (SAML 2.0 or SAML 1.1). Mismatched versions can lead to errors.
Streamline SAML with WorkOS
Dealing with SAML configurations is often a complex and error-prone process. Each IdP can have different requirements, and human errors can prevent a successful SSO setup at many points.
One way to normalize IdPs and reduce error friction is by using WorkOS SSO.
- Getting started is fast: With easy-to-use APIs and just a few lines of code, you can integrate once with WorkOS and offer SAML integrations or even OIDC for over 20+ different IdPs.
- Avoid the back-and-forth: WorkOS’s Admin Portal takes the pain out of onboarding your customers’ IT teams and configuring your app to work with their identity provider.
- Troubleshooting support: WorkOS guides IT admins through troubleshooting and offers hands-on support from our dedicated Developer Success Engineering team for tackling complex challenges. Plus, you can effortlessly debug connection issues with the SAML session viewer.
- Pricing that makes sense: Unlike competitors who price by monthly active users, WorkOS charges a flat rate for each company you onboard — whether they bring 10 or 10,000 SSO users to your app.
.webp)

.webp)


.webp)
.webp)

_.webp)
.webp)
.webp)


.webp)


.webp)
