How to add SSO, MFA, and Passwordless authentication to your .NET app
Step-by-step tutorial on integrating Single Sign-On, Multi-Factor Authentication, and Passwordless login into your .NET app with WorkOS.
Authentication is one of the first and most important features you’ll implement in your application. WorkOS makes it simple to integrate modern authentication patterns such as Single Sign-On (SSO), Multi-Factor Authentication (MFA), and Passwordless login.
In this tutorial, we’ll walk through how to add these different authentication methods to your .NET app using the WorkOS SDKs and APIs. You don’t need to implement all of them together, choose the method that best fits your product. For example, most teams use SSO for enterprise customers, while Passwordless is a great option for lightweight apps.
By the end, your application will support enterprise-ready authentication flows that scale with your customers’ security needs.
What we will build
In this tutorial, we’ll show you how to add different authentication methods to your .NET app using WorkOS. You can mix and match depending on your needs, but you don’t need to implement all of them together.
We’ll cover how to:
- Enable Single Sign-On (SSO) so users can authenticate with their organization’s Identity Provider (IdP).
- Add Multi-Factor Authentication (MFA) using TOTP or SMS codes, if you’re not already leveraging an IdP’s MFA.
- Offer Passwordless login so users can sign in with a secure, one-time-use code delivered via email.
Each method can stand on its own, you can choose the one that best fits your product and user base.
Prerequisites
- A WorkOS account.
- Your WorkOS API Key and Client ID, which you can find in the dashboard.
- A .NET Standard 2.0+ or .NET Framework 4.6.1+ app.
Once you all these in place proceed with installing the WorkOS .NET SDK and setting environment variables for the API keys.
- Install the WorkOS .NET SDK:
- Store your secrets securely in environment variables:
Add SSO to your .NET app
To implement SSO with WorkOS you need to add two endpoints to your app: one where you will redirect the user to initiate authentication, and another where WorkOS will redirect the user once they are authenticated.
Create an authorization endpoint
Add an endpoint in your .NET app that initiates the SSO flow. This endpoint calls the WorkOS API to generate an authorization URL.
Example:
!!You can also add social logins by setting the provider instead of organization. Values can be GoogleOAuth, MicrosoftOAuth, GitHubOAuth, or AppleOAuth.!!
Handle the callback
After authentication, WorkOS redirects the user back with a code. This endpoint should exchange the authorization code returned by WorkOS with the authenticated user’s profile. The authorization code is valid for 10 minutes.
Configure a redirect URI
Go to the Redirects page in the dashboard to configure allowed redirect URIs. This is your callback endpoint you used in the previous section.
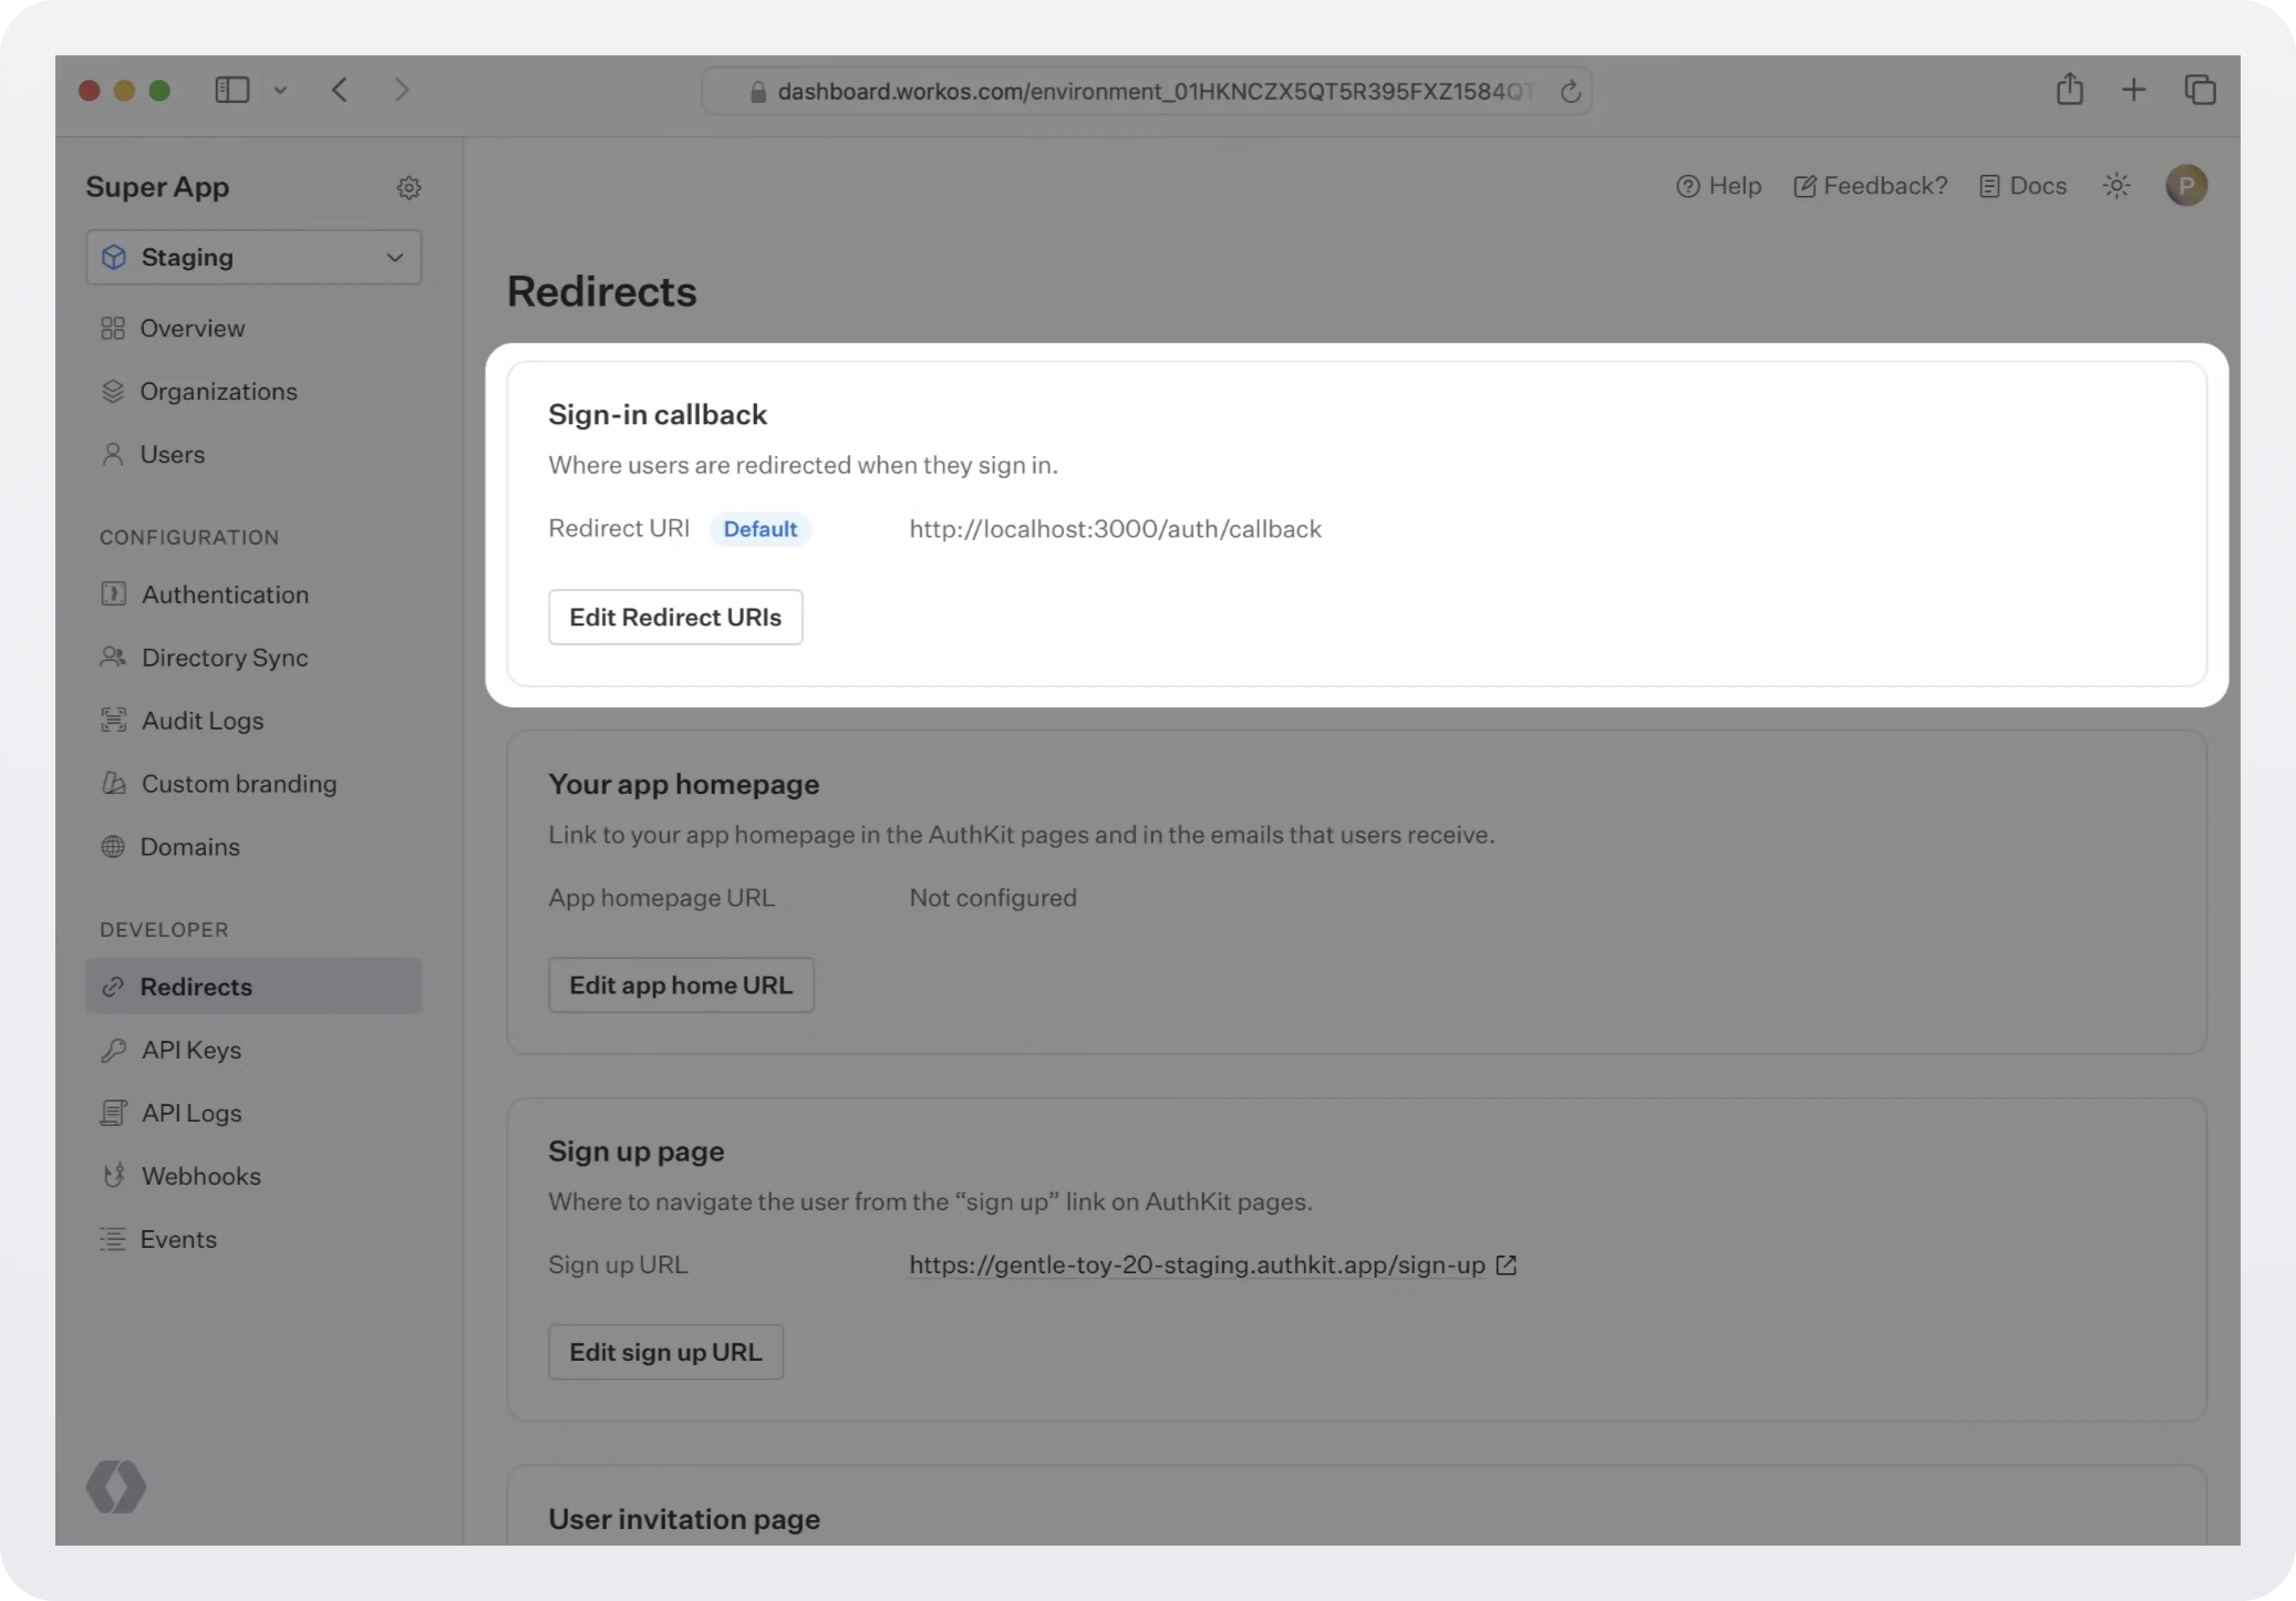
Multi-tenant apps will typically have a single redirect URI specified. You can set multiple redirect URIs for single-tenant apps. You’ll need to be sure to specify which redirect URI to use in the WorkOS client call to fetch the authorization URL.
Configure the identity provider
Configure your identity provider (e.g. Okta, Entra ID, JumpCloud, etc.) following the detailed instructions provided in the Integrations page.
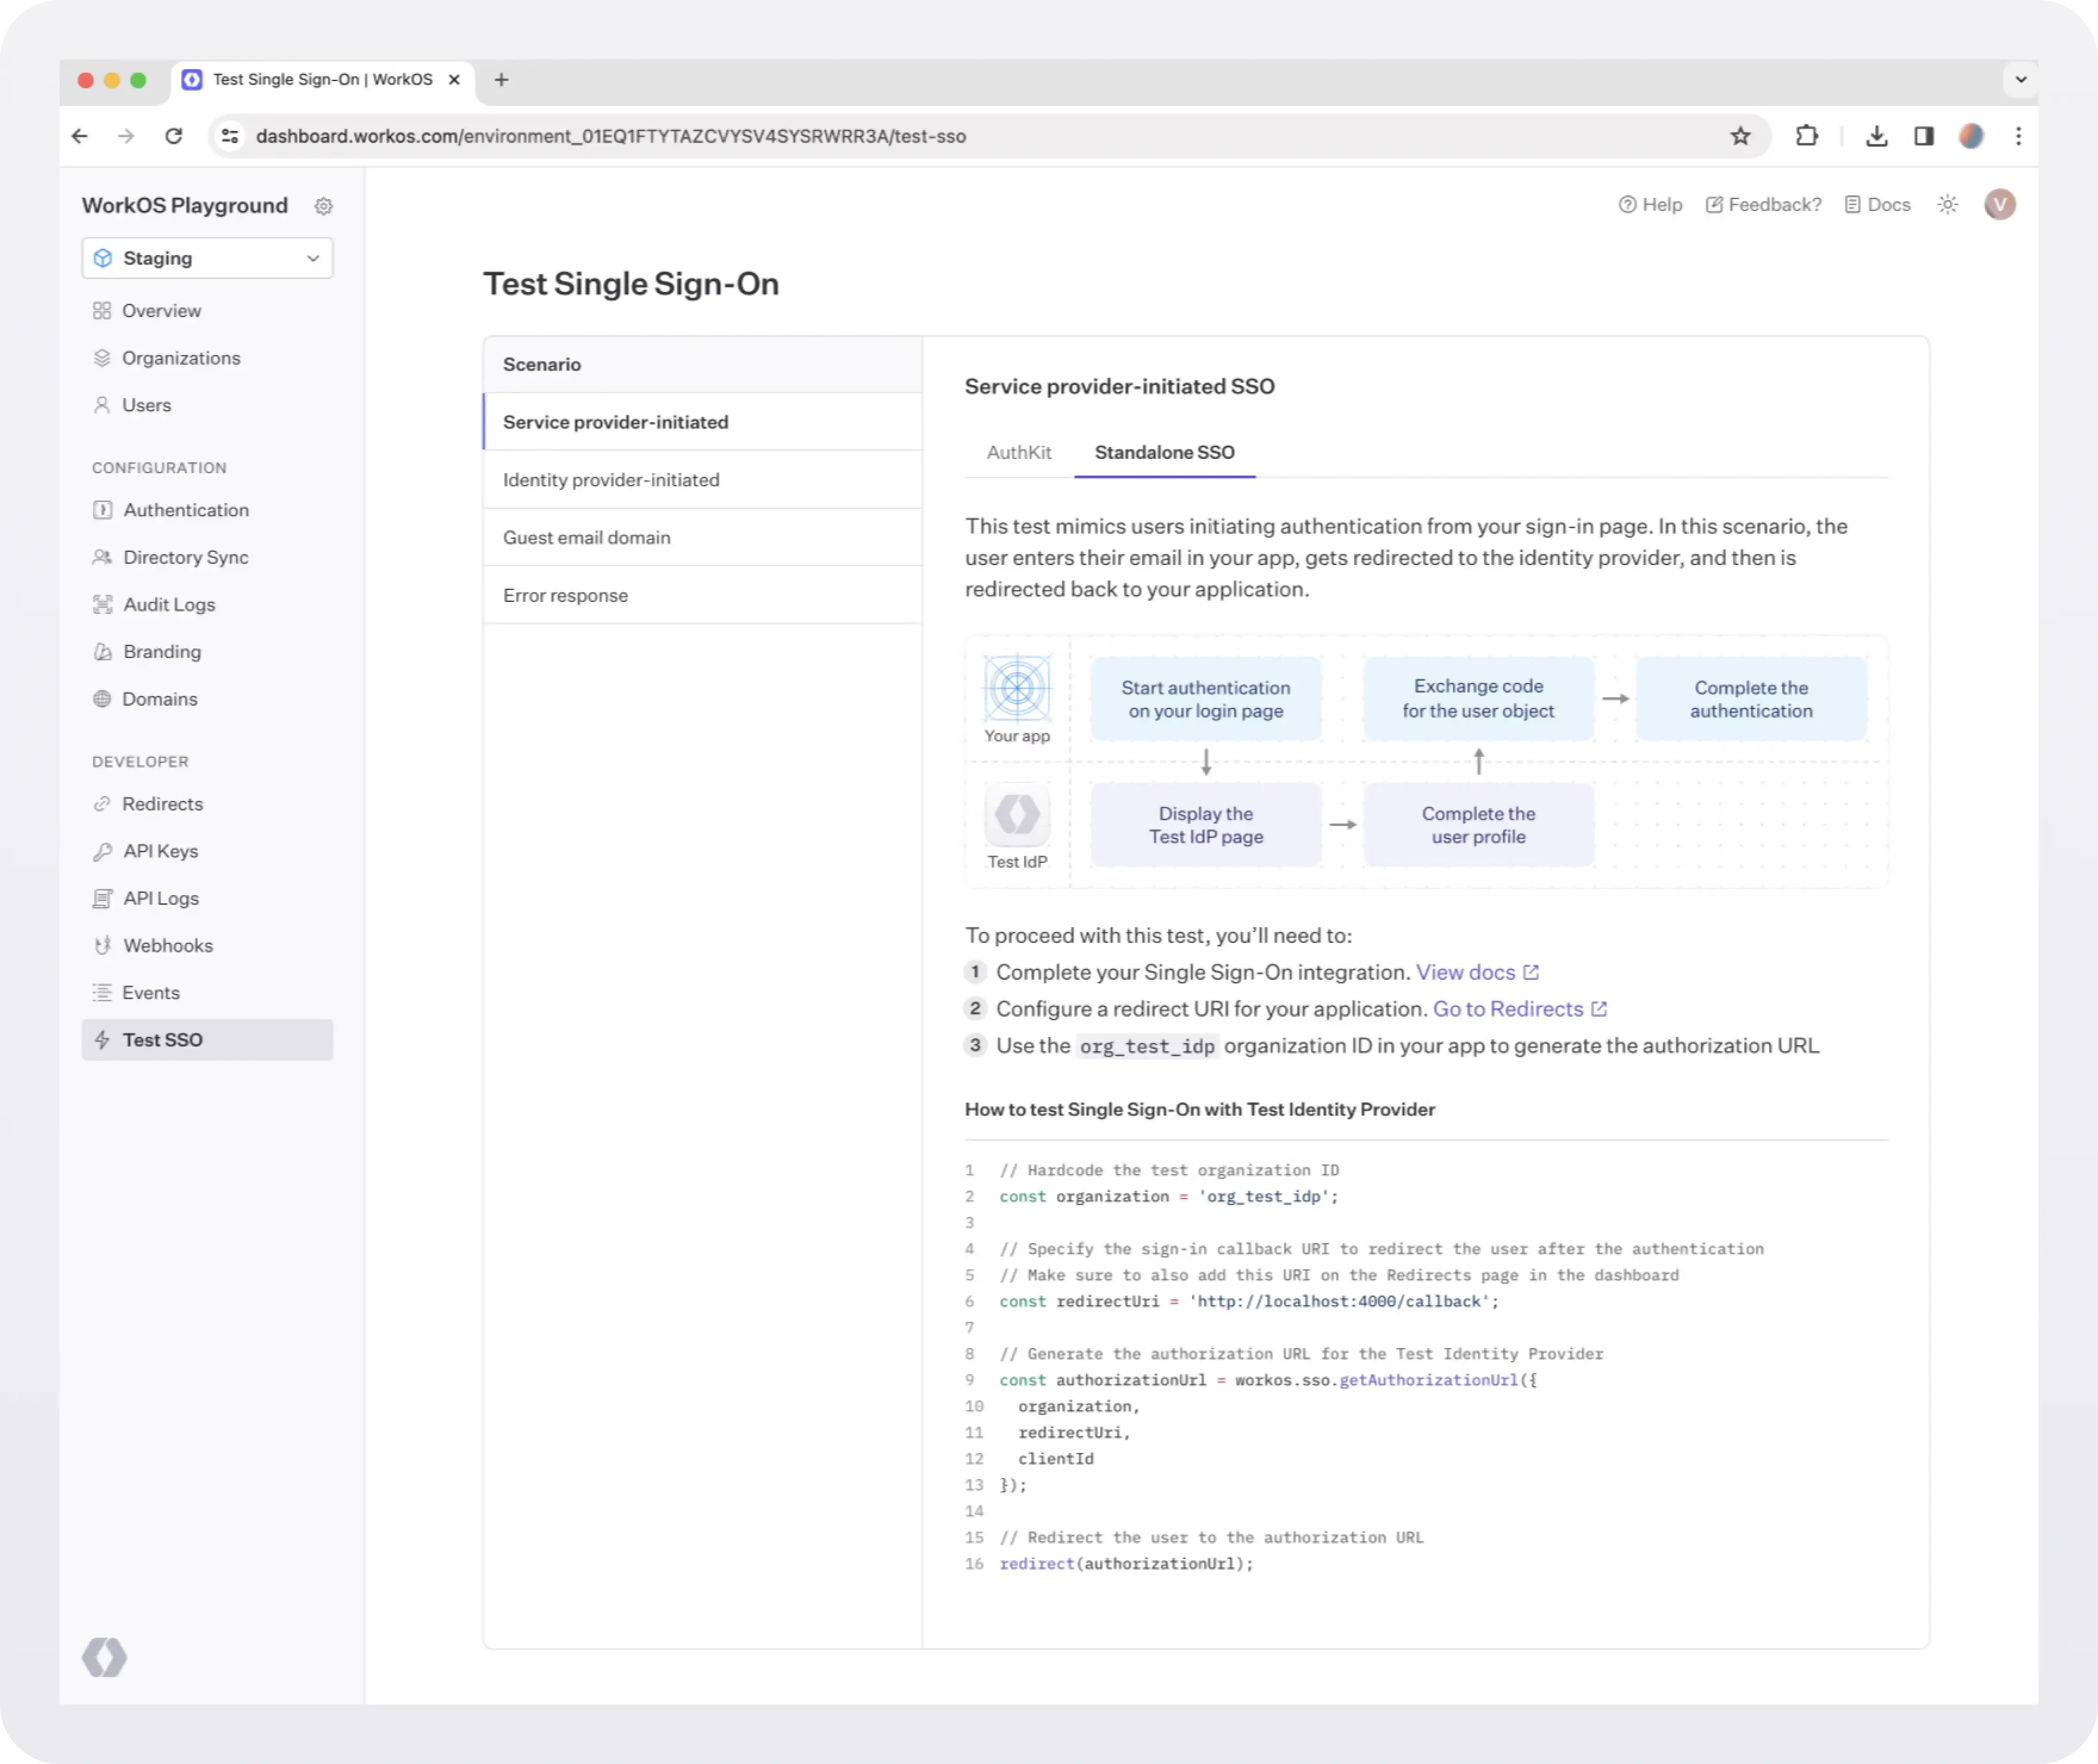
Test end-to-end
Head to the Test SSO page in the WorkOS Dashboard to get started with testing common login flows, or read on about that in detail in the docs.
Add MFA to your .NET app
MFA provides an additional layer of security. With WorkOS, you can enroll and verify factors like TOTP (Time-based one-time password) as the most secure option over SMS. In this tutorial, we will use the TOTP type when the user is using a third-party authenticator app such as Google Authenticator or Authy.
!!The MFA API is not intended to be used with the WorkOS SSO feature. It’s recommended to leverage the MFA features of the Identity Provider that is powering your SSO implementation.!!
Create an authentication factor
Use the WorkOS SDK to create a factor:
The response returns a qr_code and a secret. The qr_code value is a base64 encoded data URI that is used to display the QR code in your application for enrollment with an authenticator application.
The secret can be entered into some authenticator applications in place of scanning a QR code.
Now that we’ve successfully created an authentication factor, we’ll need to save the ID for later use. It’s recommended that you persist the factor ID in your own user model according to your application’s needs.
Challenge the authentication factor
Next we’ll initiate the authentication process for the newly created factor which we’ll refer to as a challenge.
Now that we’ve successfully challenged the authentication factor, we’ll need to save the challenge ID for the last step, challenge verification.
Verify the challenge
The last step in the authentication process is to verify the one-time password provided by the end-user.
If the challenge is successfully verified valid will return true. Otherwise it will return false and another verification attempt must be made.
Response:
We’ve now successfully verified an end-user’s authentication factor. This authentication factor can now be used as a second factor of authentication in your application’s existing authentication strategy.
The ID of the authentication factor should be persisted in your application for future authentication challenges.
Add Passwordless auth to your .NET app
WorkOS also supports passwordless authentication via Magic Auth, a passwordless authentication method that allows users to sign in or sign up via a unique, six-digit one-time-use code sent to their email inbox.
AuthKit will make the necessary API calls to issue one-time-use codes via email and provide input verification and authentication automatically. If desired, you can send these emails yourself.
Magic Auth can be enabled in the Authentication section of the WorkOS dashboard. Users will then be able to sign in or sign up via Magic Auth on the AuthKit authentication page.
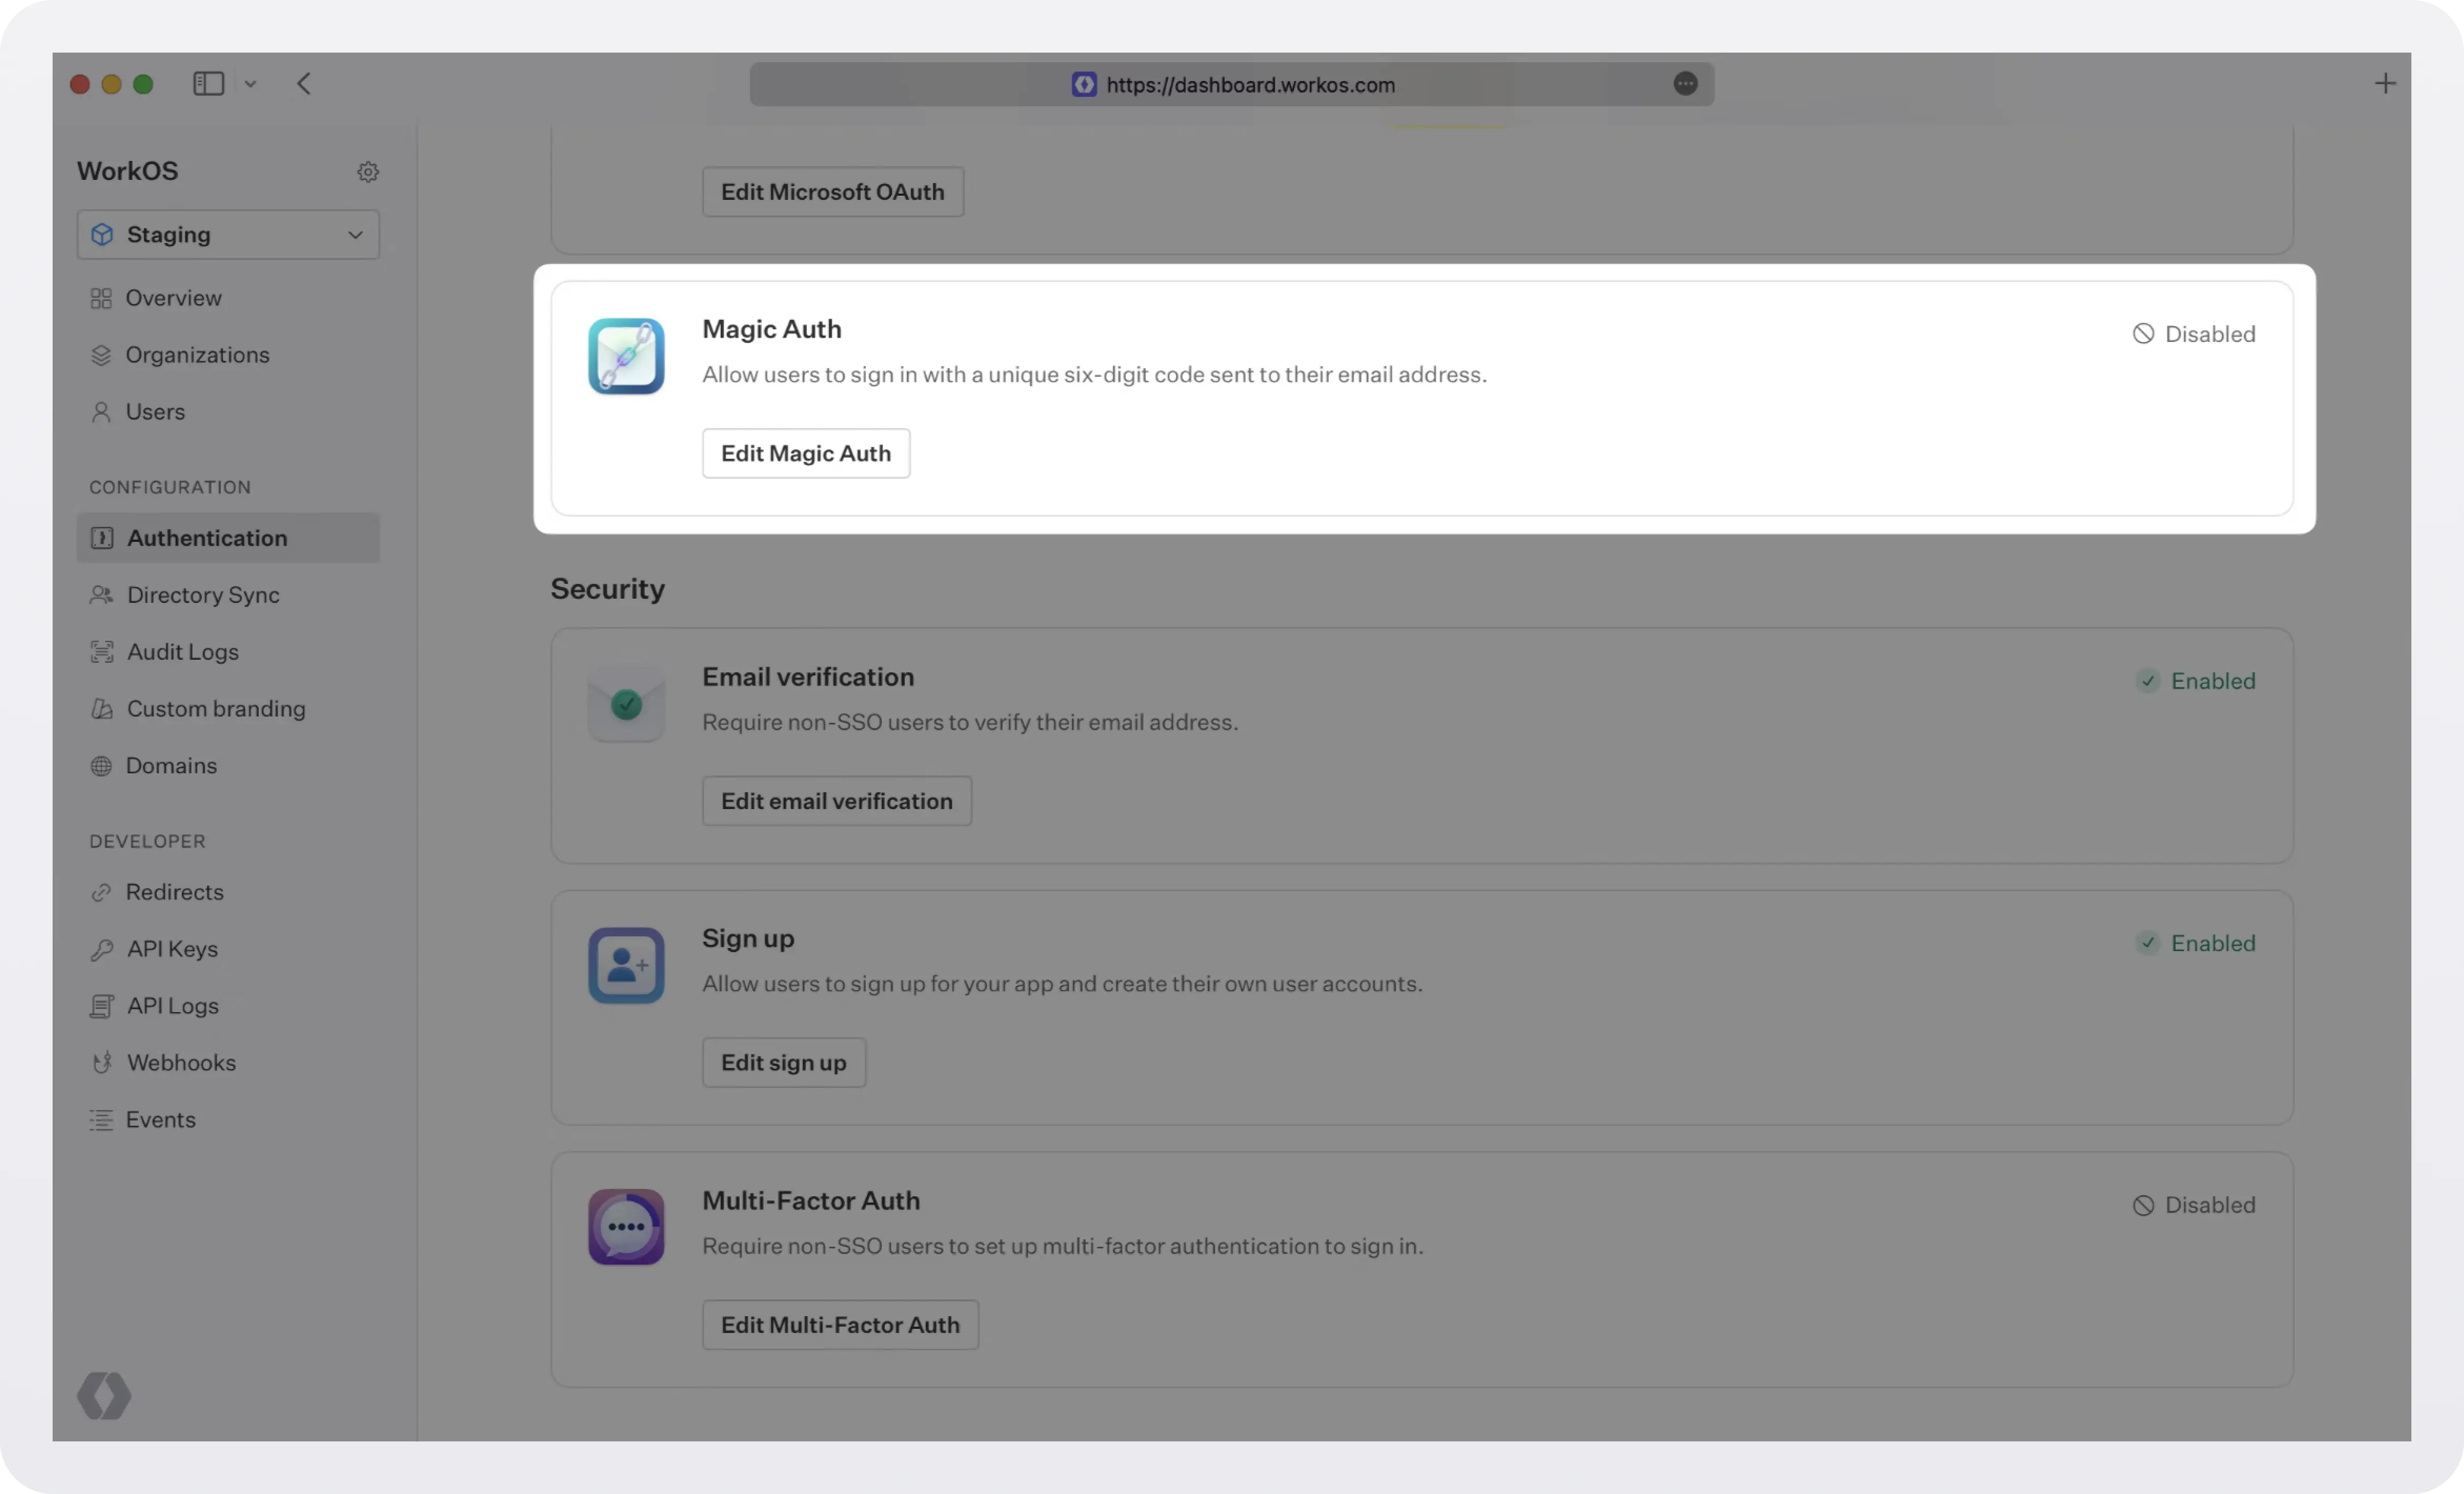
One-time-use codes expire after 10 minutes.
If you’d prefer to build and manage your own authentication UI, you can do so via the AuthKit Magic Auth API.
Next steps
With SSO, MFA, and Passwordless in place, your .NET app now has a strong authentication foundation. From here, you can expand into advanced, enterprise-ready capabilities with WorkOS:
- Directory Sync: Provision and de-provision users automatically from external directories like Okta or Azure AD.
- Admin Portal: Let IT admins self-serve and configure SSO, Directory Sync, and more without involving your engineering team.
- Roles and Permissions: Implement fine-grained access control across your application.
- Audit Logs: Record detailed event logs for compliance and security monitoring.
By layering these features on top of your core authentication, you’ll ensure your application is not only secure for individual users but also fully equipped for enterprise adoption. To see these patterns in action, check out our .NET example applications and start scaling your app’s authentication strategy with confidence.