Getting Started with Claude Desktop and custom MCP servers using the TypeScript SDK
The Model Context Protocol (MCP) is an open specification that simplifies connecting AI models (like Claude) to external tools and data sources.
The Model Context Protocol (MCP) is an open specification that simplifies connecting AI models (like Claude) to external tools and data sources. Rather than creating custom plugins for every environment, you implement an MCP “server” that:
- Exposes data (called “resources”) in a read-only way
- Defines “tools” the AI can call to perform actions or run functions.
- Optionally includes “prompts” to standardize messages and tasks.
Any MCP-capable client (Claude, specialized CLI apps, etc.) can discover and call these resources and tools in a standardized manner, making it easy to integrate new functionality without rewriting everything from scratch.
Complete working weather server example
Step 1. Project setup
- Make a new directory, e.g. my-weather-mcp.
- Initialize a Node.js project:
npm init -y
npm install @modelcontextprotocol/sdk zod
Step 2. Implement a custom MCP server using the modelcontextprotocol TypeScript SDK
import { McpServer } from "@modelcontextprotocol/sdk/server/mcp.js";
import { StdioServerTransport } from "@modelcontextprotocol/sdk/server/stdio.js";
import { z } from "zod";

// Example: Free weather endpoint (wttr.in, etc.)
async function fetchWeather(city: string): Promise<string> {
  try {
    // We'll use a simple URL with wttr.in
    const response = await fetch(
      `https://wttr.in/${encodeURIComponent(city)}?format=3`
    );
    return await response.text();
  } catch (error) {
    console.error("Error fetching weather:", error);
    return "Unable to fetch weather information";
  }
}

async function main() {
  // Create an MCP server with metadata
  const server = new McpServer({
    name: "WeatherServer",
    version: "1.0.0",
  });

  // Define a "tool" for Claude to call, e.g. get-weather
  server.tool(
    "get-weather",
    { city: z.string() },
    async ({ city }) => {
      const weatherInfo = await fetchWeather(city);
      return {
        content: [
          {
            type: "text",
            text: `Weather for ${city}: ${weatherInfo}`,
          },
        ],
      };
    }
  );

  // Set up stdio transport for local usage
  const transport = new StdioServerTransport();
  await server.connect(transport);

  // Using console.error here so logs appear distinctly in Claude's debug
  console.error("Weather MCP Server running via stdio...");
}

main().catch((err) => {
  console.error("Error in weather server:", err);
  process.exit(1);
});
Step 3. Review your custom MCP server
- McpServer: Central object that implements the MCP specification.
- server.tool(): Declares a function, get-weather, that the AI can call with arguments. We validate the city with Zod.
- StdioServerTransport: Listens for requests on stdin and writes responses to stdout, all in the MCP message format.
- fetchWeather: Uses fetch to query a free weather API (wttr.in). If something goes wrong, we catch and log the error, returning a fallback string.
Step 4. Connect your custom MCP server to Claude for Desktop
In Claude Desktop, open the Developer settings (e.g., “Edit Config”) to get to your claude_desktop_config.json file. In the following example, you can see I have two custom MCP servers defined:
- The official server filesystem server, which I pass 3 allowed local directories to
- The custom weatherServer we’re implementing as part of this tutorial
Note that in both cases, Claude Desktop, the MCP client, will call npx to interact with these servers and exchange messages.
{
  "globalShortcut": "",
  "mcpServers": {
    "filesystem": {
      "command": "npx",
      "args": [
        "-y",
        "@modelcontextprotocol/server-filesystem",
        "/Users/zachary/Desktop",
        "/Users/zachary/Downloads",
        "/Users/zachary/Documents"
      ]
    },
    "weatherServer": {
      "command": "npx",
      "args": [
        "tsx",
        "/Users/zachary/Dev/my-weather-mcp/weather-server.ts"
      ]
    }
  }
}
Configure your weather server as follows, making sure to update the file path to your server on your system.Here’s how a custom server is typically defined:
- command: node, which runs your compiled .js file (you can also specify npx tsx if you prefer to run TypeScript directly).
- args: Path to the server script. Make sure you’ve built it with tsc if needed, or swap in a .ts path with tsx.
Once configured, restart Claude Desktop. It should automatically launch your Weather Server.
You’ll see:

A hammer icon in Claude’s chat UI. The number is the count of MCP tools that were successfully discovered and registered, meaning Claude encountered no issues when starting their servers.
Click it to see the registered MCP tools:
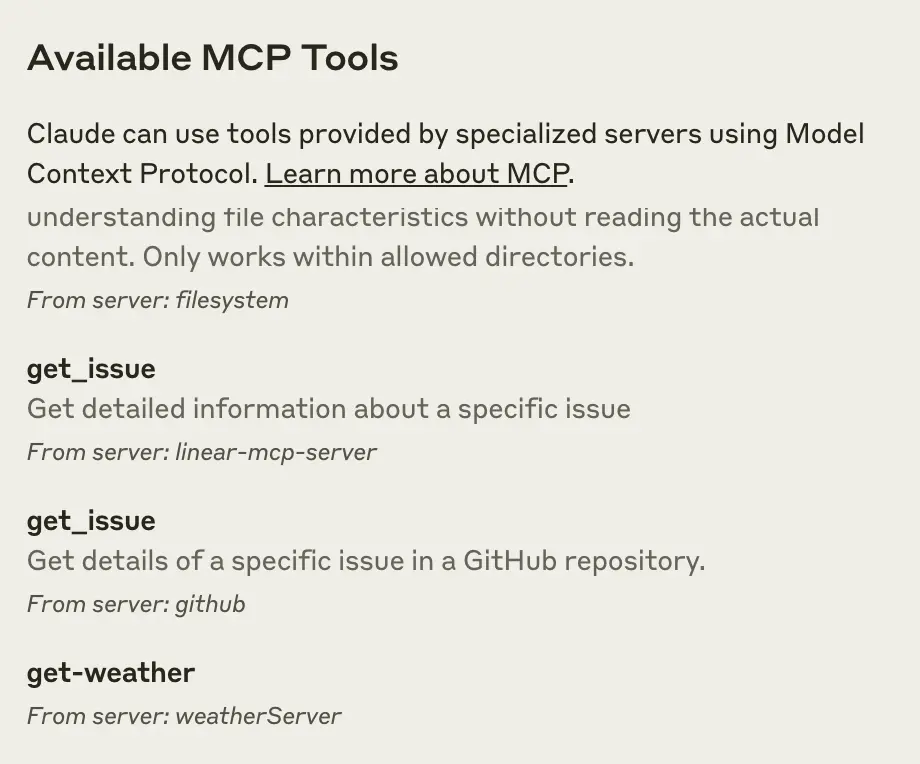
You should see our custom get-weatherserver defined if it was successfully started by Claude Desktop.
If not, Claude Desktop will throw an error and link you to the server logs, where you can see error messages.
Step 5. Try it out
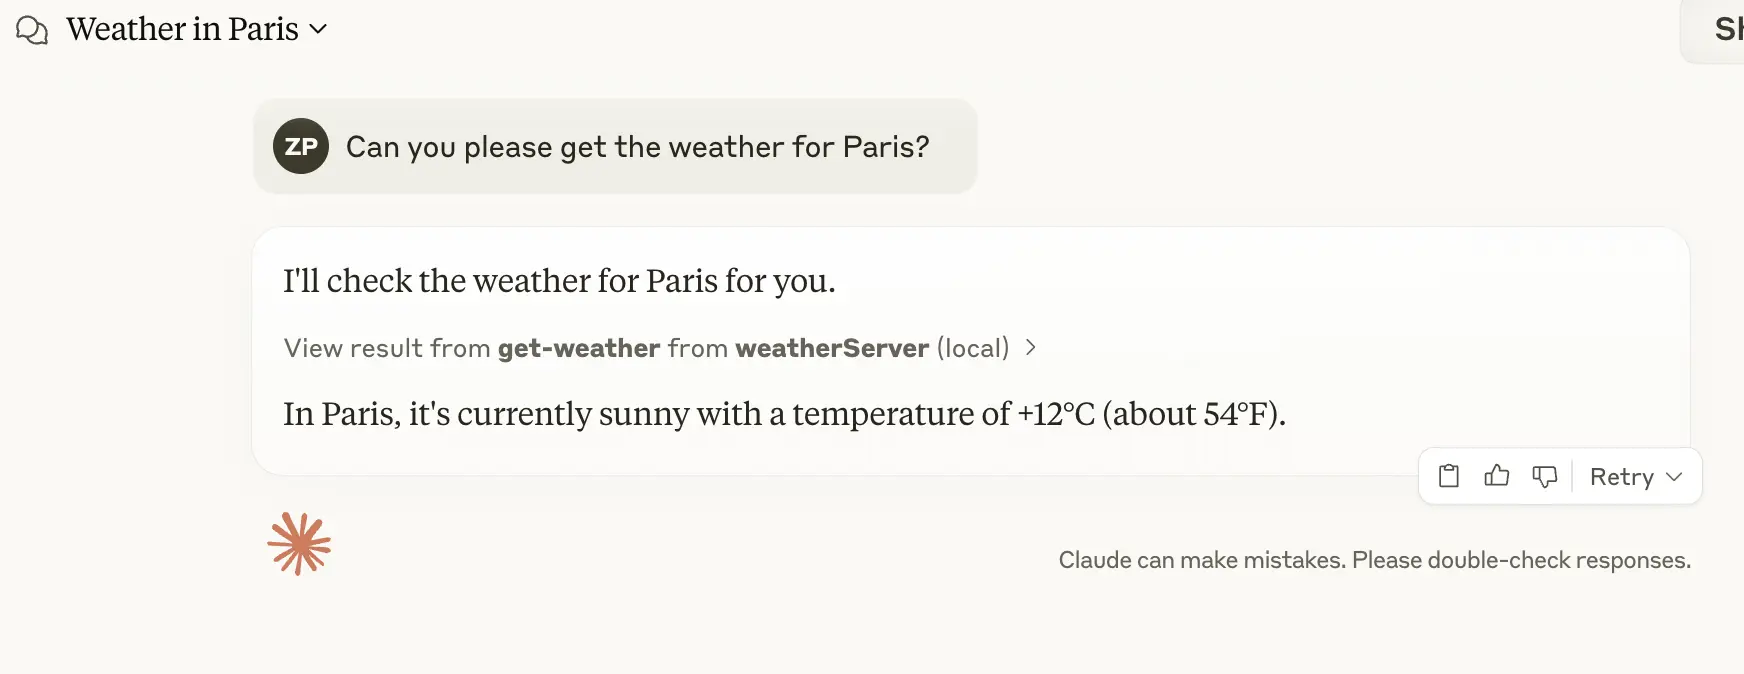
Open Claude’s chat window and ask something like:
“Can you please get the weather for Paris?”
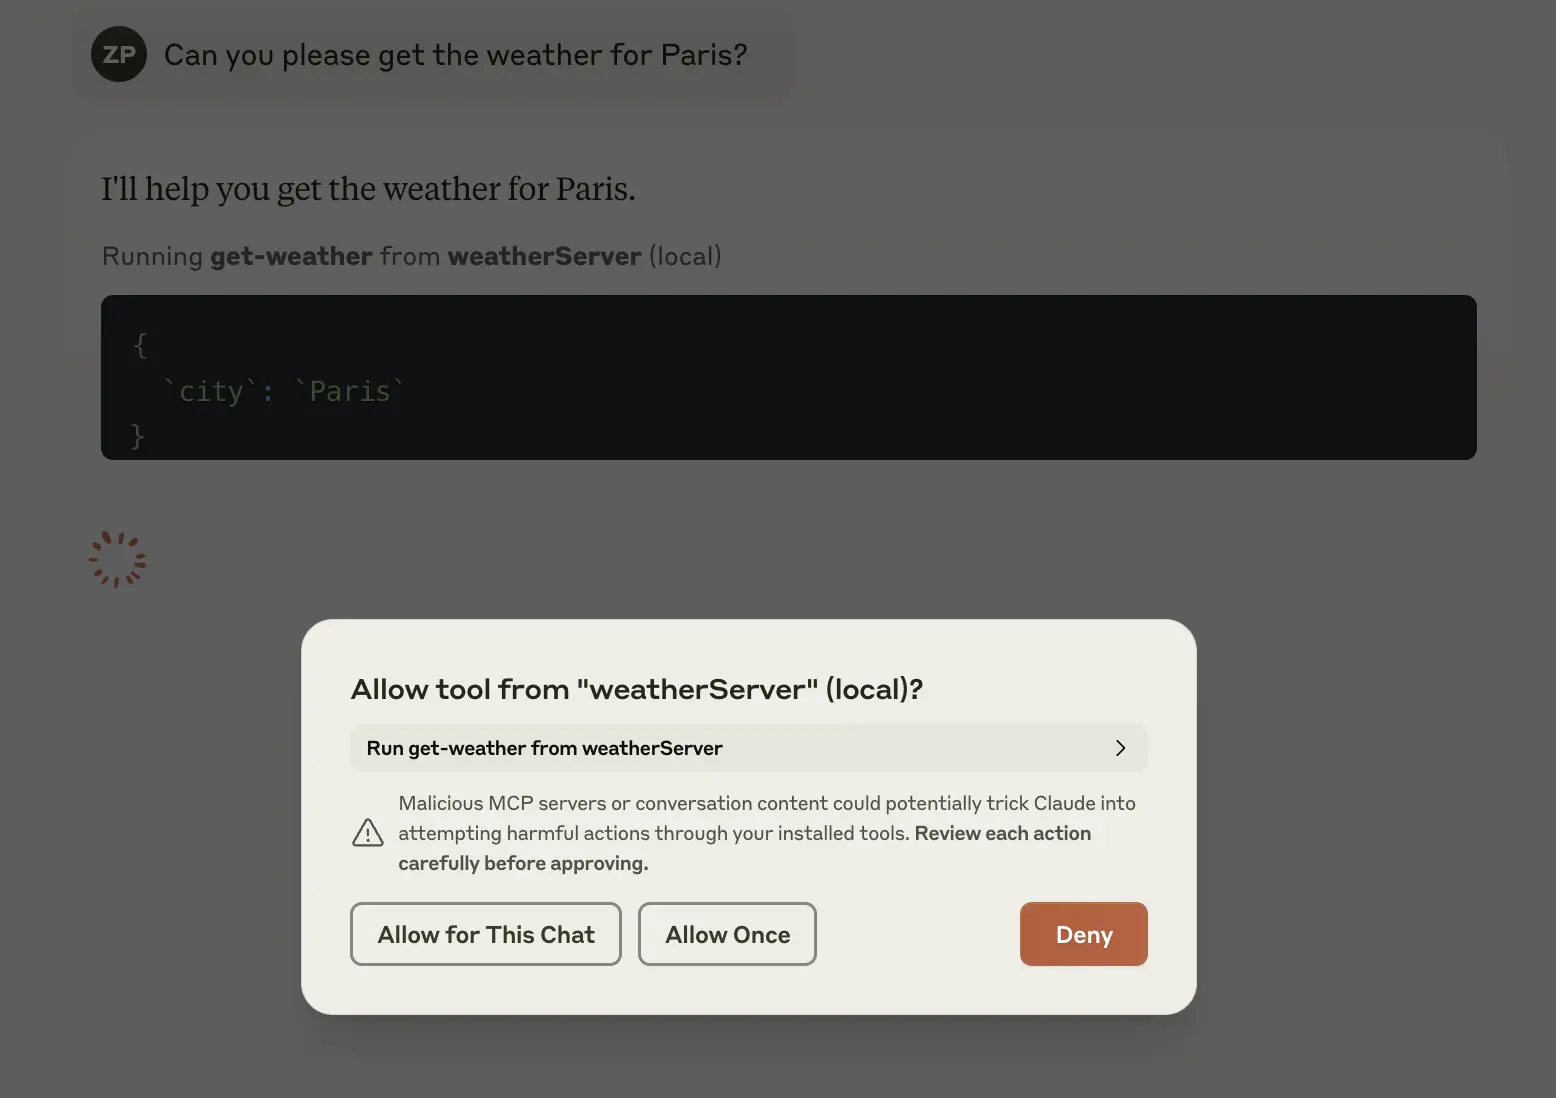
Claude should prompt you for permission to run the get-weather tool with { city: "Paris" }.
When allowed, it’ll call your code, wait for the response, and print something like:
“Weather for Paris: Paris: ☀️ +12°C”
If anything goes wrong:
- Double-check your system logs or the Claude Desktop logs for errors.
- Ensure your Node version supports fetch or run Node with the necessary flags.
- Confirm that your path in the configuration is correct and that the server actually starts without crashing.
The MCP lifecycle
- Claude reads your
claude_desktop_config.jsonand sees it should start a server named “weatherServer.” - Claude spawns your Node process and connects stdio pipes.
- Your server announces its capabilities (one tool: get-weather).
- When the user asks about the weather, Claude decides to call get-weather with { city: "Paris" }.
- The server receives the request over stdin, fetches data from wttr.in, and returns it to stdout.
- Claude reads the response, merges it into the chat, and shows it to you.
All of this is wrapped in the formal MCP message format, but you never have to manually parse the messages; the @modelcontextprotocol/sdk handles it behind the scenes.
Next steps
- Add more tools: Maybe add compare-forecasts or get-weather-extended that returns multi-day info. Or, more usefully, wrap any API you wish.
- Add Resources: This is where you can serve static or dynamic data (like a “weather://help” resource explaining usage).
- Use SSE Transport: If you plan to run this on a remote server instead of locally.
- Experiment with Prompts: Create a standard prompt that instructs Claude how to present weather data or handle edge cases.
This approach sets you up to integrate all sorts of functionality with Claude Desktop (or any other MCP client).
Define your logic in a TypeScript server, provide the instructions in your config file, and enjoy a more powerful, integrated AI experience.