Blog

How to secure RAG applications with Fine-Grained Authorization: tutorial with code

With RAG and GenAI applications, how can you ensure users only see results from documents they have permission to access? In this runnable tutorial, we demo using WorkOS Fine-Grained Authorization to secure your documents.


Your Retrieval Augmented Generation (RAG) applications are built on documents from many different departments, customers, or organizations.

How do you ensure users only search through documents they're authorized to see?

In this tutorial, we demonstrate how to implement secure document access control in a RAG application using WorkOS FGA (Fine-Grained Authorization) integrated with Pinecone's vector database.

The companion repository is available here, if you'd like to skip ahead and run the demo yourself.
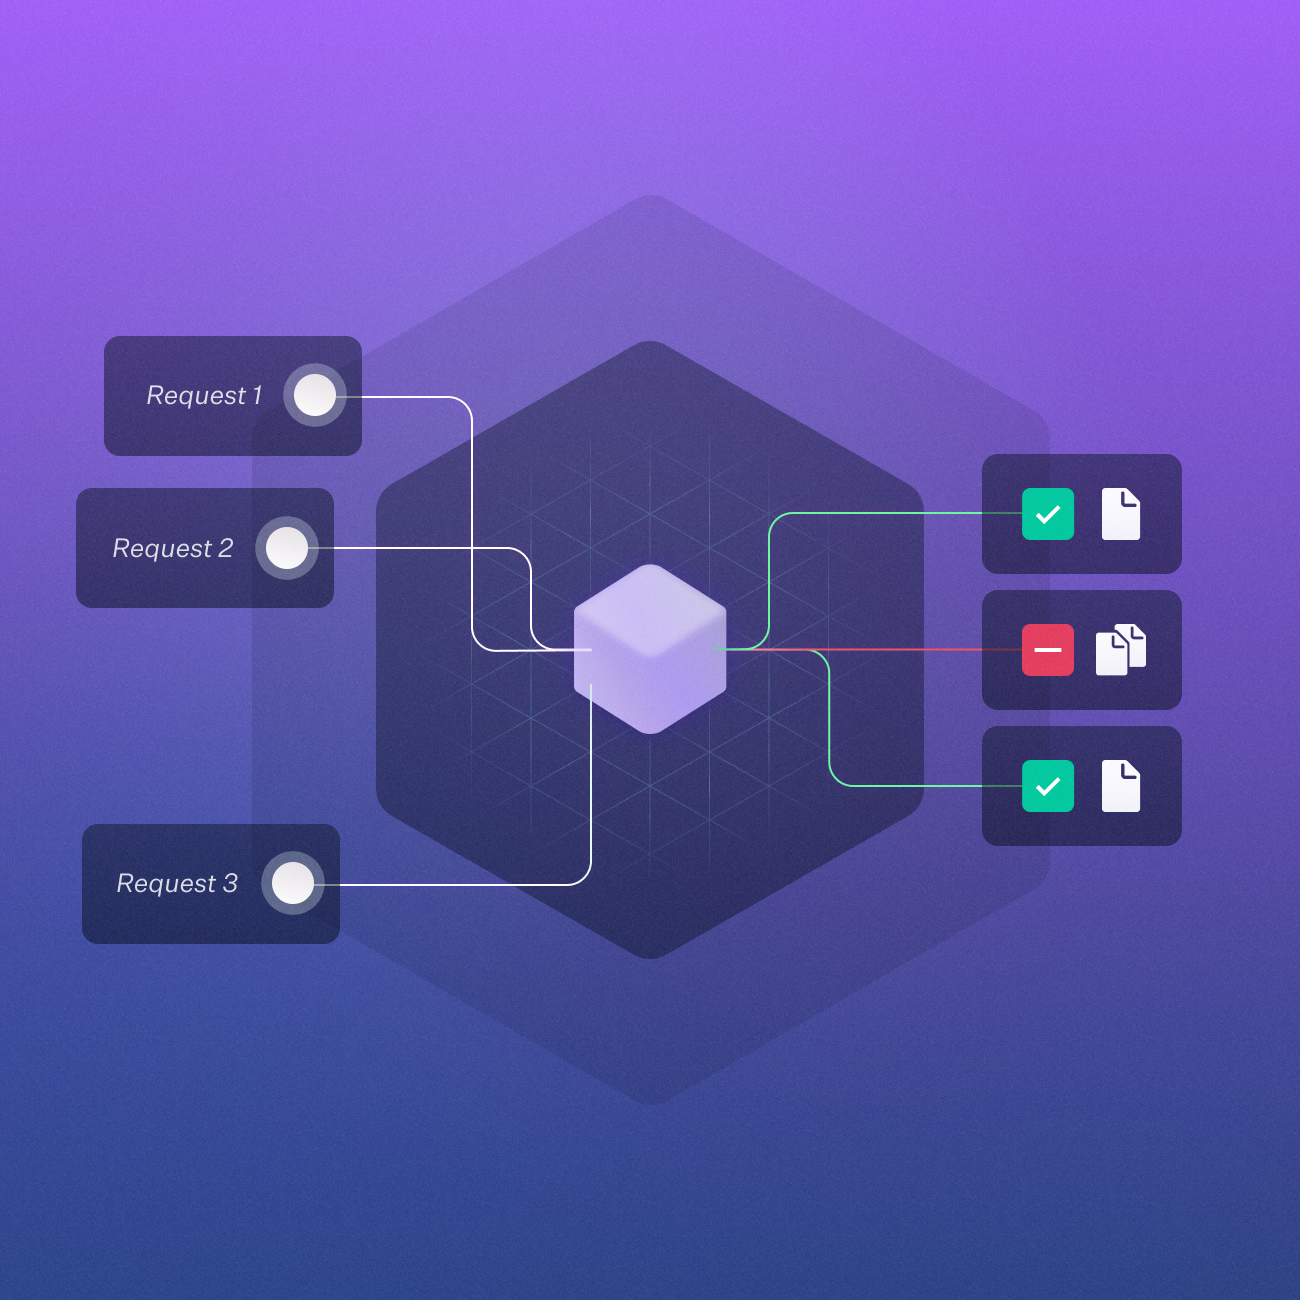
WorkOS Fine-Grained Auth (FGA) perfectly complements Retrieval Augmented Generation systems

Enter WorkOS Fine-Grained Authorization (FGA)

WorkOS FGA is a flexible authorization system that allows you to define granular permissions on a per-resource basis.

In this tutorial, we'll use FGA to define document ownership, viewing permissions, and document sharing.

We'll implement a runtime access control layer on top of the Pinecone vector database to filter search results based on user permissions.

How it works

Let's break down how our proof-of-concept works:
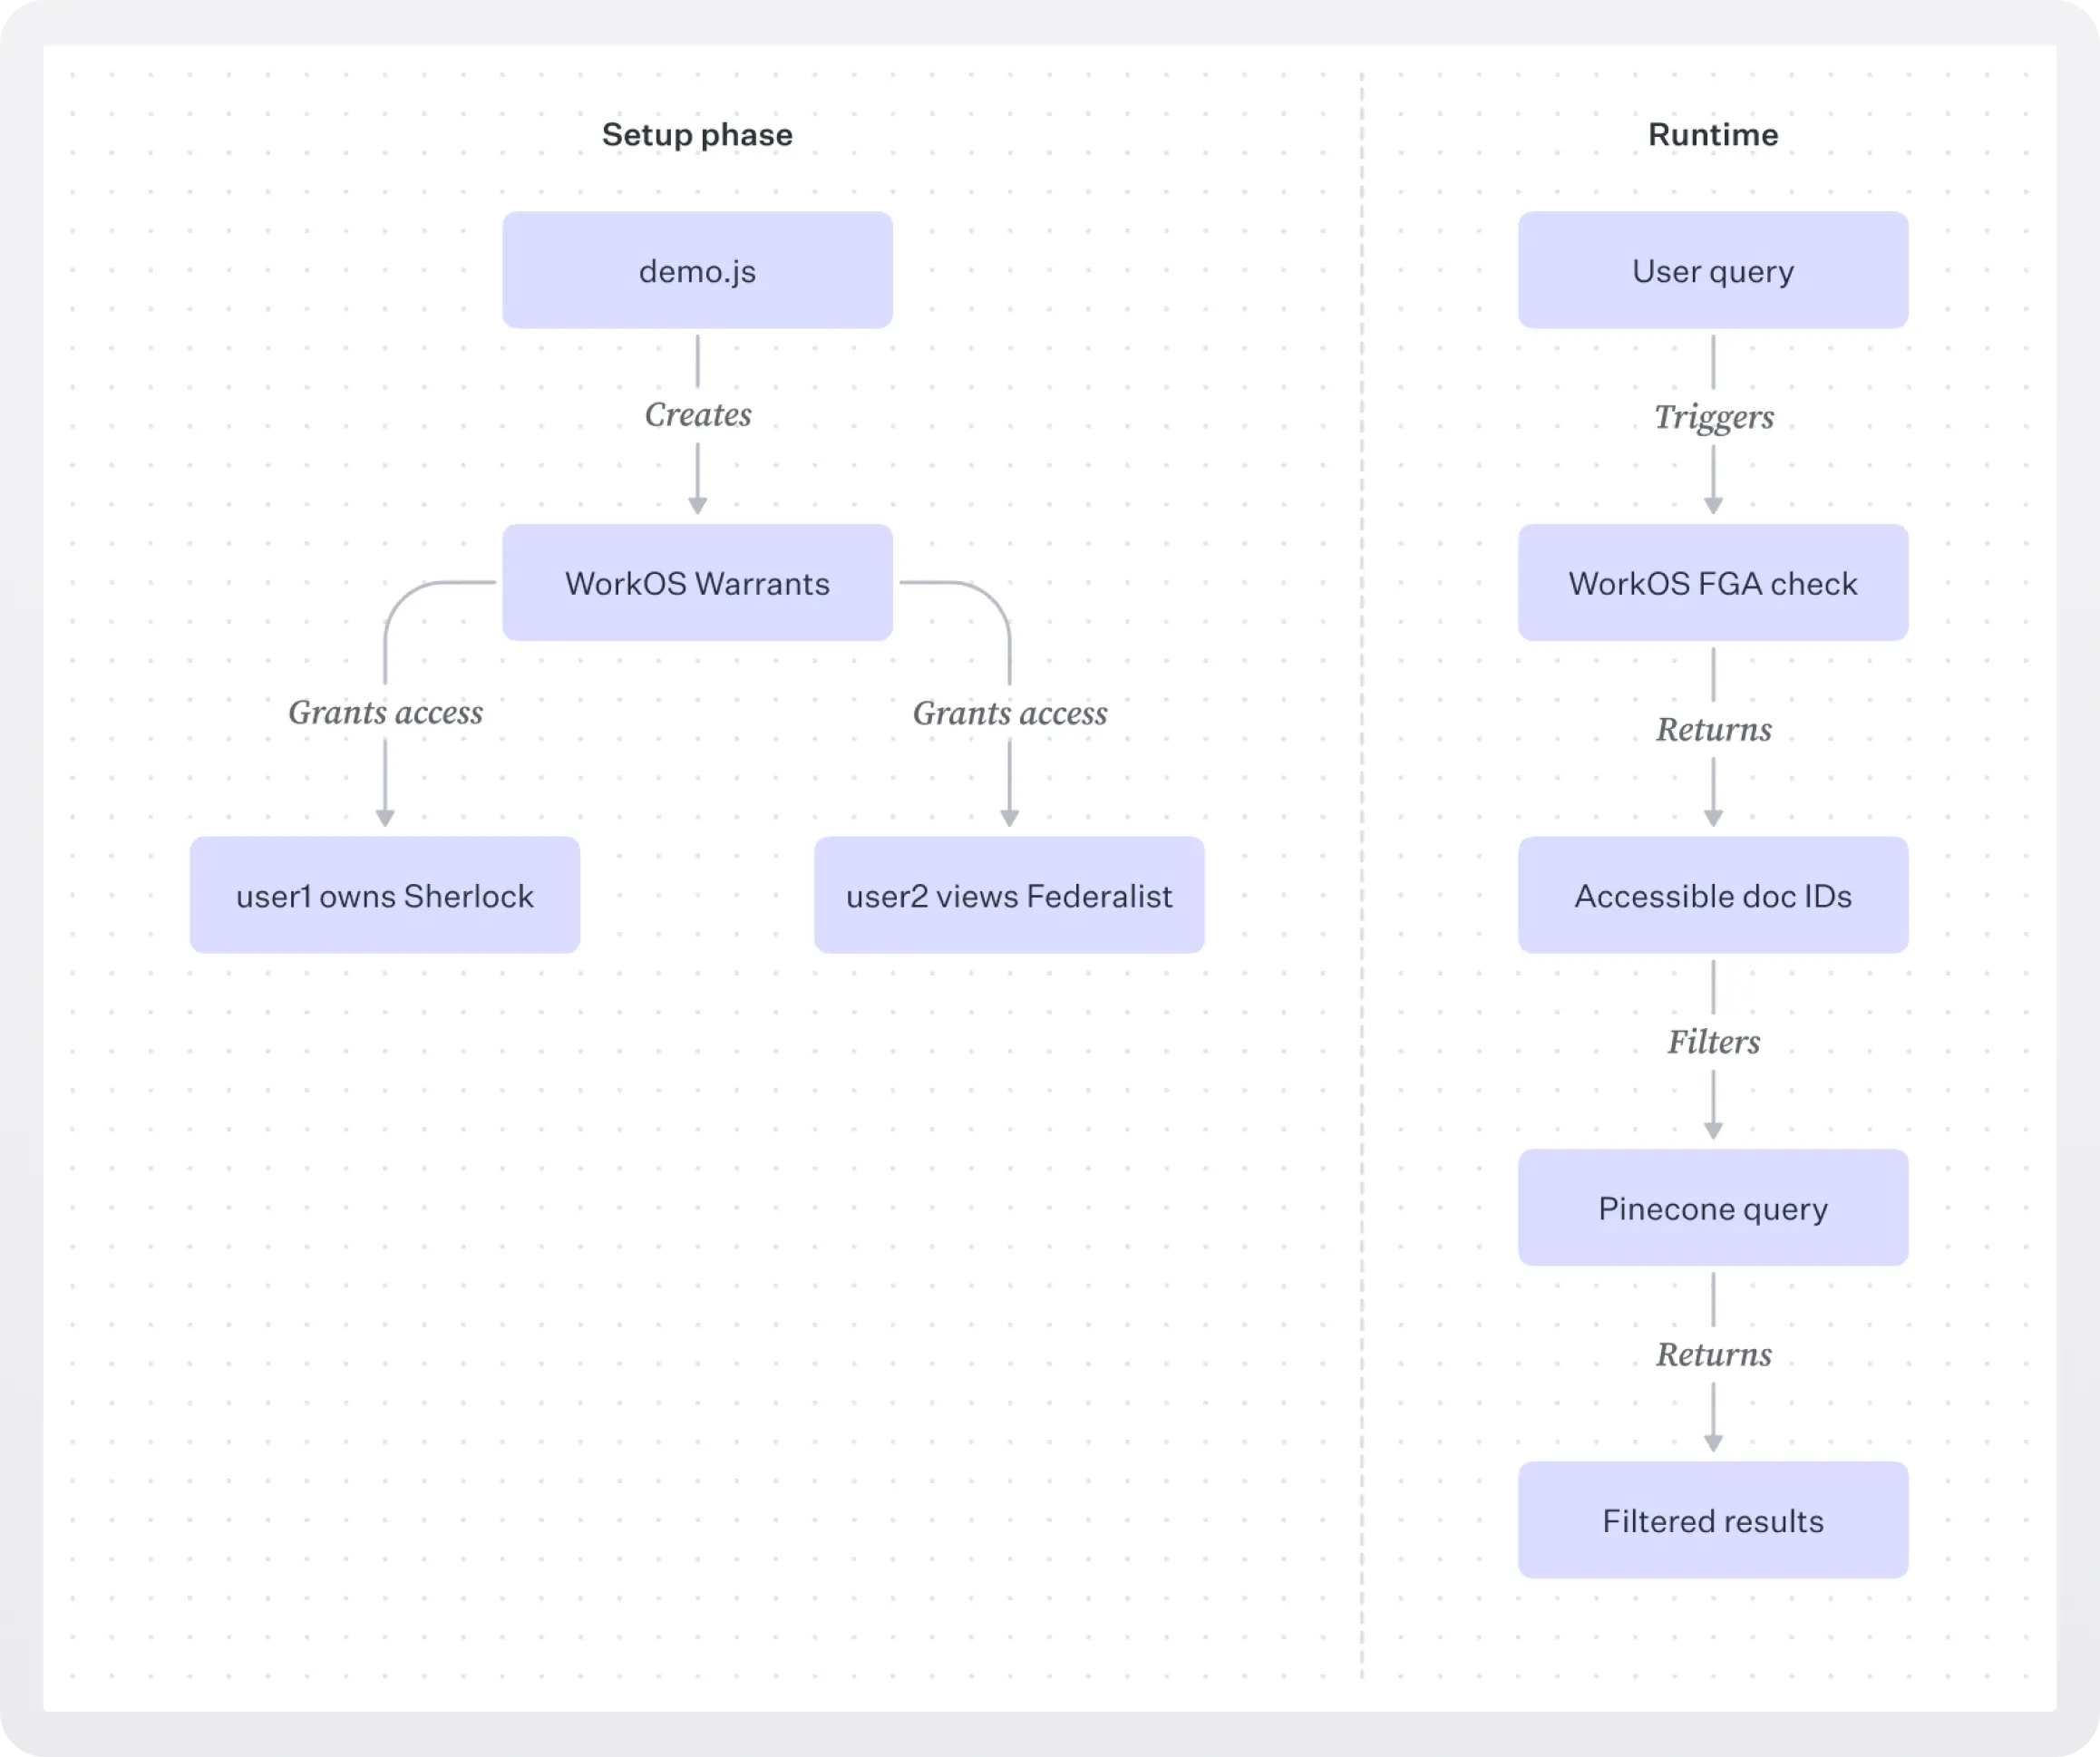
How the WorkOS Fine-Grained Authorization + Pinecone vector DB proof of concept works

First, we define our authorization model using WorkOS FGA. The model consists of two resource types, document and user.

FGA is designed to be flexible: your resources can be anything you want, and you can define relations between resource types.

Visit the FGA Workos dashboard and enter the following code into the Schema section.
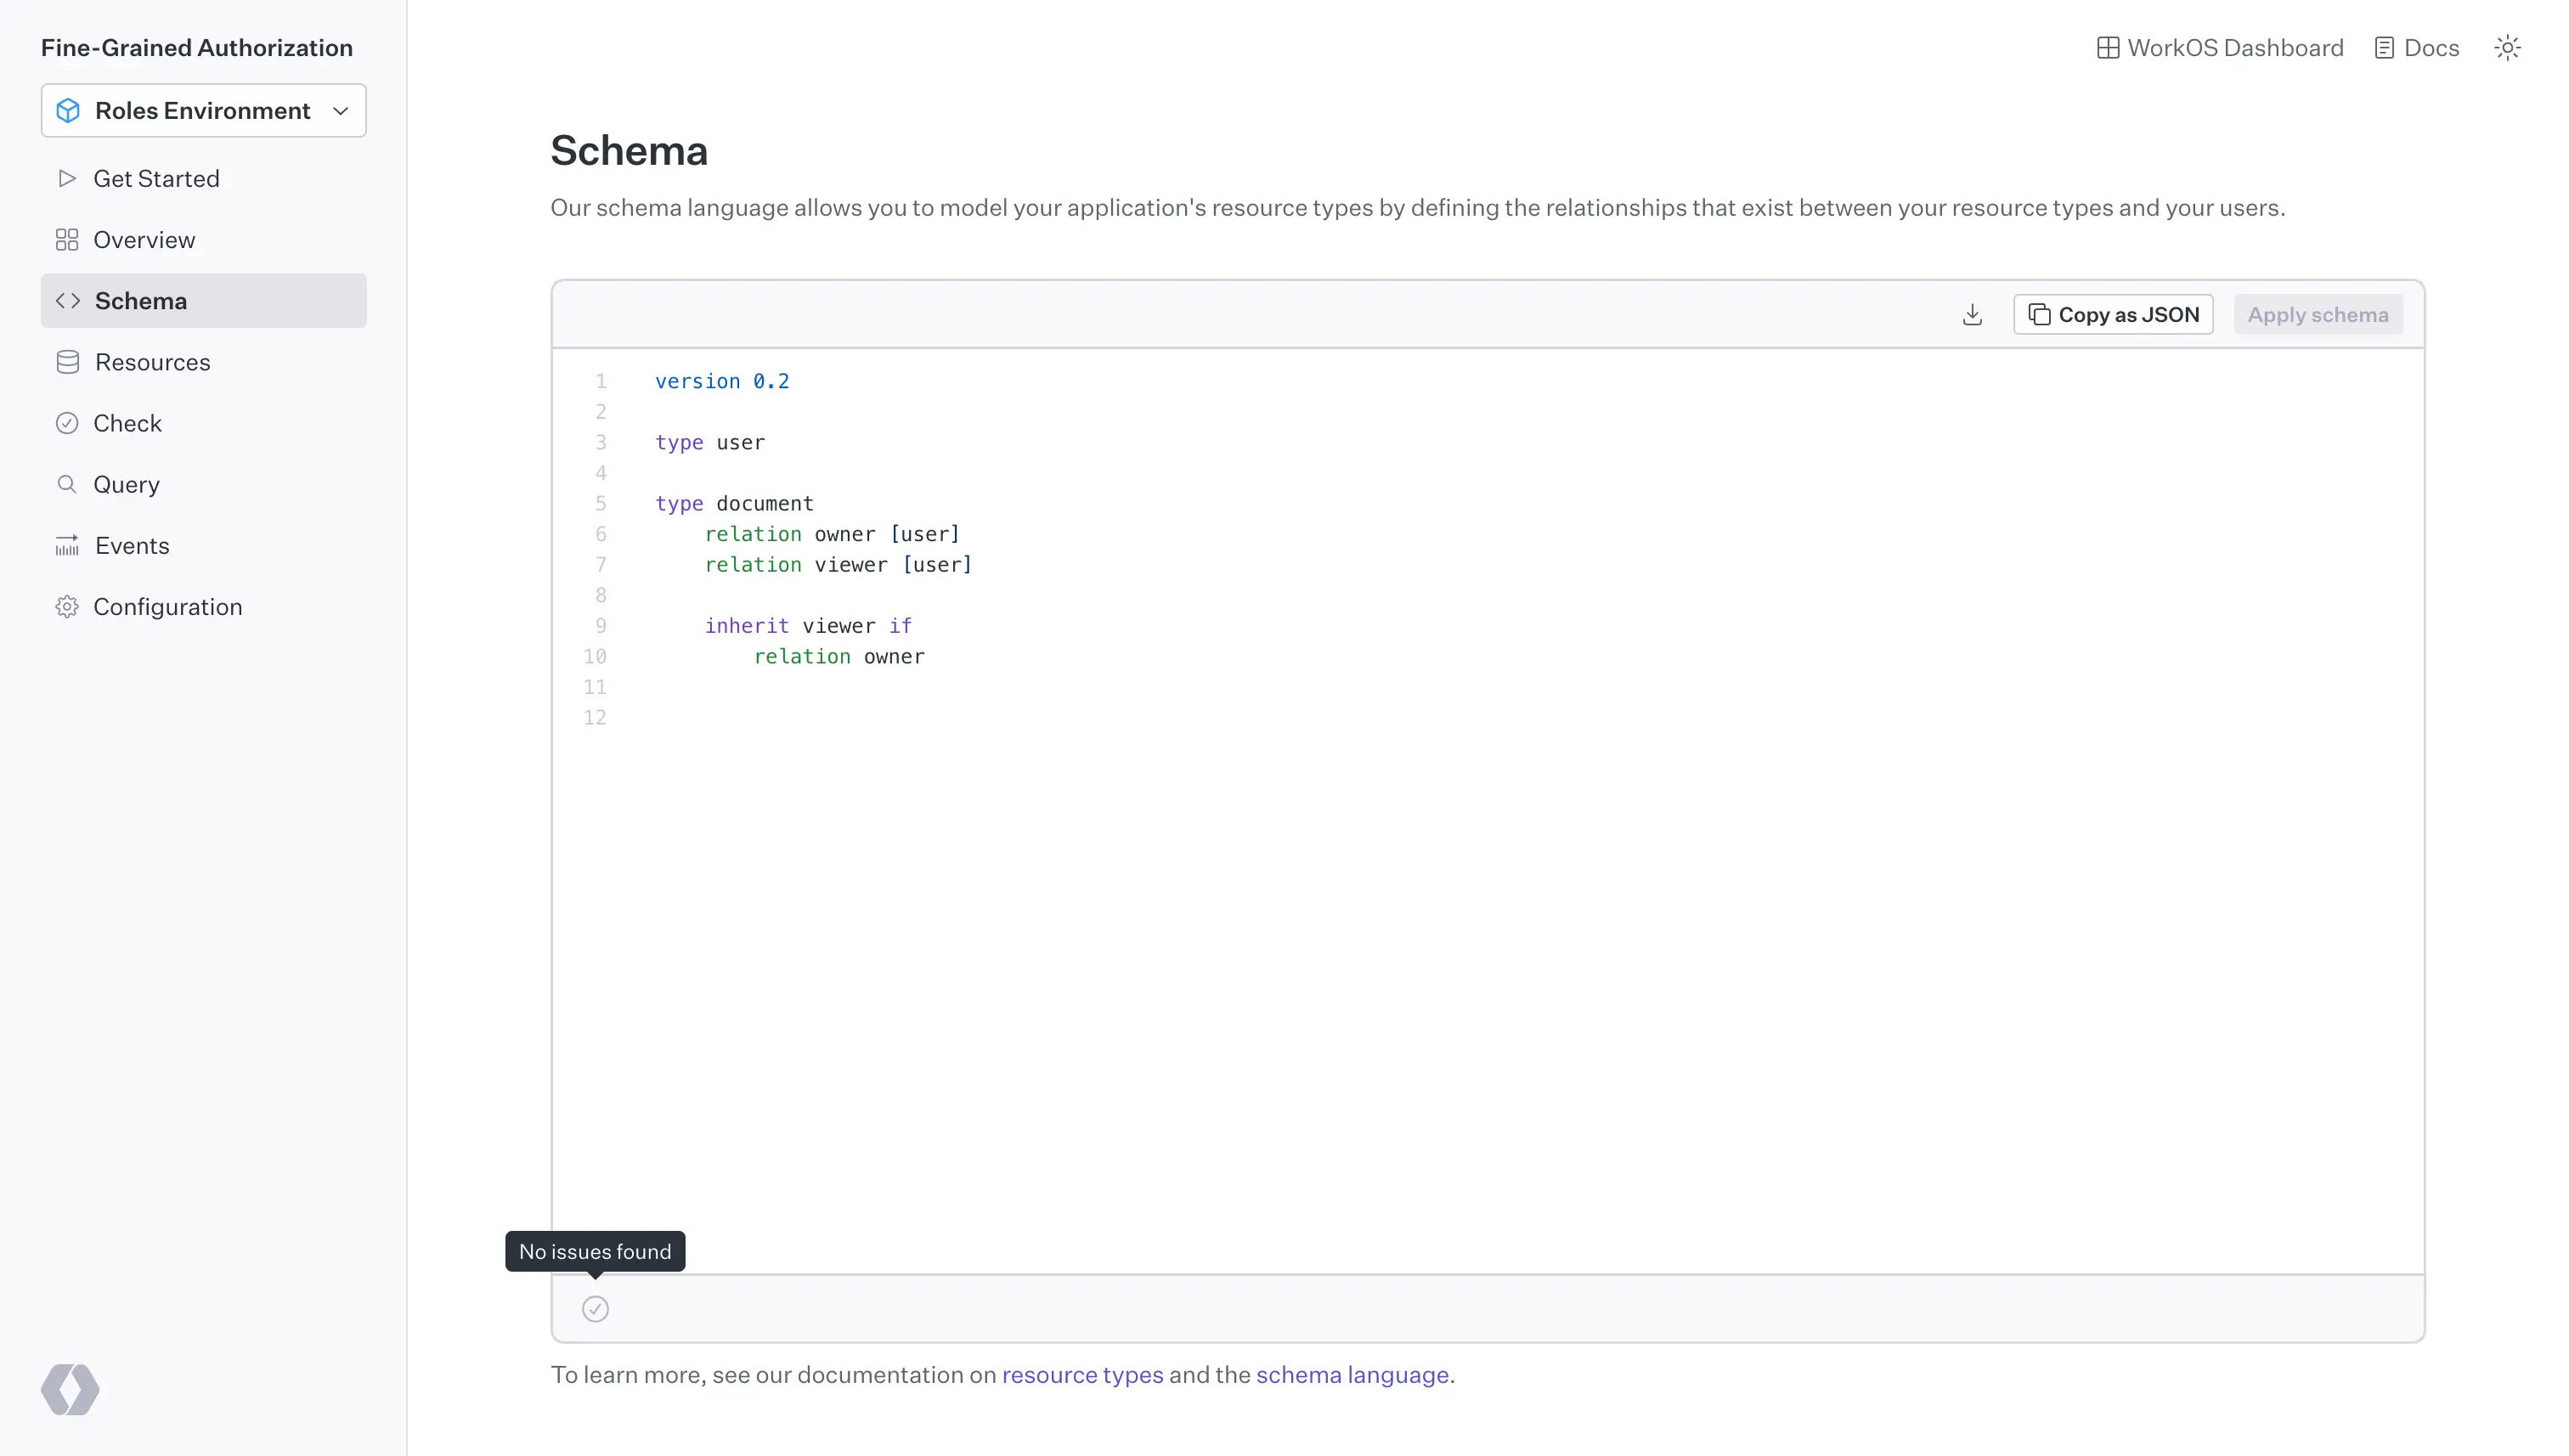
In this case, we're defining an owner relation between documents and users, and a viewer relation that inherits from owner :


version 0.2

type user

type document
    relation owner [user]
    relation viewer [user]

    inherit viewer if
        relation owner

This creates:

  • A user resource type to represent system users
  • A document resource type with owner and viewer relations
  • Permission inheritance: document owners automatically get viewer access

Step 2. Processing documents for vector search

To provide a more realistic end-to-end example, we'll ingest, chunk, and convert a set of PDF documents into vector embeddings and then upsert them to Pinecone. Here's what that process looks like:
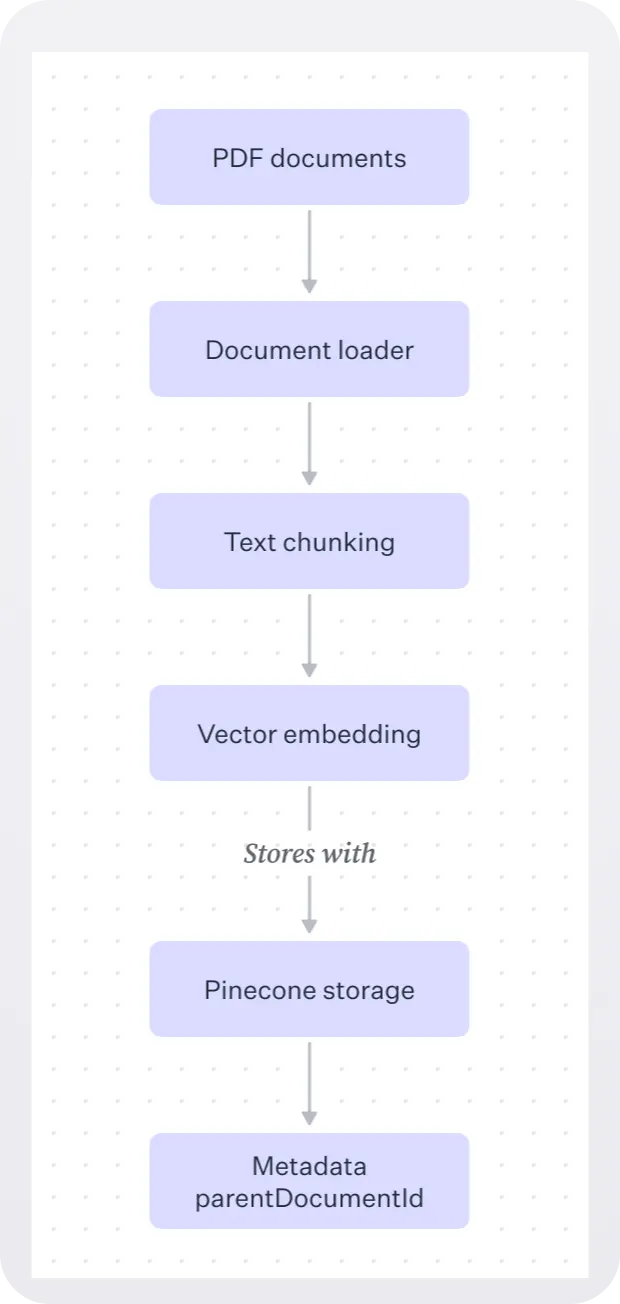
We've supplied a few sample documents in the companion repository that live in the data directory:


data/
├── sherlock-holmes.pdf
├── federalist-papers.pdf
└── universal-declaration.pdf

In the setupPinecone.js script, we use a PDFLoader to load a given PDF into memory and split it into chunks:


async function processDocument(docInfo) {
  console.log(`\n📚 Processing "${docInfo.displayName}"...`);
  
  const loader = new PDFLoader(docInfo.path, {
    splitPages: true
  });

  const docs = await loader.load();
  console.log(`   📄 Loaded ${docs.length} pages`);

  // Limit to maxPages if specified
  const limitedDocs = docInfo.maxPages ? docs.slice(0, docInfo.maxPages) : docs;
  
  const splitter = new RecursiveCharacterTextSplitter({
    chunkSize: 1000,
    chunkOverlap: 200,
  });

  const chunks = await splitter.splitDocuments(limitedDocs);
  console.log(`   🔪 Split into ${chunks.length} chunks`);
  
  return chunks;
}

We loop through each document, chunk it, and convert it to embeddings, which are arrays of floating point numbers output by a neural network that represent features of the data.

We then upsert the embeddings representing that chunk to Pinecone, attaching the parent document ID as metadata so we can filter by it later:


async function bootstrapDocuments() {
  try {
    console.log('=== 🚀 Starting Pinecone Setup ===');
    
    const index = await setupPineconeClient();
    const embeddings = new OpenAIEmbeddings();
    
    // Process each document
    for (const [key, docInfo] of Object.entries(TEST_DOCUMENTS)) {
      const chunks = await processDocument(docInfo);
      const docId = createStableDocumentId(docInfo.path);
      
      console.log(`\n📥 Uploading chunks for "${docInfo.displayName}" (${docId})`);
      
      // Process in batches to avoid rate limits
      const batchSize = 100;
      for (let i = 0; i < chunks.length; i += batchSize) {
        const batch = chunks.slice(i, i + batchSize);
        
        const vectors = await Promise.all(
          batch.map(async (chunk, j) => {
            const embedding = await embeddings.embedQuery(chunk.pageContent);
            return {
              id: `chunk_${docId}_${chunk.metadata.pageNumber}_${j}`,
              values: embedding,
              metadata: {
                text: chunk.pageContent,
                source: docInfo.path,
                page: chunk.metadata.pageNumber,
                // Attach the parent document ID to each chunk so we can filter by it later
                parentDocumentId: docId,
                documentName: docInfo.displayName
              },
            };
          })
        );

        await index.upsert(vectors);
        console.log(`   ✅ Uploaded batch ${i/batchSize + 1} (${vectors.length} chunks)`);
      }
    }

    console.log('\n=== 🎉 Setup Complete! ===');
  } catch (error) {
    console.error('❌ Setup failed:', error);
    throw error;
  }
}

In our case the stable document ID is a simple modification of the document path, e.g:

  • doc_sherlock-holmes
  • doc_federalist-papers

In a production system, you might want to use a more complex ID scheme, e.g. a hash of the document contents.

If we log into the Pinecone dashboard now, we'll see something like the following:
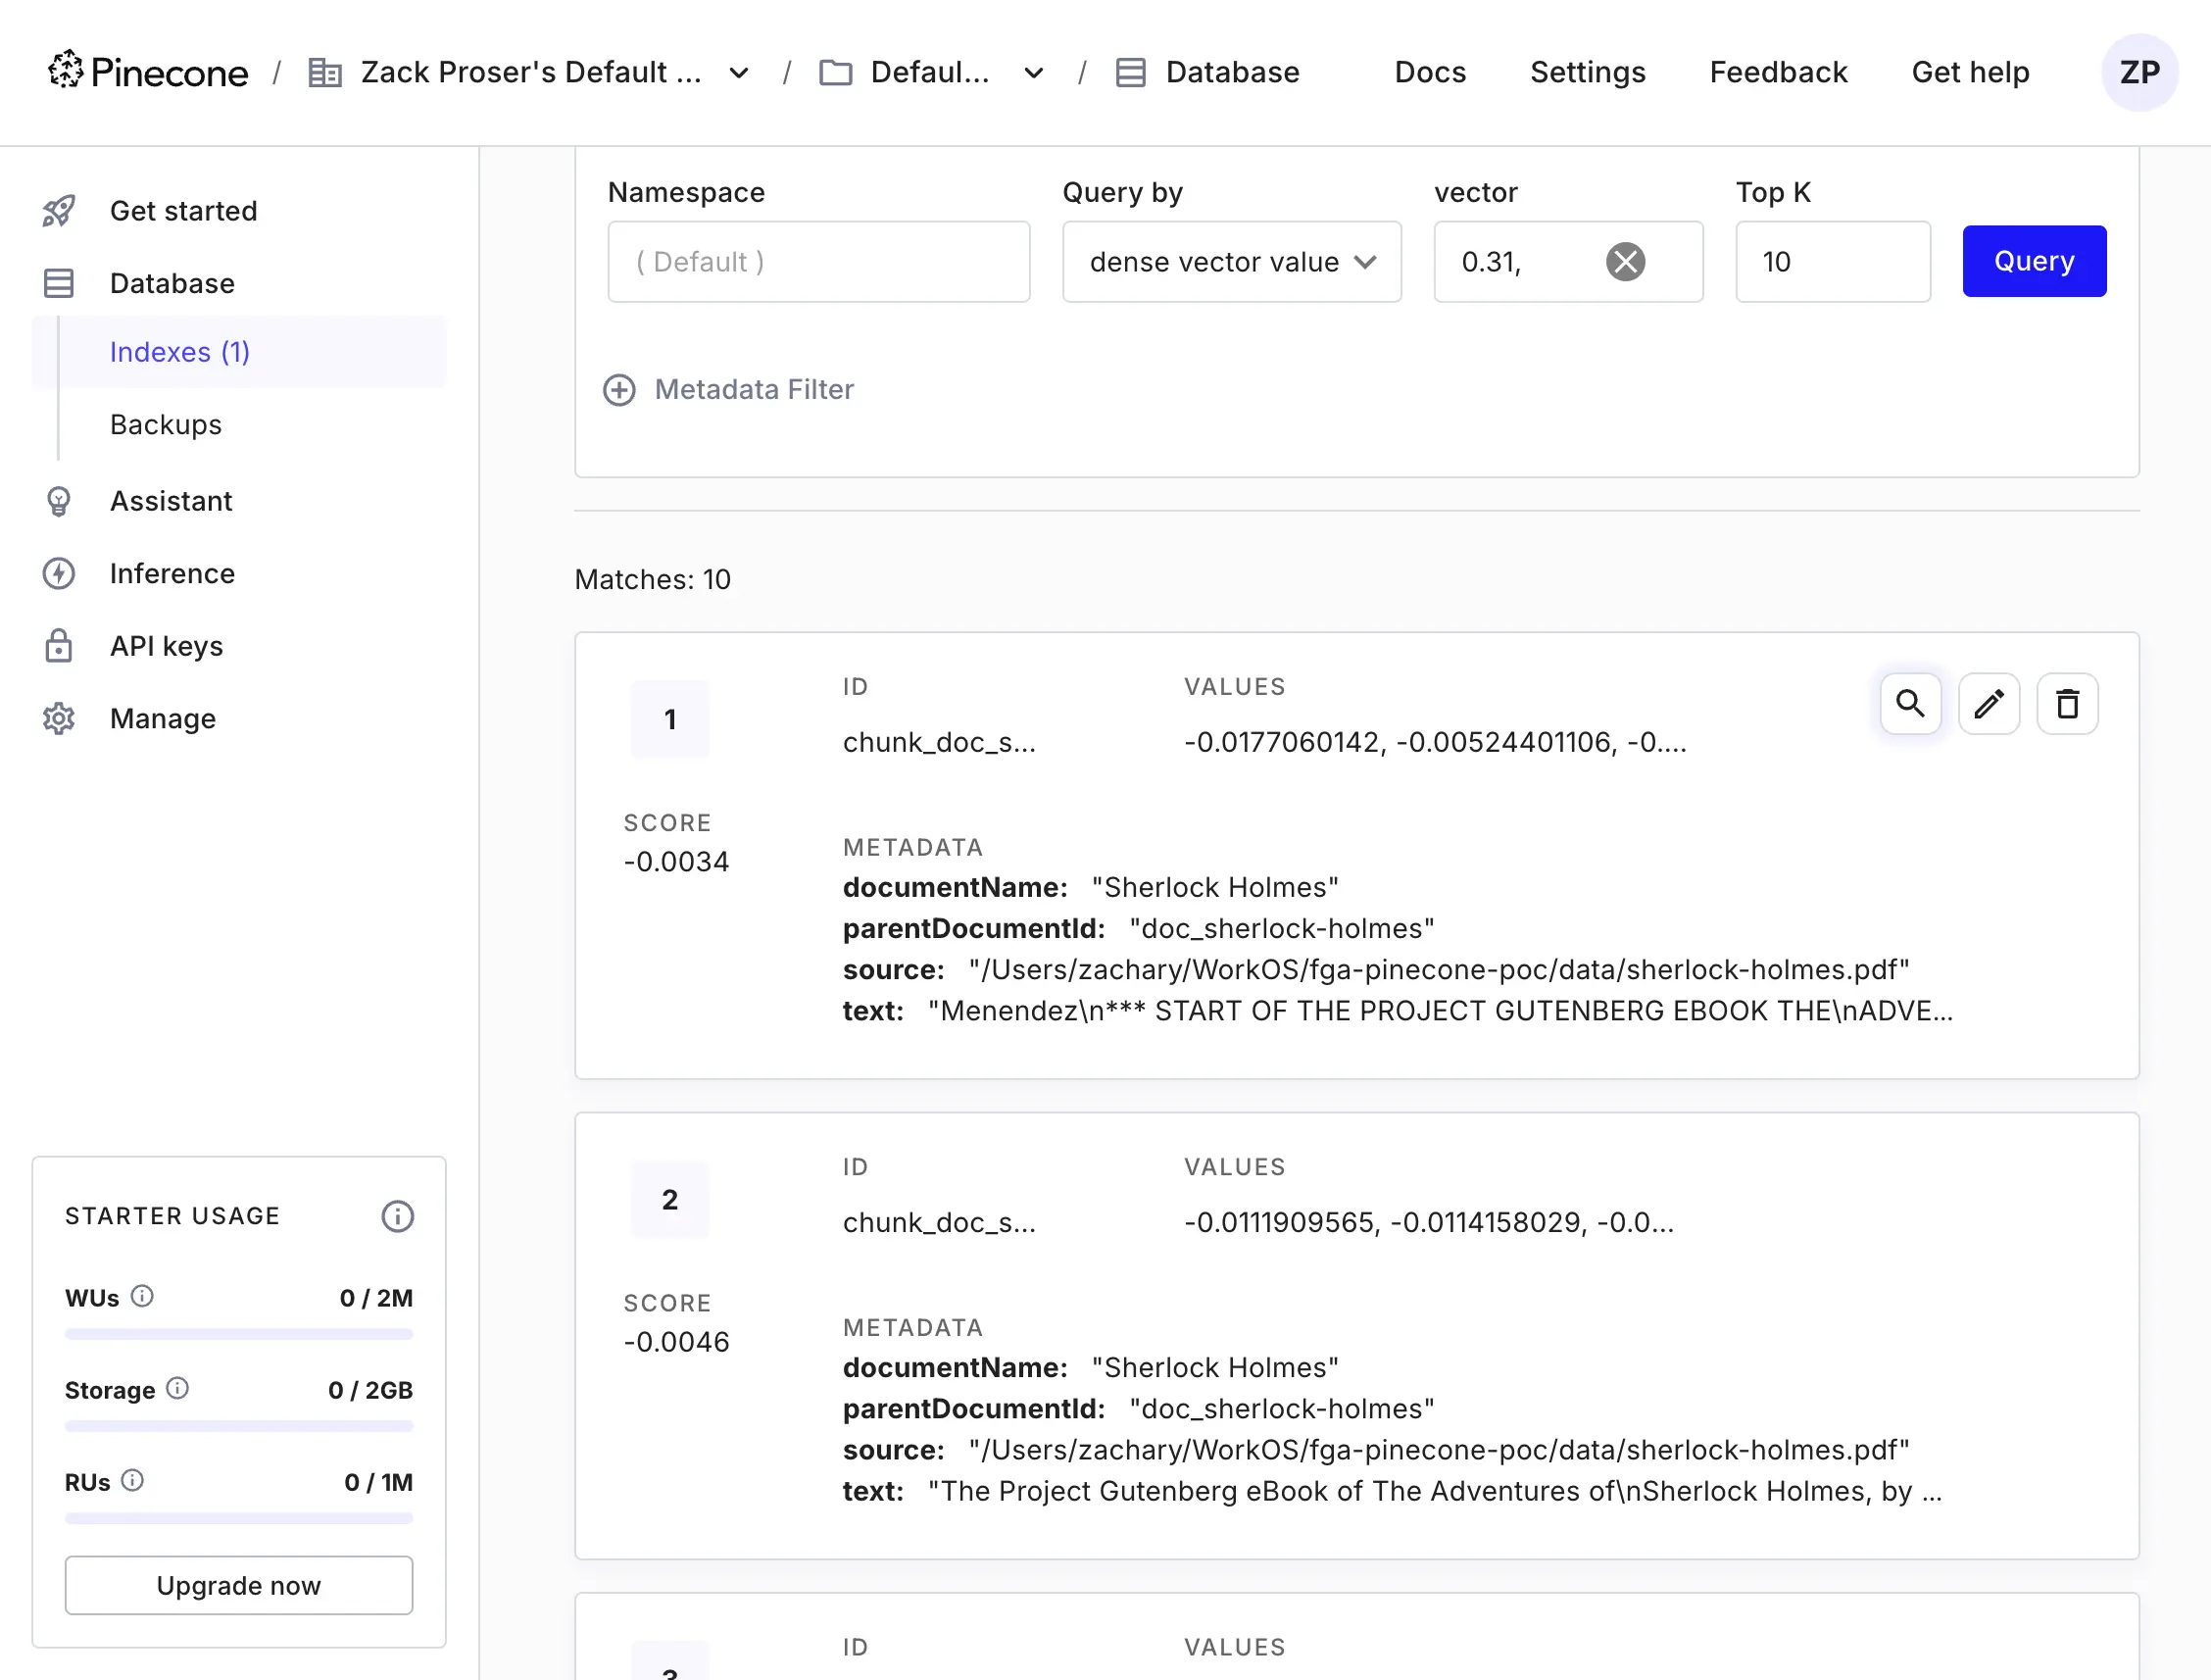
Note that each chunk has a parentDocumentId metadata field that corresponds to the ID of the document it originated from.

Step 3.  Runtime access control

In the demo.js script, we'll create a few sample warrants to demonstrate how FGA works.

Warrants are access rules that specify relationships between entities in your application.

We'll give user1 owner access to "Sherlock Holmes" and user2 viewer access to "The Federalist Papers":


async function createBasicWarrants() {
  try {
    console.log("\n=== Creating Basic Warrants ===");

    // Give user1 owner access to Sherlock Holmes
    await workos.fga.writeWarrant({
      op: WarrantOp.Create,
      resource: {
        resourceType: 'document',
        resourceId: 'doc_sherlock-holmes',
      },
      relation: 'owner',
      subject: {
        resourceType: 'user',
        resourceId: 'user1',
      },
    });
    console.log(`👤 Granted user1 owner access to "Sherlock Holmes"`);

    // Give user2 viewer access to Federalist Papers
    await workos.fga.writeWarrant({
      op: WarrantOp.Create,
      resource: {
        resourceType: 'document',
        resourceId: 'doc_federalist-papers',
      },
      relation: 'viewer',
      subject: {
        resourceType: 'user',
        resourceId: 'user2',
      },
    });
    console.log(`👤 Granted user2 viewer access to "The Federalist Papers"`);
  } catch (error) {
    console.error('Error creating warrants:', error);
    throw error;
  }
}

This shows how you can create user permissions at runtime using WorkOS FGA's warrant APIs.

Also at runtime, we determine the list of documents a user has access to by using FGA's powerful query API:


async function getAccessibleDocuments(userId) {
  try {
    console.log(`\n=== Checking document access for user: ${userId} ===`);
    
    const queryResponse = await workos.fga.query({
      q: `select document where user:${userId} is viewer`
    });

    console.log(`=== FGA Query Response ===`);
    console.log(`%`, queryResponse.data);

    // Extract document ID from each result object
    const accessibleDocs = queryResponse.data.map(result => 
      result.resourceId
    );
    
    if (accessibleDocs.length > 0) {
      const accessibleNames = accessibleDocs.map(getDocumentDisplayName);
      console.log(`✅ User has access to: ${accessibleNames.join(', ')}`);
    } else {
      console.log(`❌ User has no document access`);
    }

    return accessibleDocs;
  } catch (error) {
    console.error('Error querying document access:', error);
    return [];
  }
}

This solution uses FGA's query language to find all documents where the user has viewer access. Remember that our schema defines owners as implicit viewers, so this single query catches both cases.

The function returns a list of document IDs the user can access, or an empty array if the user has no access.

Now that we know which documents a user has access to, we can filter our vector search results accordingly.

Metadata filtering is a feature supported by many vector databases allowing you to specify simple or advanced operators on metadata fields when querying for results:


async function searchPineconeWithAccess(userId, searchQuery) {
  try {
    console.log(`\n=== 🔍 Searching for user ${userId} with query: "${searchQuery}" ===`);

    const accessibleDocs = await getAccessibleDocuments(userId);
    
    if (accessibleDocs.length === 0) {
      console.log('❌ User has no document access - skipping search');
      return [];
    }

    // Only proceed with search if we have accessible documents
    const accessibleNames = accessibleDocs.map(getDocumentDisplayName);
    console.log(`✅ User can search in: ${accessibleNames.join(', ')}`);
    
    const queryEmbedding = await embeddings.embedQuery(searchQuery);
    const index = await setupPineconeClient();

    const searchResponse = await index.query({
      vector: queryEmbedding,
      filter: {
        parentDocumentId: { $in: accessibleDocs }
      },
      topK: 5,
      includeMetadata: true
    });

    // ... display results ...
    return searchResponse.matches;
  } catch (error) {
    console.error('Error in search:', error);
    return [];
  }
}

In the above query, we’re telling Pinecone that we want chunks that semantically match the user’s query.

We’re also passing the metadata filter stating that the chunks must also have a parentDocumentId value in the array of accessibleDocs to be included in the result set.

This ensures:

  • We efficiently check user permissions with a single FGA query
  • Only documents the user can access are included in the search results
  • Results are filtered using Pinecone metadata filters

Let's look at the scenario from the demo output:

Note, you can view the expected demo output here in the companion repository README if you don't want to run the code yourself.

  • User1 is granted owner access to "Sherlock Holmes"
  • User2 is granted viewer access to "The Federalist Papers"
  • User3 has no access to any documents

When searching for "What are the principles of justice and liberty?":

  • User1 only sees results from Sherlock Holmes
  • User2 only sees results from The Federalist Papers
  • User3 sees no results

This demonstrates how FGA effectively controls access at the document level while maintaining good performance through its query API and Pinecone's metadata filtering.

Step 4. Implement document sharing with FGA

One of the powerful features of FGA is the ability to manage permissions dynamically. Let's look at how we implement document sharing in our demo:


async function shareDocumentAccess(ownerId, newUserId) {
  try {
    console.log(`\n=== 🤝 Sharing documents with user${newUserId} ===`);
    
    // Security check: Verify that the sharing user actually has owner permissions
    const checkResult = await workos.fga.check({
      checks: [{
        resource: {
          resourceType: 'document',
          resourceId: 'doc_sherlock-holmes',
        },
        relation: 'owner',
        subject: {
          resourceType: 'user',
          resourceId: ownerId,
        },
      }]
    });

    if (!checkResult.isAuthorized()) {
      console.log(`❌ User ${ownerId} is not owner of the documents - cannot share`);
      return false;
    }

    // Grant viewer access to both documents
    const documentsToShare = [
      'doc_sherlock-holmes',
      'doc_federalist-papers'
    ];

    for (const docId of documentsToShare) {
      await workos.fga.writeWarrant({
        op: WarrantOp.Create,
        resource: {
          resourceType: 'document',
          resourceId: docId,
        },
        relation: 'viewer',
        subject: {
          resourceType: 'user',
          resourceId: newUserId,
        },
      });
      console.log(`✅ Shared "${getDocumentDisplayName(docId)}" with user${newUserId}`);
    }
    
    return true;
  } catch (error) {
    console.error('Error sharing document access:', error);
    return false;
  }
}

To make things more realistic, our sharing code implements an ownership check. We verify that the user attempting to share owns the document.

In our demo output, we see this in action:


=== 🤝 Sharing documents with user4 ===
✅ Shared "Sherlock Holmes" with user4
✅ Shared "The Federalist Papers" with user4

⏳ Waiting to propagate changes...

--- Access After Sharing ---
=== 🔍 Searching for user user4 with query: "What are the principles of justice and liberty?" ===
✅ User can search in: Sherlock Holmes, Federalist Papers

After sharing, user4 can now search across both documents. This demonstrates how FGA makes it easy to implement dynamic permission changes while maintaining security boundaries.

This approach is transparent to the search functionality - our searchPineconeWithAccess function automatically picks up the new permissions through the getAccessibleDocuments check, requiring no changes to the search logic.

Get started with WorkOS FGA

This tutorial demonstrated how to use WorkOS FGA to control access to RAG applications.

With WorkOS FGA, you get fast, large-scale authorization checks and a system flexible enough to handle even the most complex use cases.

You can define your authorization model once and enforce it across micro-services, applications, cloud environments, and more. You can define and manage your resources, hierarchies, access policies, and inheritance rules from the FGA dashboard or programmatically with the FGA API or the WorkOS CLI.

To start with WorkOS FGA, sign up for a free WorkOS account and follow the quickstart guide.

In this article

This site uses cookies to improve your experience. Please accept the use of cookies on this site. You can review our cookie policy here and our privacy policy here. If you choose to refuse, functionality of this site will be limited.