LLMs are très bien at localization
We localized AuthKit into 90 languages in 5 weeks. Learn how we did it, and how you can do it for your web-based product.
We translated AuthKit into 90 languages in 5 weeks. Every string of text — form fields, tooltips, transactional emails, API error messages — displays in the user's preferred language.
Sign-in and sign-up pages are the gateway to your product. With AuthKit, your visitors are greeted in their native tongue, increasing their likelihood of creating an account. But what about the rest of your app? Your users will expect the entire experience to be in the same language: theirs. How do you go about finding, extracting, and translating all the hard-coded strings in your app's code?
The good news is that it's never been easier to add localization to your web app. Modern developer tooling is robust, and frontier LLMs excel at multilingual translations — they are large language models after all.
Here's how we added localization to AuthKit, and how you can do it too for your React-based product.
Design philosophies
Localization is the practice of adapting a digital product or experience to align with the cultural and linguistic preferences of its users. A locale isn’t just about language — it also shapes how people interpret dates, numbers, idioms, and other conventions. By tailoring your product to these differences, localization helps you connect with a broader audience, allowing people to engage with your product in the way that feels natural to them.
There are decisions that you'll need to make as a team about how to approach localization. Below are decisions we made that helped us move fast.
Go global from the start
You might initially feel inclined to add localization for only the top few user-requested languages. Perhaps a phased rollout will give you more time to verify that you didn't break anything.
I'm here to tell you that you don't need to do this. Why? If you've already found and extracted all the user-facing strings in your app's frontend, then running them through the automated translation pipeline for additional languages is not hard! When implemented correctly, supporting additional locales becomes trivial.
A guiding principle at WorkOS is to "earn the wow". Treating each language as a first-class citizen will win the respect of your users overseas.
Mistranslations are bugs, not showstoppers
We’ve all shipped typos before — it happens. If you’ve made them in English, you may make them in another language too. When major errors do slip through, your users will usually point them out through normal feedback channels (assuming you’re listening to feedback!) — just fix them and move on.
While it might feel counterintuitive to deprioritize translation accuracy, this approach helped us move faster and focus our time on engineering work rather than translation polish.
Deciding which languages to support
Congratulations — if you've made it this far, you're already invested in adding localization to your app. But how do you know which languages to support? You want to support them all, but what does "all" mean?
Understanding language tags
A BCP 47 language tag is a code that identifies a language. A simple tag without a hyphen (such as en, for English) refers to the general language, while hyphenated subtags (such as en-GB, for British English) define specific regions or dialects.
The number of possible permutations of regional language tags exceeds what is necessary to ship localization for your product. Not even accounting for regional dialects, there are 183 assigned two-letter general language codes alone! It is insurmountable to support every known language tag — you must decide upon a subset.
For AuthKit, we whittled this down to 90 language tags, supporting a blend of regional and generic languages. How did we decide which locales to include? By looking at real data!
We inspected the accept-language request header of real user traffic in DataDog to visualize a list of our end-users’ preferred languages.
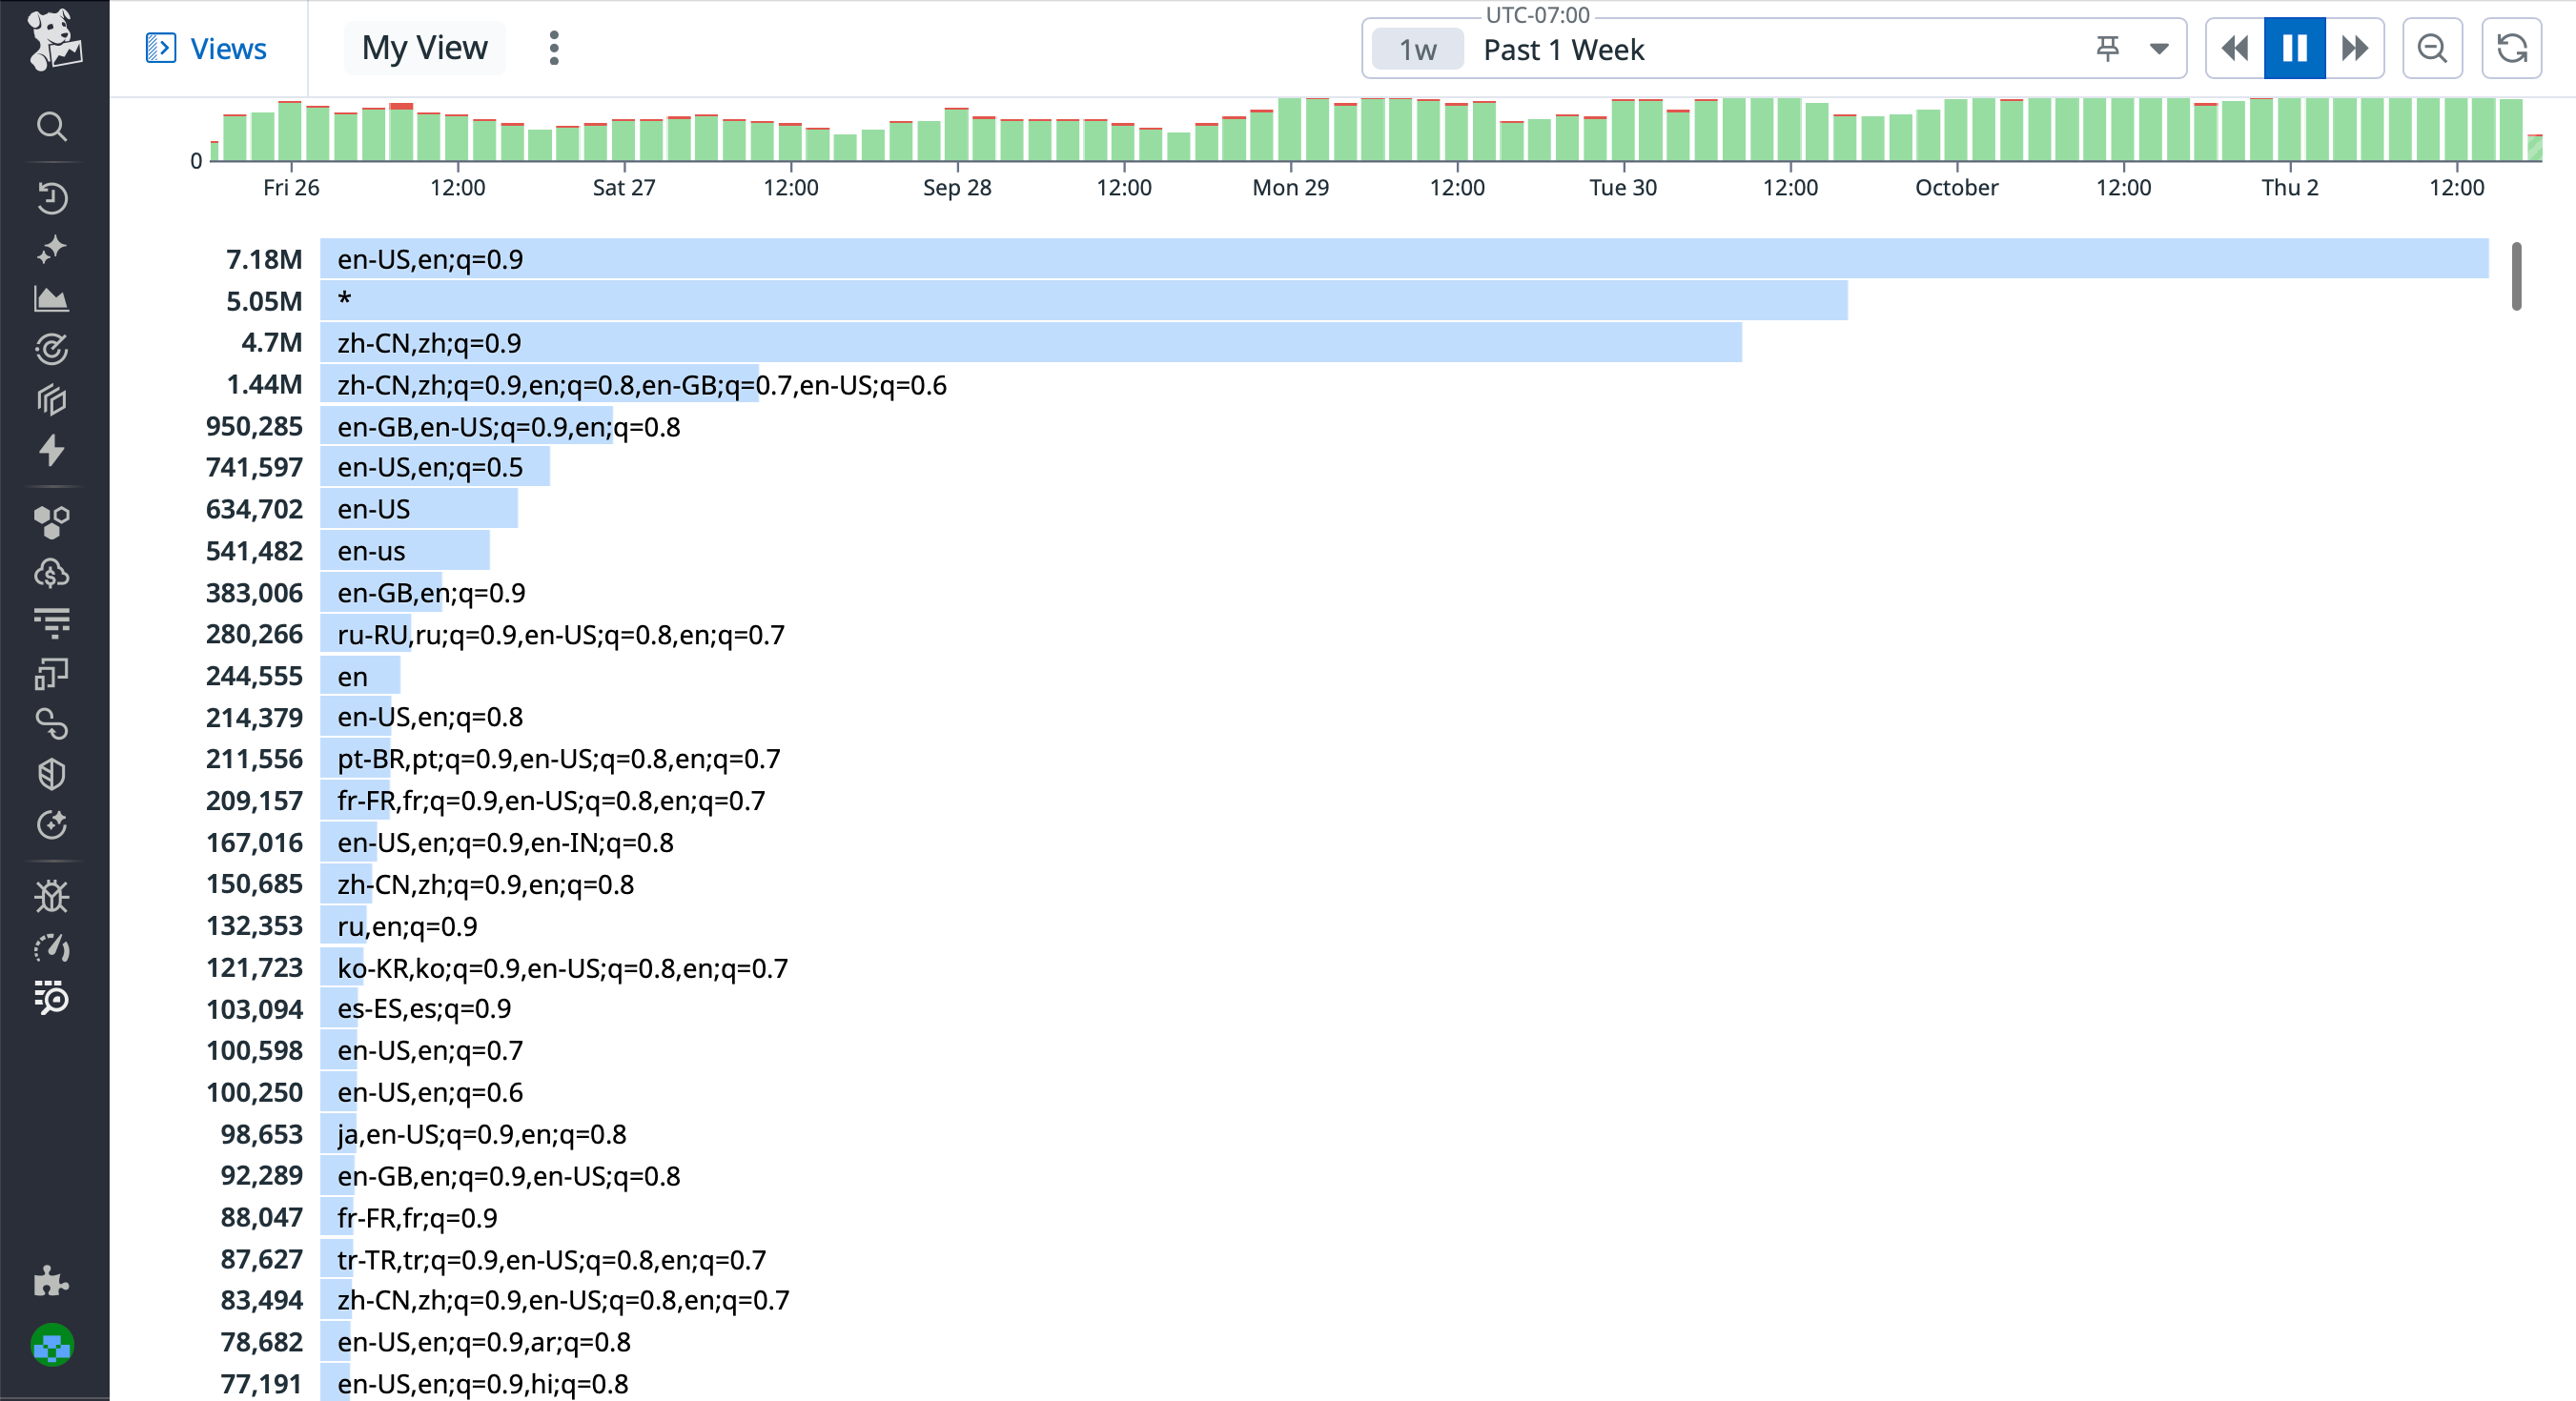
From this list, we were able to deduce the preferred languages of all our end-users. But first, we had to understand the format of the accept-language header value.
Understanding accept-language
The accept-language header specifies anywhere from zero to multiple language tags. Modern browsers send this header on every HTTP request. A straightforward example of a value is as follows:
Here, the user prefers British English, as denoted by the value before the comma, en-GB. If the application does not support that specific locale, then the user prefers to fall back to the general English language, as denoted by the value between the comma and semicolon, en.
The q value is a weight, and it doesn’t really come into play unless the user is fluent in multiple languages. The higher the weight, the more comfortable the user is speaking that language. Weights are ordered from highest to lowest. A user indicates the languages they speak in their OS settings — this value then gets picked up by browsers on the device.
Above, the user’s primary language is Simplified Chinese, and as a secondary language accepts a few flavors of English. As an application developer, you shouldn’t need to parse these values yourself. We use and recommend negotiator to handle accept-language value parsing.
Leveraging FormatJS
We use the battle-tested FormatJS (née react-intl) to do localization heavy-lifting. It runs in both client and server components, and includes CLI tooling for easy string extraction.
A naive approach would be to not use FormatJS, and instead import translations directly from a JSON dictionary. FormatJS offers many ergonomic improvements to DX compared to this approach:
- Your translations are co-located with your code. No flipping back and forth between tabs just to edit a string. When a component gets deleted, the translations get deleted with it.
- The required
descriptionprop acts as additional context and removes ambiguity so that the LLM can provide more accurate translations. - Translation IDs (which map translations to the relevant spot in the code) get generated automatically, which means that your engineers don’t need to come up with unique variable names like
sign_in_welcome_messagethemselves. - String interpolation is a built-in feature — simply wrap your variable name in curly braces.
Install dependencies
Install the runtime dependency:
You'll also need these development dependencies:
Optionally, you can install one of the following compile-time dependencies to auto-generates translation IDs. Without it, you’ll need to include a unique ID for every translation instance in your code. The eslint plugin can autofix them, which is helpful, but it’s a little nicer to not even worry about IDs at all.
- @swc/plugin-formatjs (incompatible with Next.js v14 and lower, due to this issue)
- babel-plugin-formatjs
- ts-transformer
Wrap layout with a context provider
Wrap your root layout with the IntlProvider context provider from react-intl. Your localization components and hooks will need the context provider as an ancestor, so the higher up the tree the better.
Create a Translation component
Export a component that doesn’t do much other than wrap FormattedMessage from react-intl. We added a trailing space after ours, which helps in cases where you need a space character between words but don’t want to violate the no-literal-string-in-jsx eslint rule.
It’s commonplace for this component to be renamed T for brevity, however we called ours Translation for grepability, and to avoid conflation with the TypeScript template generic <T>.
The <Translation /> component is a React.ReactElement, and is painless to drop in whenever the string you’re replacing is a text node (for example, text content within <p></p> tags). Then you can use it in your code like so:
Create a useTranslation hook
Sometimes you need the return type of your translation to remain as string. For example, the placeholder prop of a text input might only expect a string. Rather than re-type the component’s props to also accept ReactElements, you can create a translation function that returns a pure string.
The code below is a helper hook that returns a translate() function that takes the same props signature as the <Translation /> component.
Then in your code, you can reference the hook like this:
Keep in mind that hooks only run in client components, so for isomorphic apps, you may need to include a use client directive at the top of the file to avoid getting bundled in server logic.
Finding strings
Now that you’ve done the initial setup, it’s time to find all the hard-coded user-facing strings in your application. For large repositories, this would be a nightmare to do manually. Luckily, eslint comes to the rescue — add the following to your eslintrc.js file:
If you didn’t install the optional compile-time dependencies, you should add the enforce-id rule to let eslint be able to autofix translation IDs. The translation ID is a hash of the concatenation of the raw string and its description. You won’t need this if you are using the FormatJS babel plugin, ts-transformer, or SWC plugin.
With these rules in place, eslint will squiggle errors on every instance of a string literal used in JSX. This is helpful for not only finding strings in your app, but also for preventing shipping untranslated strings in the future.

Extracting strings
Now that you’ve added stricter linting rules, your project probably has hundreds of eslint errors. These errors are helpful for AI agents like Claude Code to know where to look when replacing the string literals with your <Translation /> components. Here’s a prompt you can use to let Claude automate the tedium for you:
If this results in TypeScript errors, your agent may have put <Translation /> component where a pure string is expected. To fix, you can instruct your agent to use the useTranslation() hook to create a translate() function instead, as that returns a pure string rather than a React.ReactElement.
After your agent has finished replacing raw strings, run eslint --fix to generate translation IDs for every instance. After that, you can run a command to extract all instances of <Translation /> and translate() from code into a single JSON file. The FormatJS CLI has a built-in command that makes this very easy:
This results in a single extractions.json file that contains the defaultMessage and description text used in your code. Each grouping is keyed by a unique identifier that is a hash of the concatenation between the string and its description.
Translating strings
Now comes the fun part: once you have your string extractions, you can run them through an automated pipeline to generate translations in each of your supported languages. We wrote a script that iterates over each value of the extraction object, feeding defaultMessage and description into the user prompt to generate the translation in the desired locale. The end result is a JSON dictionary file per locale.
Choosing a model
We wanted to use a model capable of handling these features:
- Structured outputs. Knowing that the AI was guaranteed to respond with JSON that matched our provided schema helped avoid parsing issues.
- Prompt caching. The system prompt is long, and the same from request to request. It should be able to cache and reuse the system prompt, improving speed and decreasing cost.
- Deterministic results. We wanted to be able to provide a
seedvalue so that subsequent runs would generate the same result in order to avoid potential merge conflicts. - High rate limits. We wanted to run our translations concurrently so that new strings (or existing strings in new locales) could be generated without our engineers waiting around. A high rate limit ensured that we could blast tens of requests at once without hitting a limit.
Comparing various frontier models, we found that Claude Sonnet 4 met our needs.
Writing a system prompt
Not knowing exactly what to include in our system prompt, we used AI to generate the prompt itself:
This resulted in lots of specific tips useful for guiding the LLM in the right direction — things like prioritizing clarity and readability over word-for-word literal translation, adjusting idioms to sounds natural to the target audience, maintaining gender neutrality, and so forth. We hand-selected our favorite bullet points from the response to use in our system prompt.
We also added sections about AuthKit and WorkOS, so that the LLM would have additional context about the purpose of our product. This article from Victor Pontis gave us some pointers on how to structure the prompt so that results would improve over plain ChatGPT.
Once the prompt was created, we programmatically fed in values from the extractions.json file. We wrote a script that translated every string in a given locale, and saved the output as a JSON dictionary with matching translation IDs as keys.
Runtime translations
Sometimes, you don’t know the text ahead of time to be able to translate at build-time.
We encountered this in our branding editor: users are allowed to customize the heading text of their sign-in and sign-up pages. Because this text is customizable, there’s no way for us to know what these values are during the build.
We addressed this by creating a server action that translates user-supplied strings on-the-fly into every supported locale. The server action’s response is a Record<LocaleCode, string>. Rather than translate when the form is submitted, we start translating immediately after the form field is blurred, and introduce a CSS animation to add visual feedback that a translation is in progress.
To support this in the database, some fields needed to change from a string into a JSON blob. We introduced a new jsonb column, and dual-wrote into both columns while rolling out this feature. Then, we ran a migration to translate all old strings into the new format, ensuring that old values would be available in every language.
Testing translations
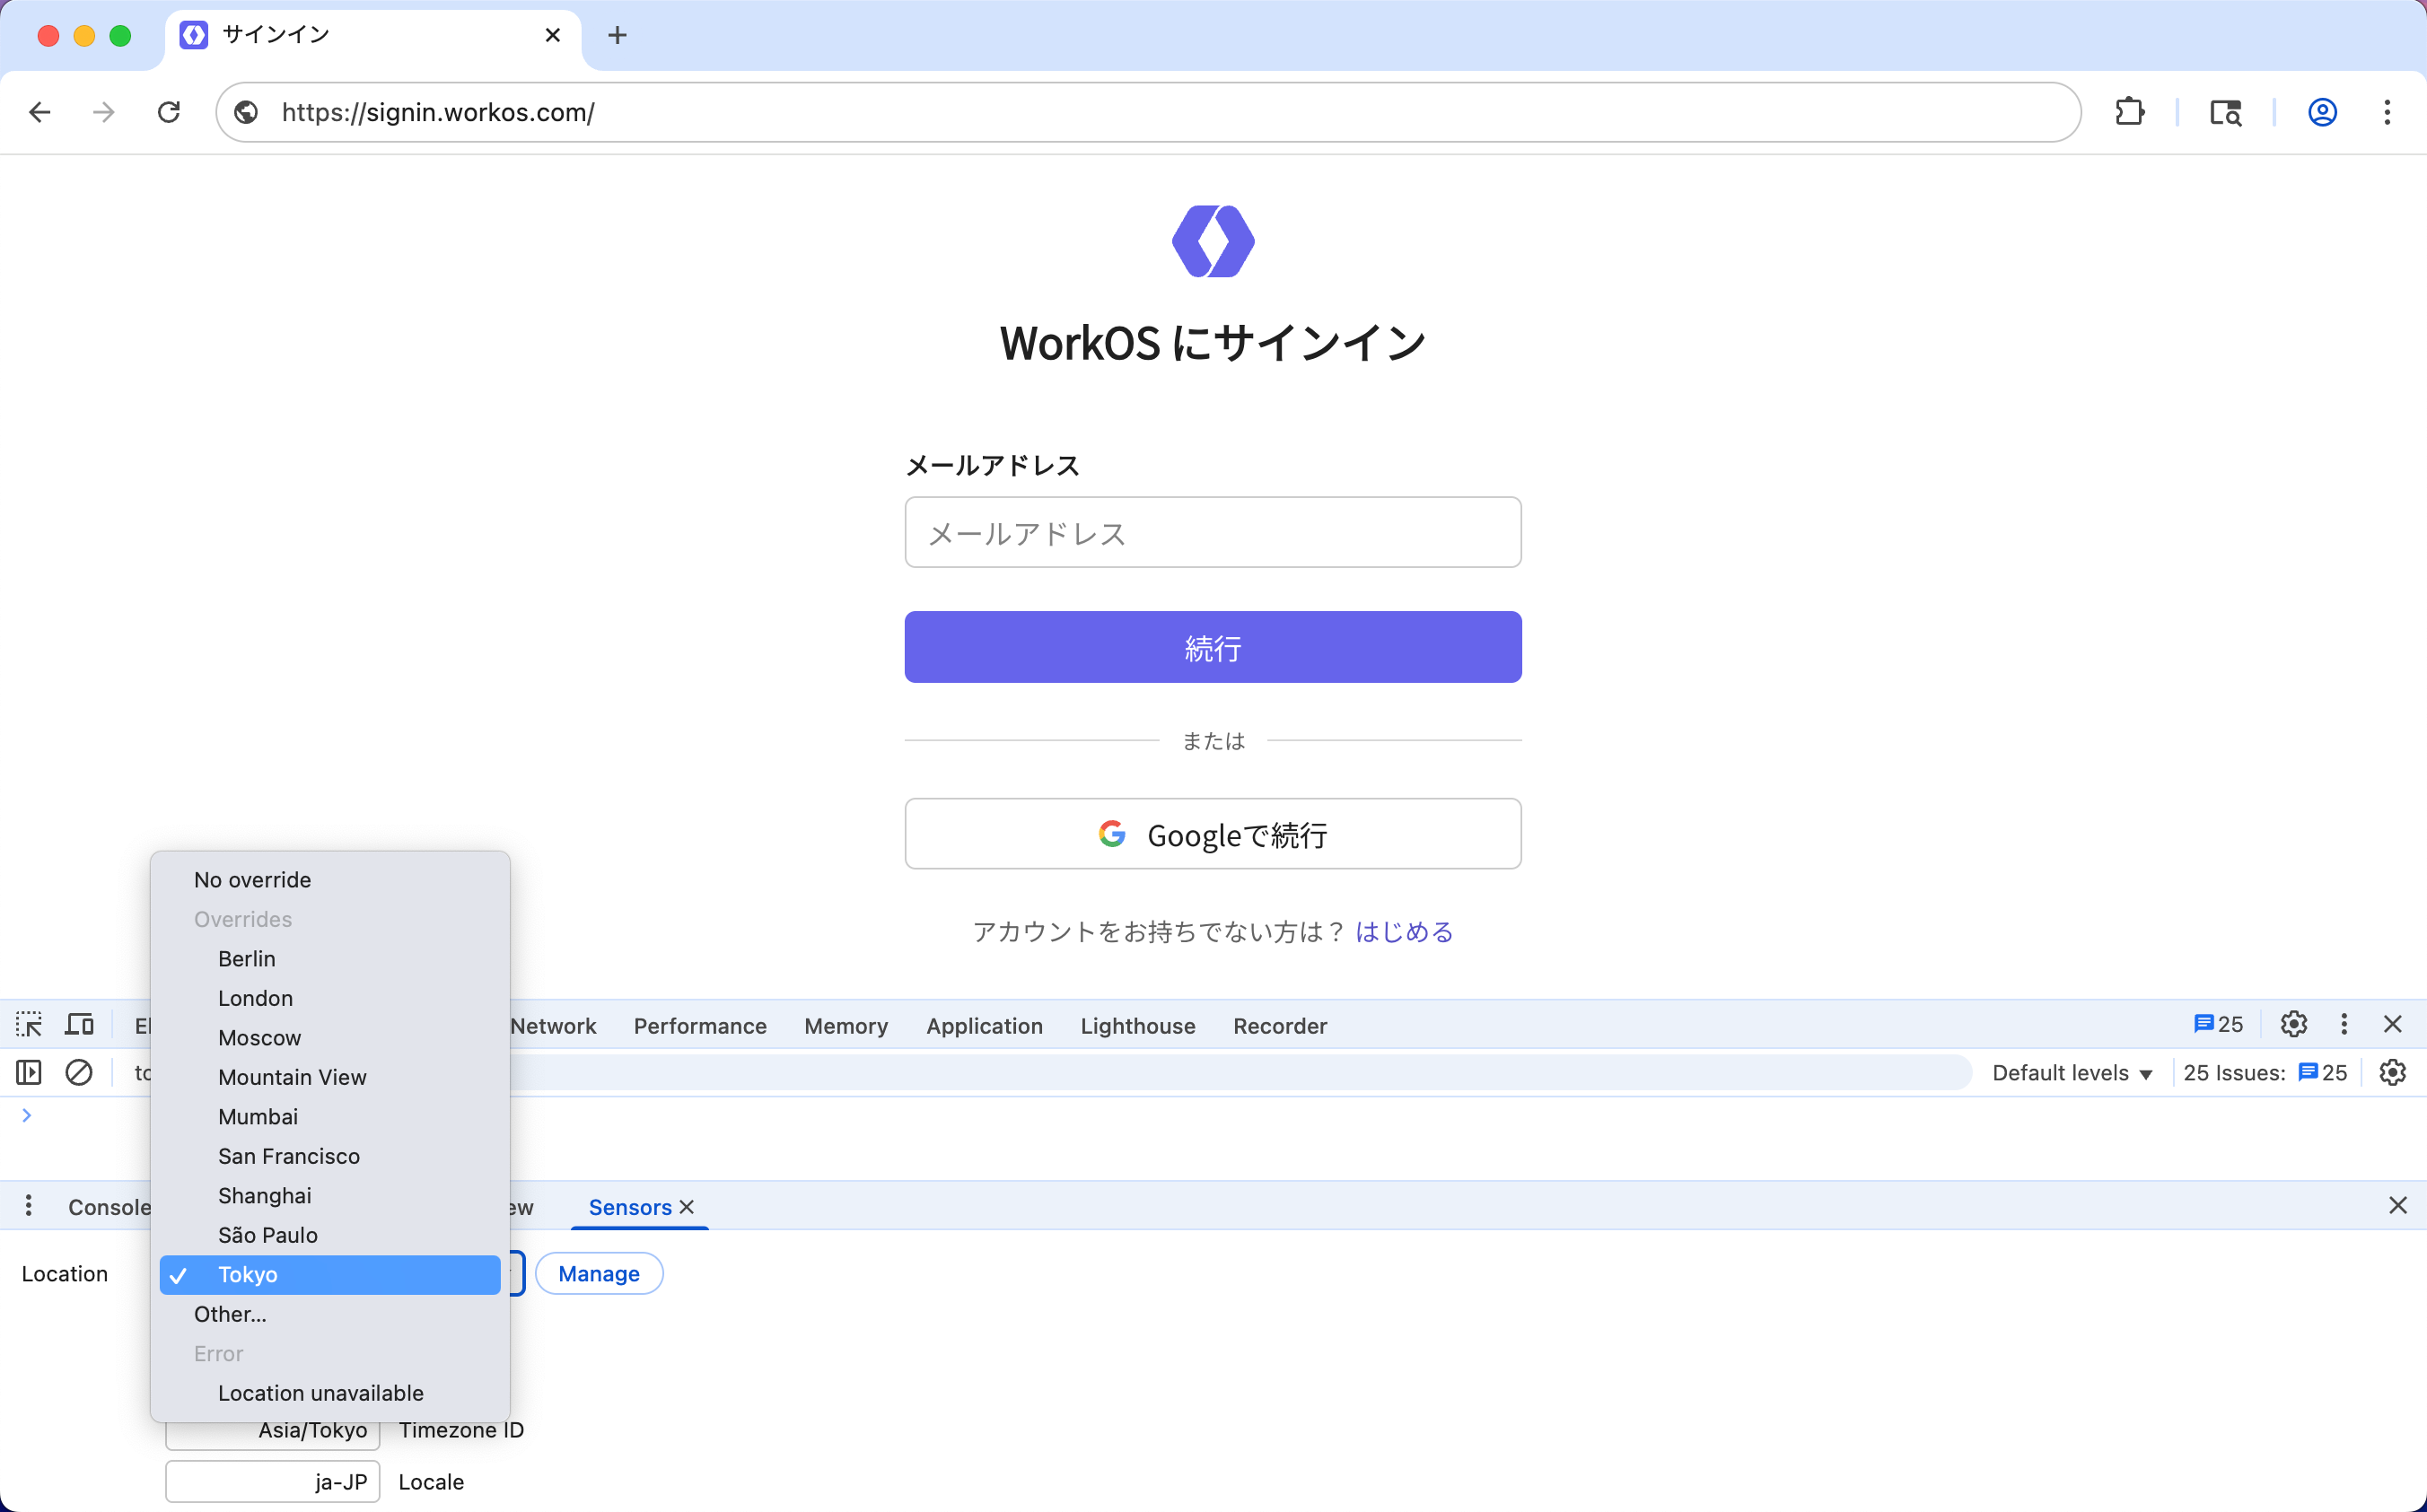
To test that localization is working end-to-end, you may be inclined to toggle your language preferences at the OS-level. That works, but is a rather cumbersome workflow: you’ll need to restart your browser every time you change your primary language in your system settings.
An easier way to test how multiple languages appear is to change your location presets within the Sensors tab of Chrome DevTools. These presets modify the actual accept-language request header that is sent with each request.
Internally, we built an app for previewing transactional email templates that get sent to end-users. We added a language picker to be able to preview what emails look like in each language.
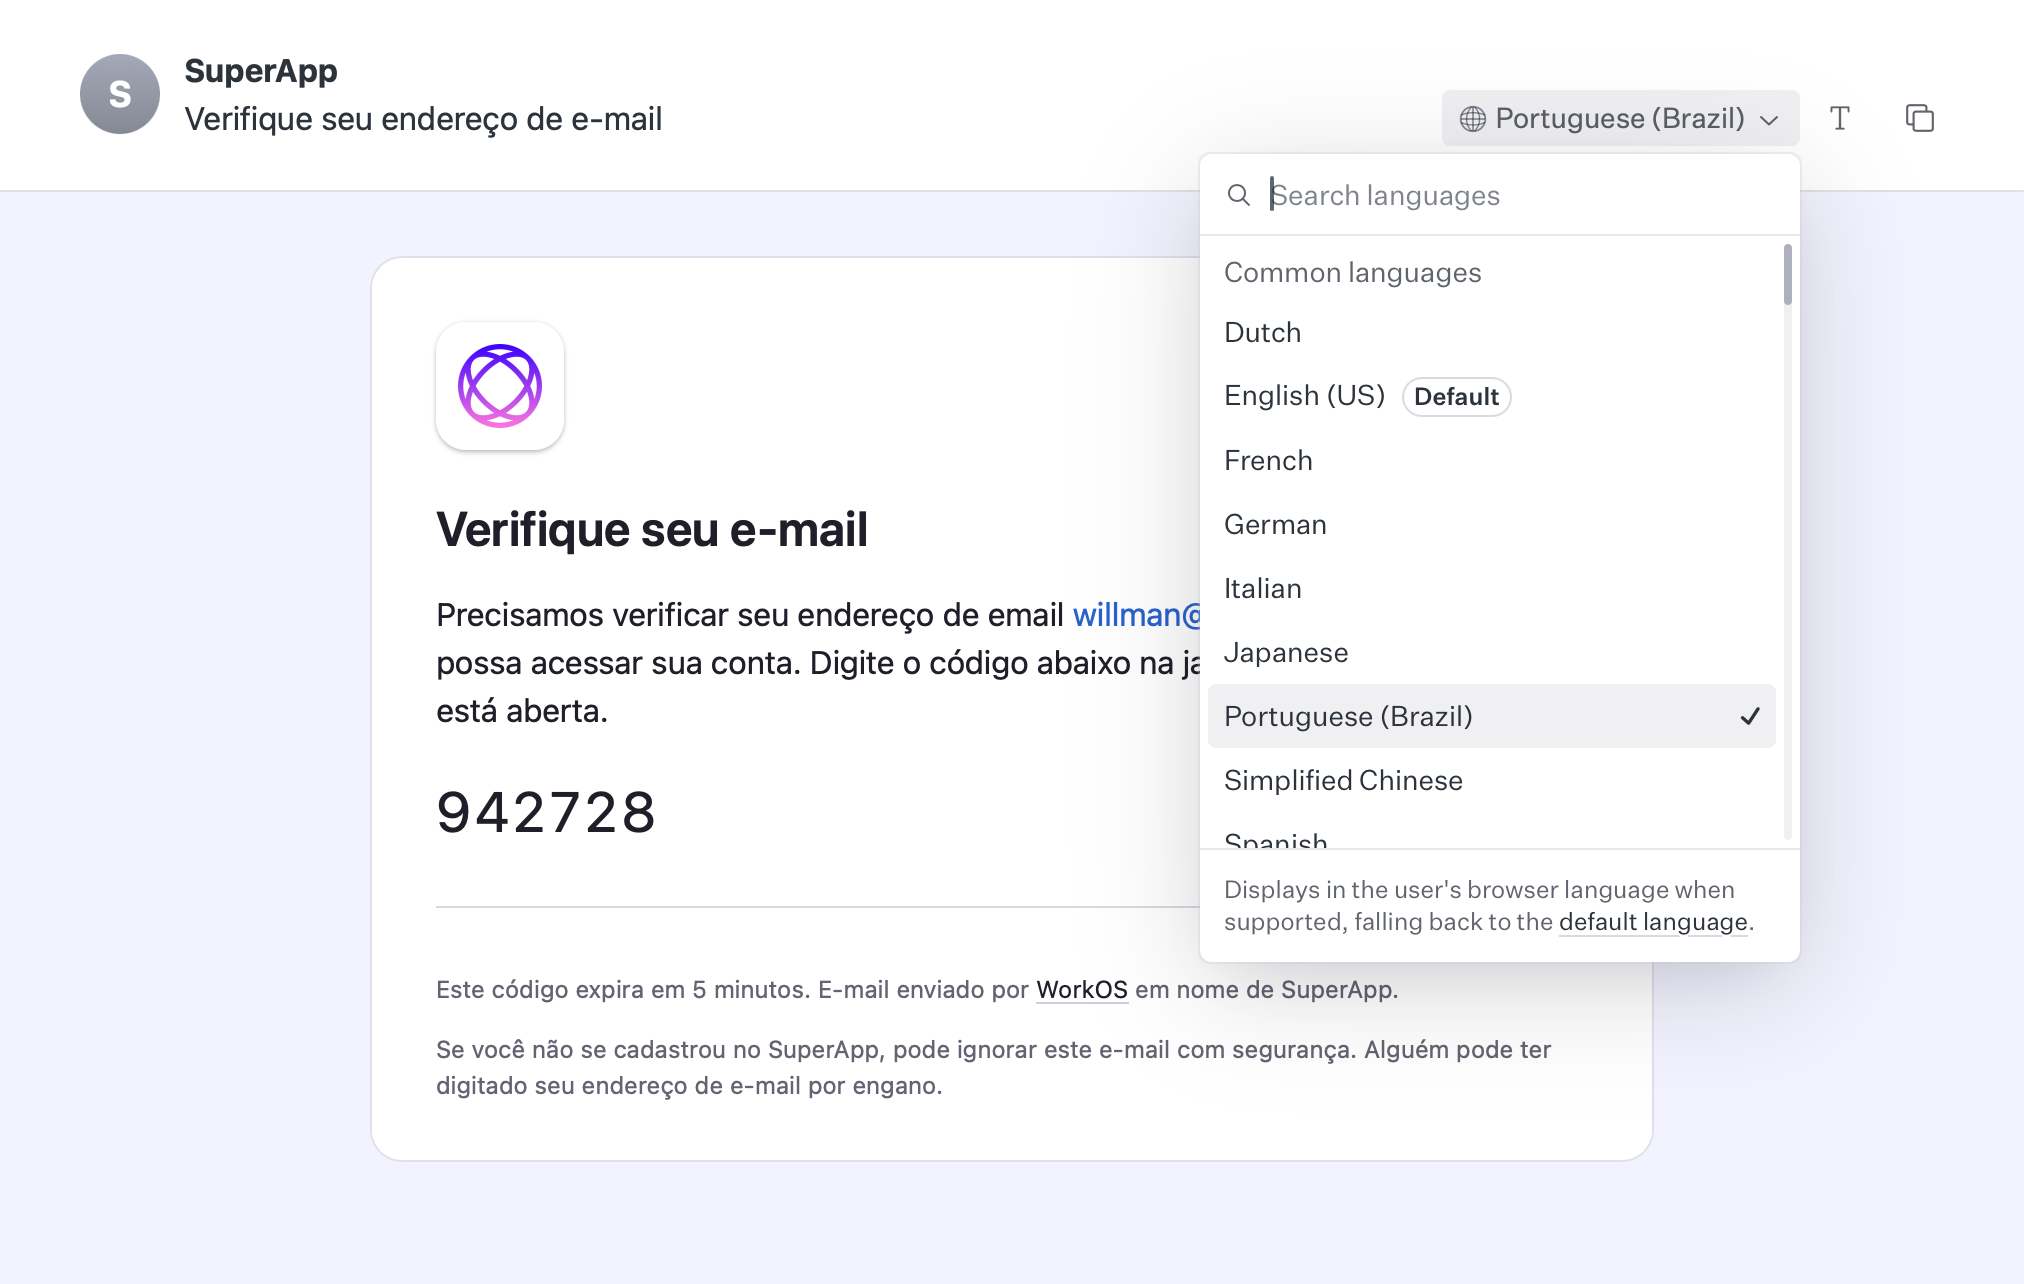
If you find a translation that is awkward or inaccurate, you can manually override it by changing the value in the given language’s JSON dictionary. All translations are checked-in to the repo, making it easy to change and version control.
Gotchas
There are a few things that might bite you if you don’t know what to look for.
Strings in default parameters
The eslint-plugin-formatjs plugin is great at finding strings used inside your React components. However, it’s not capable of pointing out strings that are used as the default prop of a component, or default parameter of a function.
Consider this component that implements an optional placeholder prop:
The default value of Password won’t get flagged by the eslint plugin, and will remain in English! To fix it, you must remove the default parameter, and place the fallback value inside the return statement.
Strings in browser tabs
In Next.js, you can export a metadata constant on page components to write <meta> tags on the page for things like displaying the window title. However, these values are static. You’ll need to replace instances of metadata with the generateMetadata function to dynamically render the window’s title in the correct language.
Chevron direction for right-to-left languages
Languages like Arabic, Hebrew, and Urdu read from right-to-left. Most of the time, you can simply set dir="rtl" on the <html> tag (or set direction: rtl; in CSS) for RTL languages, and the browser will reorient the text on the page automatically.
You’ll need to pay extra attention to chevron icons throughout your UI. Chevrons that point right in left-to-right languages should point left in right-to-left languages! If you don’t change this, then they will appear as backwards to your RTL users.

In our locale definitions, we specify whether the language is either ltr or rtl, and render different icons based on the reading direction of the language.
Fonts for non-Latin languages
When adding support for multiple languages, you may discover that your original font doesn’t hold up across alphabets. Many fonts lack full character coverage, resulting in tofu boxes or fallback fonts that cramp layout. A font that looks elegant in English can render awkwardly in Arabic, Chinese, or Cyrillic, making your product feel unpolished.
Try to use a font designed for multilingual use. That means choosing typefaces that support all required scripts, maintain visual consistency, and balance coverage. We chose the Google Noto family for displaying text in non-Latin-based languages because it combines broad language support with a consistent design.
Button overflows
Words that fit neatly inside a button in English might overflow or wrap awkwardly once translated. A short label like “Email” becomes “Correo electrónico” in Spanish, which is much longer. This can cause buttons to stretch wider than your layout allows, or cause text to wrap in multiple lines.
Detecting which labels may be problematic is easy now that your strings have been extracted into JSON. Write a script that compares the string length in your base language, and iterate over each translation file, using the translation ID to map values between languages. For any translations that are grossly longer than the original, ask an AI agent to re-translate into something more concise — since all translations are checked-in to the repo, it’s easy to manually override a given translation.
Conclusion
In practical terms, localization helps you reach and retain new audiences. Expanding internationally is largest untapped growth lever available. With LLMs, it’s never been easier to implement localization into your product.
A special thanks to the team for a truly global release! Check out our Localization documentation to learn more.