Ship a React SPA with AuthKit to production
Take a Vite and React app from localhost to production with httpOnly cookie refresh, a custom Authentication API domain, preview deployments, and a Node API that verifies every request.

Getting a React single page app (SPA) to sign users in on localhost takes about ten minutes with @workos-inc/authkit-react. Getting the same app to keep users signed in on production, in every browser, on preview deployments, and while it calls your own API takes more thought.
Most of the problems show up after launch, and they look like this:
- Users are signed out every few minutes in Safari or Firefox, but not in Chrome.
- Refresh requests fail with
Refresh token not foundand a SameSite warning in the console. - Login works on
mainbut fails on every Vercel preview. - The backend accepts any request that has a token in it, because nothing verifies the token.
This tutorial walks through the full path. You will build a Vite and React app that signs users in with AuthKit, calls an Express API with an access token, and verifies that token on the server. Then you will take it to production the right way.
What you will build
Prerequisites
- A WorkOS account
- Node.js 20 or later
- A domain you control for the production step
Want the fastest start? Run npx workos@latest integrate from your project root. The WorkOS CLI detects your framework, signs you in to WorkOS in the browser, installs the matching AuthKit SDK, adds the provider and callback code, and sets your redirect URI and CORS origins in the dashboard. That gets you to a working sign-in on localhost in a few minutes. This guide picks up where the CLI stops: verifying tokens in your own API, custom domains, preview deployments, and production settings. Steps 1 and 2 show what the CLI sets up, so you can follow them by hand or use them to review its changes.
How a client-only AuthKit session works
Before writing code, it helps to know where each token lives, because almost every production bug comes from this.
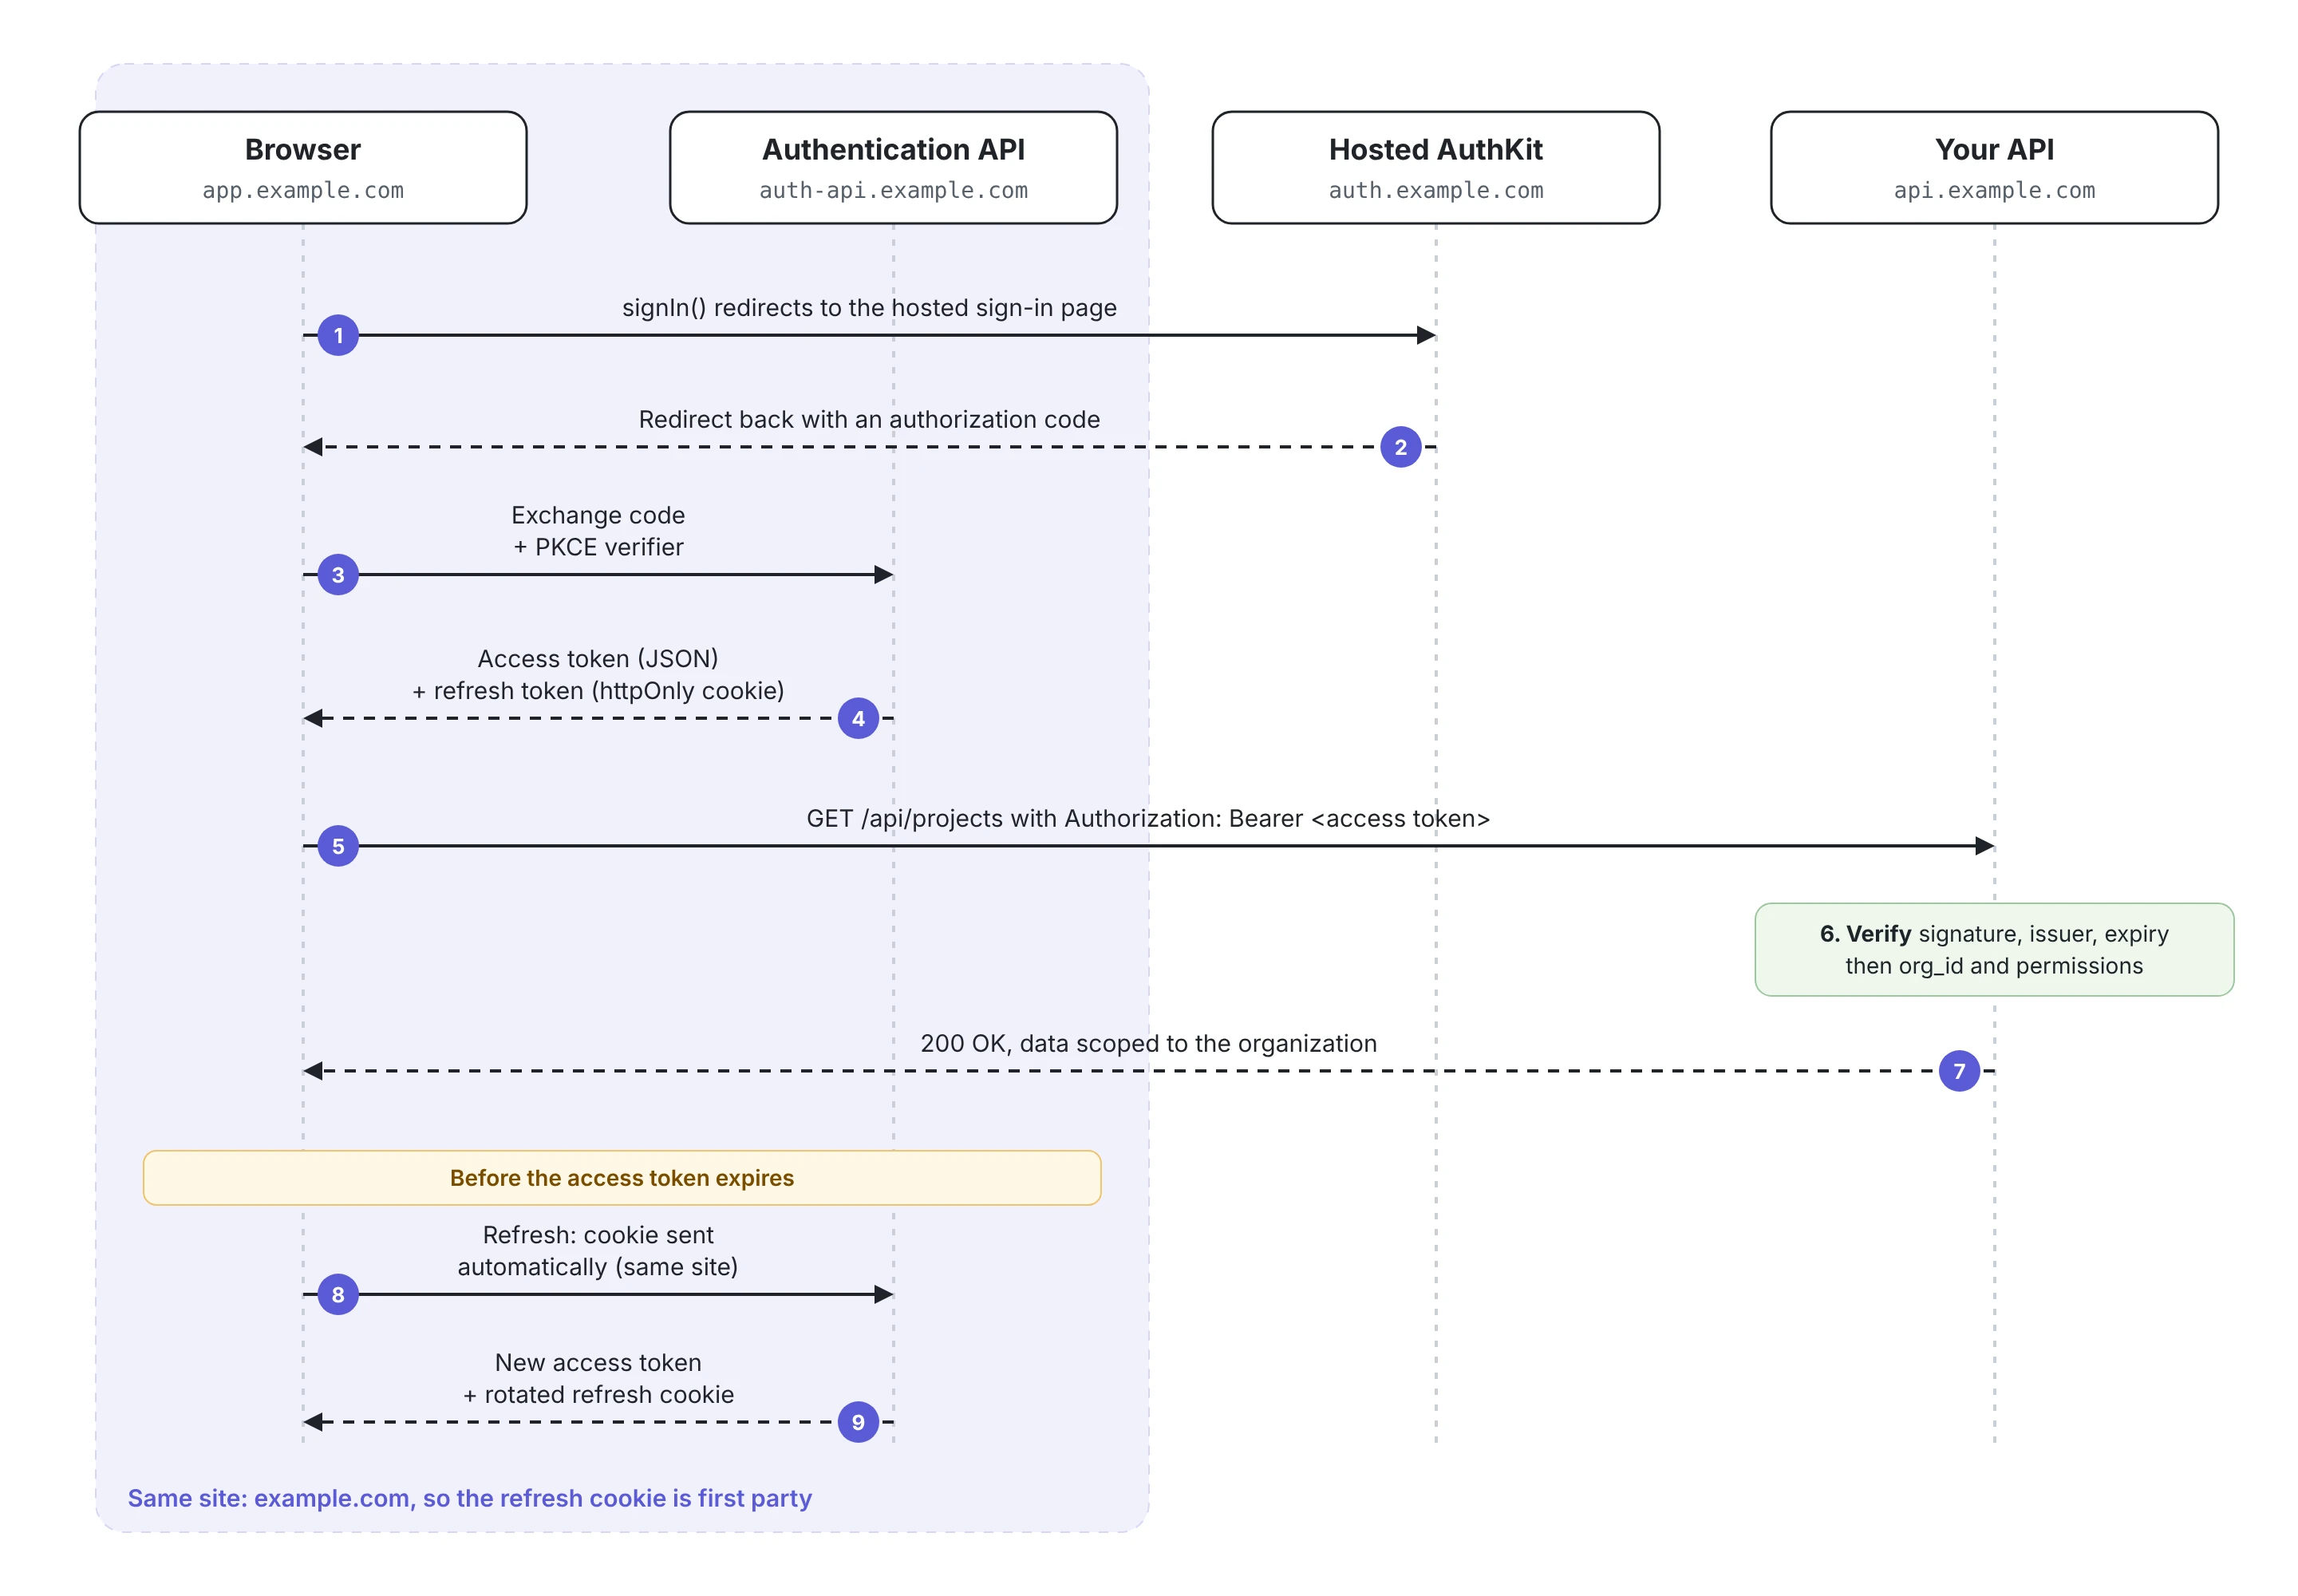
When a user signs in, the SDK runs the authorization code flow with PKCE directly from the browser. No client secret is involved, which is why this works in an SPA. The result is two tokens:
- Access token: a short-lived JWT. Your frontend sends it to your API, and your API verifies it.
- Refresh token: a long-lived credential used to get new access tokens. Where it is stored depends on one setting,
devMode.
The second column is what you want in production. An httpOnly cookie cannot be read by injected scripts, so a cross-site scripting bug in your app does not hand an attacker a long-lived refresh token.
The catch is that browsers only send that cookie when the Authentication API and your app are on the same site. That requirement drives most of the setup in this guide.
Step 1: Configure the WorkOS dashboard for local development
In the WorkOS dashboard, select your staging environment and set up the following.
- Redirect URI: add
http://localhost:5173/callback. Staging environments allowhttpandlocalhost. - Sign-in endpoint (Initiate login URI): add
http://localhost:5173/login. AuthKit sends users here when a sign-in does not start in your app, for example from a bookmarked sign-in page. - Sign-out redirect: add
http://localhost:5173. Without one,signOut()returns an error. - Allowed web origins (CORS): add
http://localhost:5173. The browser calls the WorkOS API directly, so it needs to be allowed.
Copy your Client ID. You will not need an API key anywhere in the frontend.
Using the CLI instead
If you prefer, the CLI can do most of steps 1 and 2 for you. Vite serves on port 5173, while the CLI defaults to a redirect URI on port 3000, so pass yours explicitly:
Review the result with git diff before you commit. Two things to check in a client-only app:
- No secrets in the bundle. The CLI saves keys to
.env.local. Vite exposes every variable that starts withVITE_to the browser, so only the Client ID should carry that prefix. Your WorkOS API key must never appear in frontend code. In this architecture, only the backend would ever need one, and the API in step 4 does not. - Dashboard settings it does not cover. Add the sign-in endpoint and sign-out redirect from the list above if they are not already set.
Step 2: Add AuthKit to the React app
Create the app and install the SDK.
Add your environment variables to .env.local.
Wrap the app in AuthKitProvider.
Two details matter here:
- No
devModeprop. The SDK turnsdevModeon automatically onlocalhostand127.0.0.1, so local development works without a custom domain. You will set it explicitly only for deployed staging environments (step 5). onRefreshFailure. If a refresh fails, for example because the session was revoked, the user is sent back to sign in instead of being left with a broken page.
Now use the useAuth hook to sign users in and out.
Run npm run dev, open http://localhost:5173, and sign in. You should see your email, and the user should appear under Users in the dashboard.
!!Validate redirects. If you pass a returnTo value through signIn({ state }), check it against your own origin before navigating to it. The state value is not integrity-protected.!!
Step 3: Call your API with the access token
The frontend should never cache the access token in a variable or in storage of its own. Ask the SDK for it right before each request. getAccessToken() returns the current token, or refreshes it first if it has expired.
Getting a fresh token on every call also fixes a subtle bug in long-lived tabs. Browsers throttle timers in background tabs, so a scheduled refresh can run late. A token fetched at request time is always valid, no matter how long the tab sat in the background.
Step 4: Verify the token in a Node API
Every request to your API must be verified on the server. The role and permissions values from useAuth() are useful for showing or hiding buttons, but they are not a security boundary. Anyone can call your API directly.
Create the API.
AuthKit access tokens are JWTs signed with keys published at a JWKS endpoint for your client. The middleware below checks the signature, issuer and expiry, then exposes the claims your routes need.
By default, the iss claim in AuthKit access tokens is https://api.workos.com/. When you configure a custom Authentication API domain (step 5), the issuer becomes that domain instead. That is why the middleware builds both the issuer and the JWKS URL from WORKOS_API_HOSTNAME: leave it unset locally, and set it to your custom domain in production. If the two do not match, jwtVerify rejects every token with an issuer error. See Sessions for the full list of claims.
Now use it. Scope every query to the organization in the token, not to an organization ID sent by the client.
Because the API uses an Authorization header instead of cookies, it does not need to share a site with WorkOS, and you do not need CSRF protection for these routes. The only cookie in this design is the refresh cookie, and only the Authentication API reads it.
Step 5: Set up custom domains for production
This is the step that most teams get wrong. WorkOS offers four custom domains, they do different jobs, and only one of them is required for cookie refresh to work.
A few rules apply to all of them:
- Production only. Staging environments always use WorkOS domains.
- Paid add-on. Check pricing before you plan around them.
- One team per domain. A custom domain can only be configured by one WorkOS team at a time.
- Same setup flow. Each one is a CNAME (three for email) that you add at your DNS provider. On Cloudflare, set them to DNS only, not proxied.
The rest of this step focuses on the Authentication API domain, because it is the one that decides whether refresh works. There are three hostnames involved and they are easy to mix up.
The value you pass to apiHostname is the Authentication API domain, not the hosted AuthKit domain. Setting apiHostname to auth.example.com is a common mistake.
The rule that makes cookie refresh work is simple: the Authentication API domain must be on the same site as your app. auth-api.example.com and app.example.com share example.com, so the browser treats the refresh cookie as first party and sends it. If your app is on app.example.com and your Authentication API is on auth.example-labs.com, the cookie is third party, and browsers that block third-party cookies will drop it. That shows up as Refresh token not found and a SameSite warning.
To set up the Authentication API domain:
- Select your production environment and open Domains.
- Click Configure authentication API domain and enter
auth-api.example.com. - Add the CNAME record the dashboard shows at your DNS provider. On Cloudflare, set it to DNS only, not proxied.
- Wait for verification. WorkOS keeps checking for up to 72 hours.
- Set
VITE_WORKOS_API_HOSTNAME=auth-api.example.comin the frontend andWORKOS_API_HOSTNAME=auth-api.example.comin the API.
Once the domain is verified, route all Authentication API traffic through it. Mixing it with api.workos.com causes cookie and issuer mismatches.
Then add the production versions of everything from step 1: the https://app.example.com/callback redirect URI, the sign-in endpoint, the sign-out redirect, and https://app.example.com as an allowed web origin. Production does not accept http or localhost redirect URIs.
Step 6: Staging and preview deployments
Custom domains are only available in production environments. That leaves two common cases.
Deployed staging on a sandbox environment. Without a custom domain, the refresh cookie would come from api.workos.com, which is cross site. Turn on devMode explicitly for that build so the refresh token goes to localStorage instead.
Refresh still works the same way, with the same access token lifetime. The only difference from production is where the refresh token lives. If you need staging to behave exactly like production, use a separate production-type environment with its own domain, such as auth-api.staging-example.com.
Preview deployments that use production keys. Preview URLs like my-app-git-feature.vercel.app are a problem for three reasons:
vercel.appis a public suffix, so the preview is never on the same site as your Authentication API.- Wildcard redirect URIs cannot be used with public suffix domains.
- Production keys plus
devModemeans production refresh tokens inlocalStorage.
The cleanest fix is to serve previews from a subdomain you own, for example *.preview.example.com, if your host supports it. Then:
- Cookie refresh works without
devMode, because previews shareexample.com. - One wildcard redirect URI covers every preview:
https://*.preview.example.com/callback. - One wildcard allowed web origin covers them too:
https://*.preview.example.com.
Step 7: Handle refresh in real conditions
A few settings decide how the app behaves when the network or the session changes.
onRefreshFailure: already set in step 2. Send the user to sign in, and consider saving unsent form data first.onRefresh: runs after each successful refresh. It is a good place for lightweight logging, so you can see refresh activity per user and organization when you debug.refreshBufferInterval: how many seconds before expiry the SDK refreshes. Raise it if your users are often on slow networks.- Always call
getAccessToken()per request, as in step 3, instead of reading a token you stored earlier.
On the server, keep access tokens short. You set their lifetime in the dashboard under Sessions. A short lifetime means a revoked session stops working on your API within minutes, without your API having to call WorkOS on every request.
Production checklist
Before you launch, check each item.
- The Authentication API custom domain is verified, and it shares a registrable domain with your app.
-
apiHostnamepoints to the Authentication API domain, not the hosted AuthKit domain. -
devModeis off in production builds. - Production redirect URI, sign-in endpoint, sign-out redirect and allowed web origins all use
httpsand your real domain. - Your API verifies signature, issuer and expiry on every request.
- Every data query is scoped to
org_idfrom the token, never to an ID sent by the client. - Permission checks happen on the server, not only in the UI.
- Any
returnTovalue is checked against your own origin. - Preview deployments either use your own subdomain or a separate environment.
-
onRefreshFailuresends users back to sign in.
Wrapping up
The client-only SDKs make sign-in in a React SPA quick. What takes care is the production path: an Authentication API domain on the same site as your app, so the refresh token can live in an httpOnly cookie, and an API that verifies every token instead of trusting the frontend.
From here, you can:
- Add organizations, roles and permissions with AuthKit roles and permissions.
- Let users switch organizations with
switchToOrganization()fromuseAuth(). - Read the client-only reference and the
authkit-reactSDK docs.