Let your customer's IT admin manage team members inside your app
Drop the WorkOS UsersManagement widget into your B2B app so your customers' own IT admins can invite members, remove them, and change roles without a ticket.

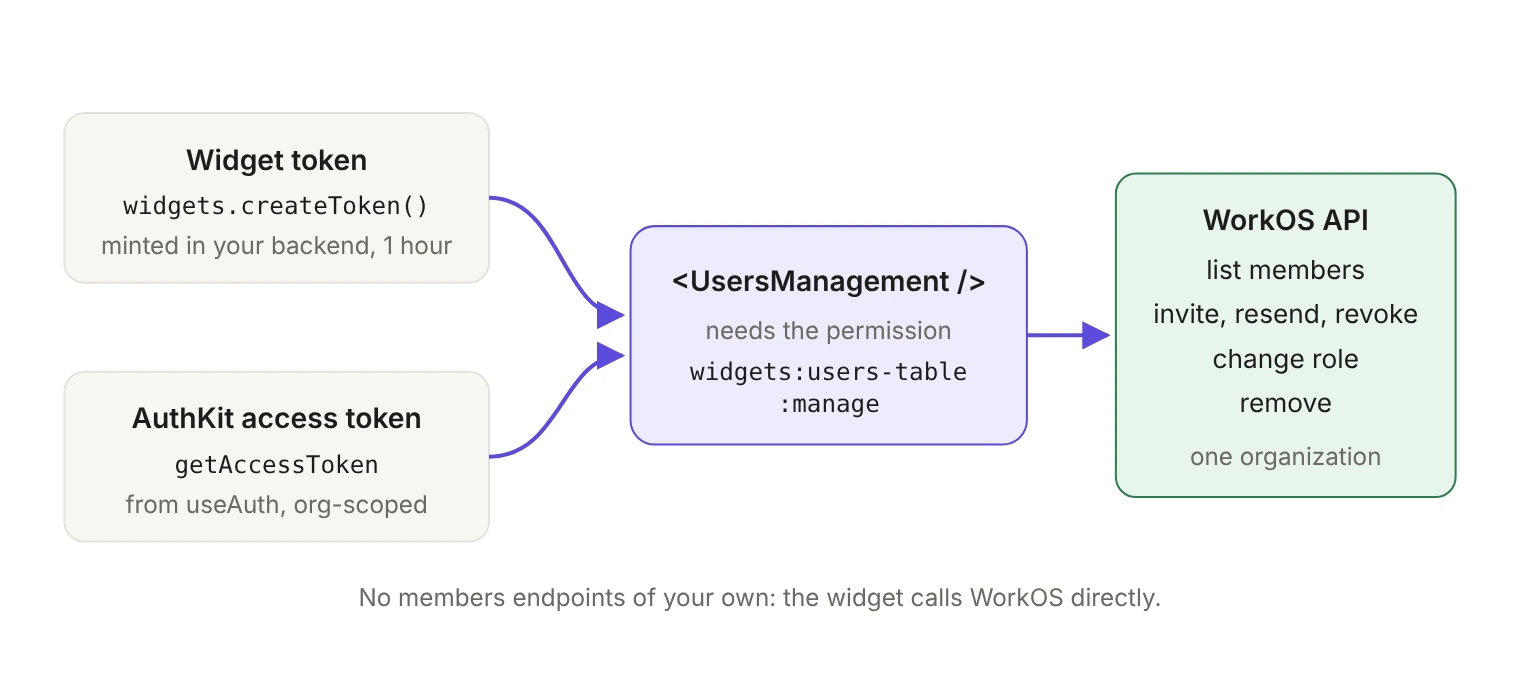
The <UsersManagement /> widget is a React component that renders a complete members page for a single organization. Your customer's IT admin uses it to invite people, remove them and change their roles, and the component talks straight to the WorkOS API instead of to endpoints you have to build. Inside the WorkOsWidgets provider, you give it one prop: an authorization token.
Every B2B app grows a Team page eventually. A customer buys seats, someone leaves, a contractor needs access for six weeks, someone's title changes. Until there is a page for it, every one of those lands on an engineer who has better things to do than flip a role by hand.
What can your customer's admin actually do?
The widget covers the membership lifecycle for one organization: list the people who have access, invite new ones, resend or revoke an invitation that hasn't been accepted, change someone's role, and remove someone entirely. It also lets the admin filter the list by role, which matters once an organization has more members than fit on one screen.
That list is the surface the component gives you. Plan the page around those single-member actions, and keep anything else your product needs in your own UI next to the widget.
Which permission opens the page?
Access is gated on a single permission: widgets:users-table:manage. A role is a named group of permissions, assigned to a user through their organization membership, and a permission can belong to any number of roles.
Add the permission to whichever role your customers' admins hold. Roles and permissions live in their own section of the WorkOS Dashboard, and you assign permissions when you create a role or edit an existing one. Then confirm the role you expect your admins to have actually carries widgets:users-table:manage; don't assume it's there because the role is called Admin. Each environment also starts with a default member role that every organization member gets automatically, and that's usually the role you don't want holding this permission.
Two things are worth knowing before you wire it up.
First, the permission is all or nothing. Anyone who can invite a member through the widget can also remove one. If your product needs an invite-only tier of admin, the widget's permission model won't express that for you.
Second, the permission is checked when the widget uses the token, not when your backend creates it. A token request that succeeds isn't proof that the user can manage members, so test the rendered page with a real low-privilege role rather than trusting a 200 from the token call.
Role changes made in the widget show up afterwards as organization_membership.updated events, which you can filter for on the Events page of the Dashboard.
How do you mint a widget token in your backend?
The first way to authorize the widget is a dedicated widget token, created server side and passed down to the component as a string.
In the WorkOS Node SDK the method is createToken. It posts to POST /widgets/token and returns a token scoped to one organization and, optionally, one user, carrying the scopes you ask for. organizationId is required; userId and scopes are optional.
Pass that string into the component:
Widget tokens expire after one hour. For a server-rendered page that's usually fine, since the token is minted on each request. For a long-lived single page app, decide up front how you'll hand the browser a fresh one before the old token runs out.
Older versions of the Node SDK (8 and earlier) called this method getToken. Since version 9 it's createToken.
How do you reuse the signed-in user's AuthKit access token?
If the page is already behind AuthKit, you don't need a second token at all. The widget accepts the access token your session already has.
With @workos-inc/authkit-react, pull getAccessToken out of useAuth and hand the function itself to the widget, not the resolved string:
useAuth comes from the AuthKit React package, not from the widgets package.
The access token has to be scoped to the organization whose members are on screen, and it has to carry the permission. Both come from the session itself: an AuthKit access token includes an org_id claim for the organization selected at sign-in, a role claim for that organization membership, and a permissions claim holding the permissions assigned to the role. If your app lets a user belong to several organizations, switching between them means getting a new access token with the refresh token and the organization_id parameter, which resets org_id, role and permissions to that membership.
One consequence of short access token lifetimes: a permission you grant in the Dashboard reaches the widget only once the user has a token that carries it. WorkOS recommends keeping access token duration short so session changes show up quickly.
Which option fits your app?
What do you set up once?
Install @workos-inc/widgets along with its peer dependencies. Widgets use Radix Themes for UI and style customization and TanStack Query for data fetching and caching; both are peer dependencies so you don't end up with two copies in your bundle. Render WorkOsWidgets near the top of your tree, since it provides the data-fetching context and theme styles every widget relies on.
Then add your site as an allowed web origin. Open your application on the Applications page of the WorkOS Dashboard and configure CORS on the Sessions tab. The widget calls the WorkOS API from the browser, so without this step the browser blocks those requests and the widget can't load your customer's members. It's a one-time step per environment.
Widgets run in client-rendered and server-rendered React apps, and the widgets-examples repo has working integrations for Next.js, React Router, and a Vite single page app. Styling is covered in the styling guide.
What about members who came from a directory?
If your customer provisions people through Directory Sync, those memberships are linked to directory users and carry directory_managed: true, with roles that follow the directory group role assignments.
Your customer's admin can still change those members' roles in the widget. Removal is different: a directory-provisioned member is removed in the customer's identity provider, not in the widget. When the IT admin deprovisions someone there, WorkOS deactivates their organization membership and they can no longer sign in to it. Re-provisioning the same person reactivates the membership with its previous role.
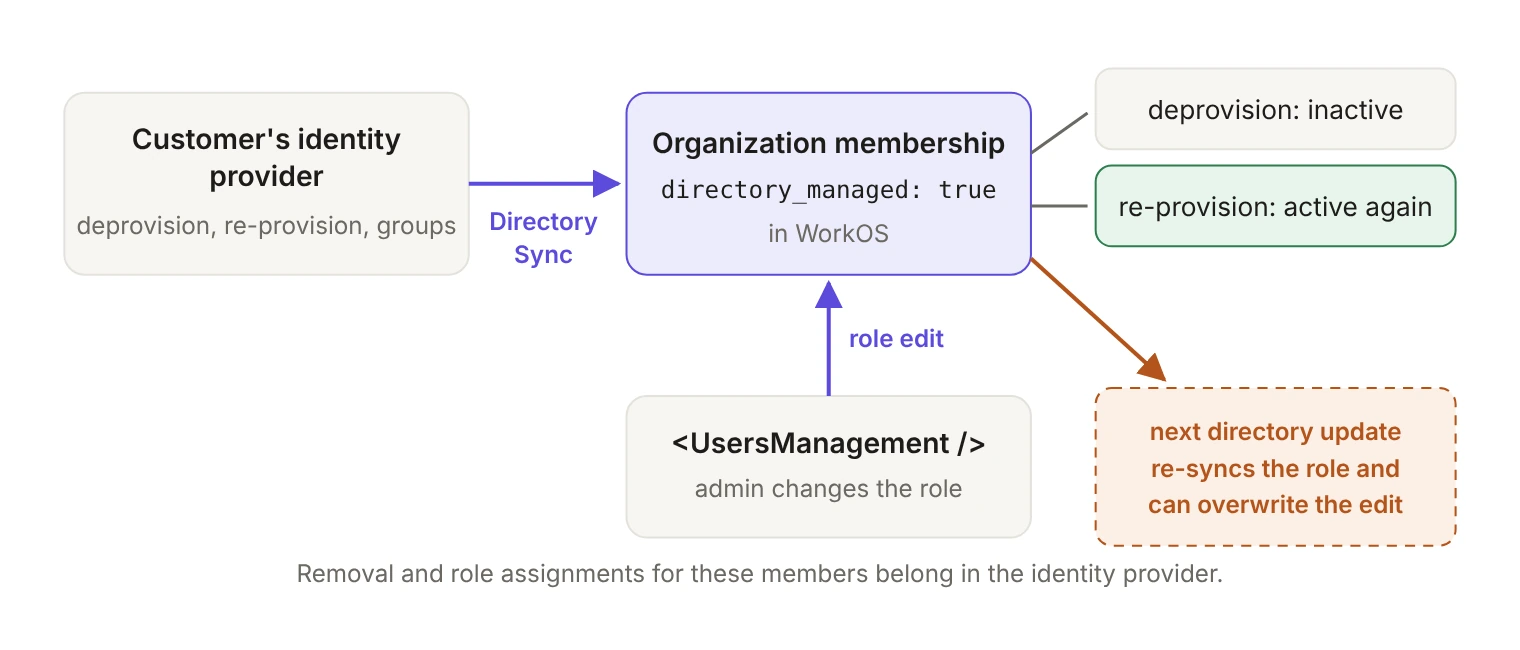
Two follow-on effects are worth passing along to whoever supports your customers. For users whose email domain matches one of the organization's verified domains, the directory is the authority: its updates override changes made through SSO, the API, or the Dashboard. And when a directory user's information is updated, the membership role is re-synced to match the identity provider's role assignment.
So a role set by hand in the widget can be overwritten the next time the directory syncs that user. For organizations that assign roles from their identity provider, put a note next to the widget telling admins to change roles in the identity provider instead, rather than letting someone make a change that silently reverts.
Where do you go from here?
This component covers one organization's members, gated by one permission. That's most of what a Team settings page needs, and none of it is code you have to maintain.
If you'd rather build the same functionality against the API, or want to see the widget next to a hand-rolled version, our earlier walkthrough covers both paths in Node: How to build a user management dashboard with WorkOS and Node.