WorkOS Widgets
Learn how to integrate WorkOS Widgets in your app.
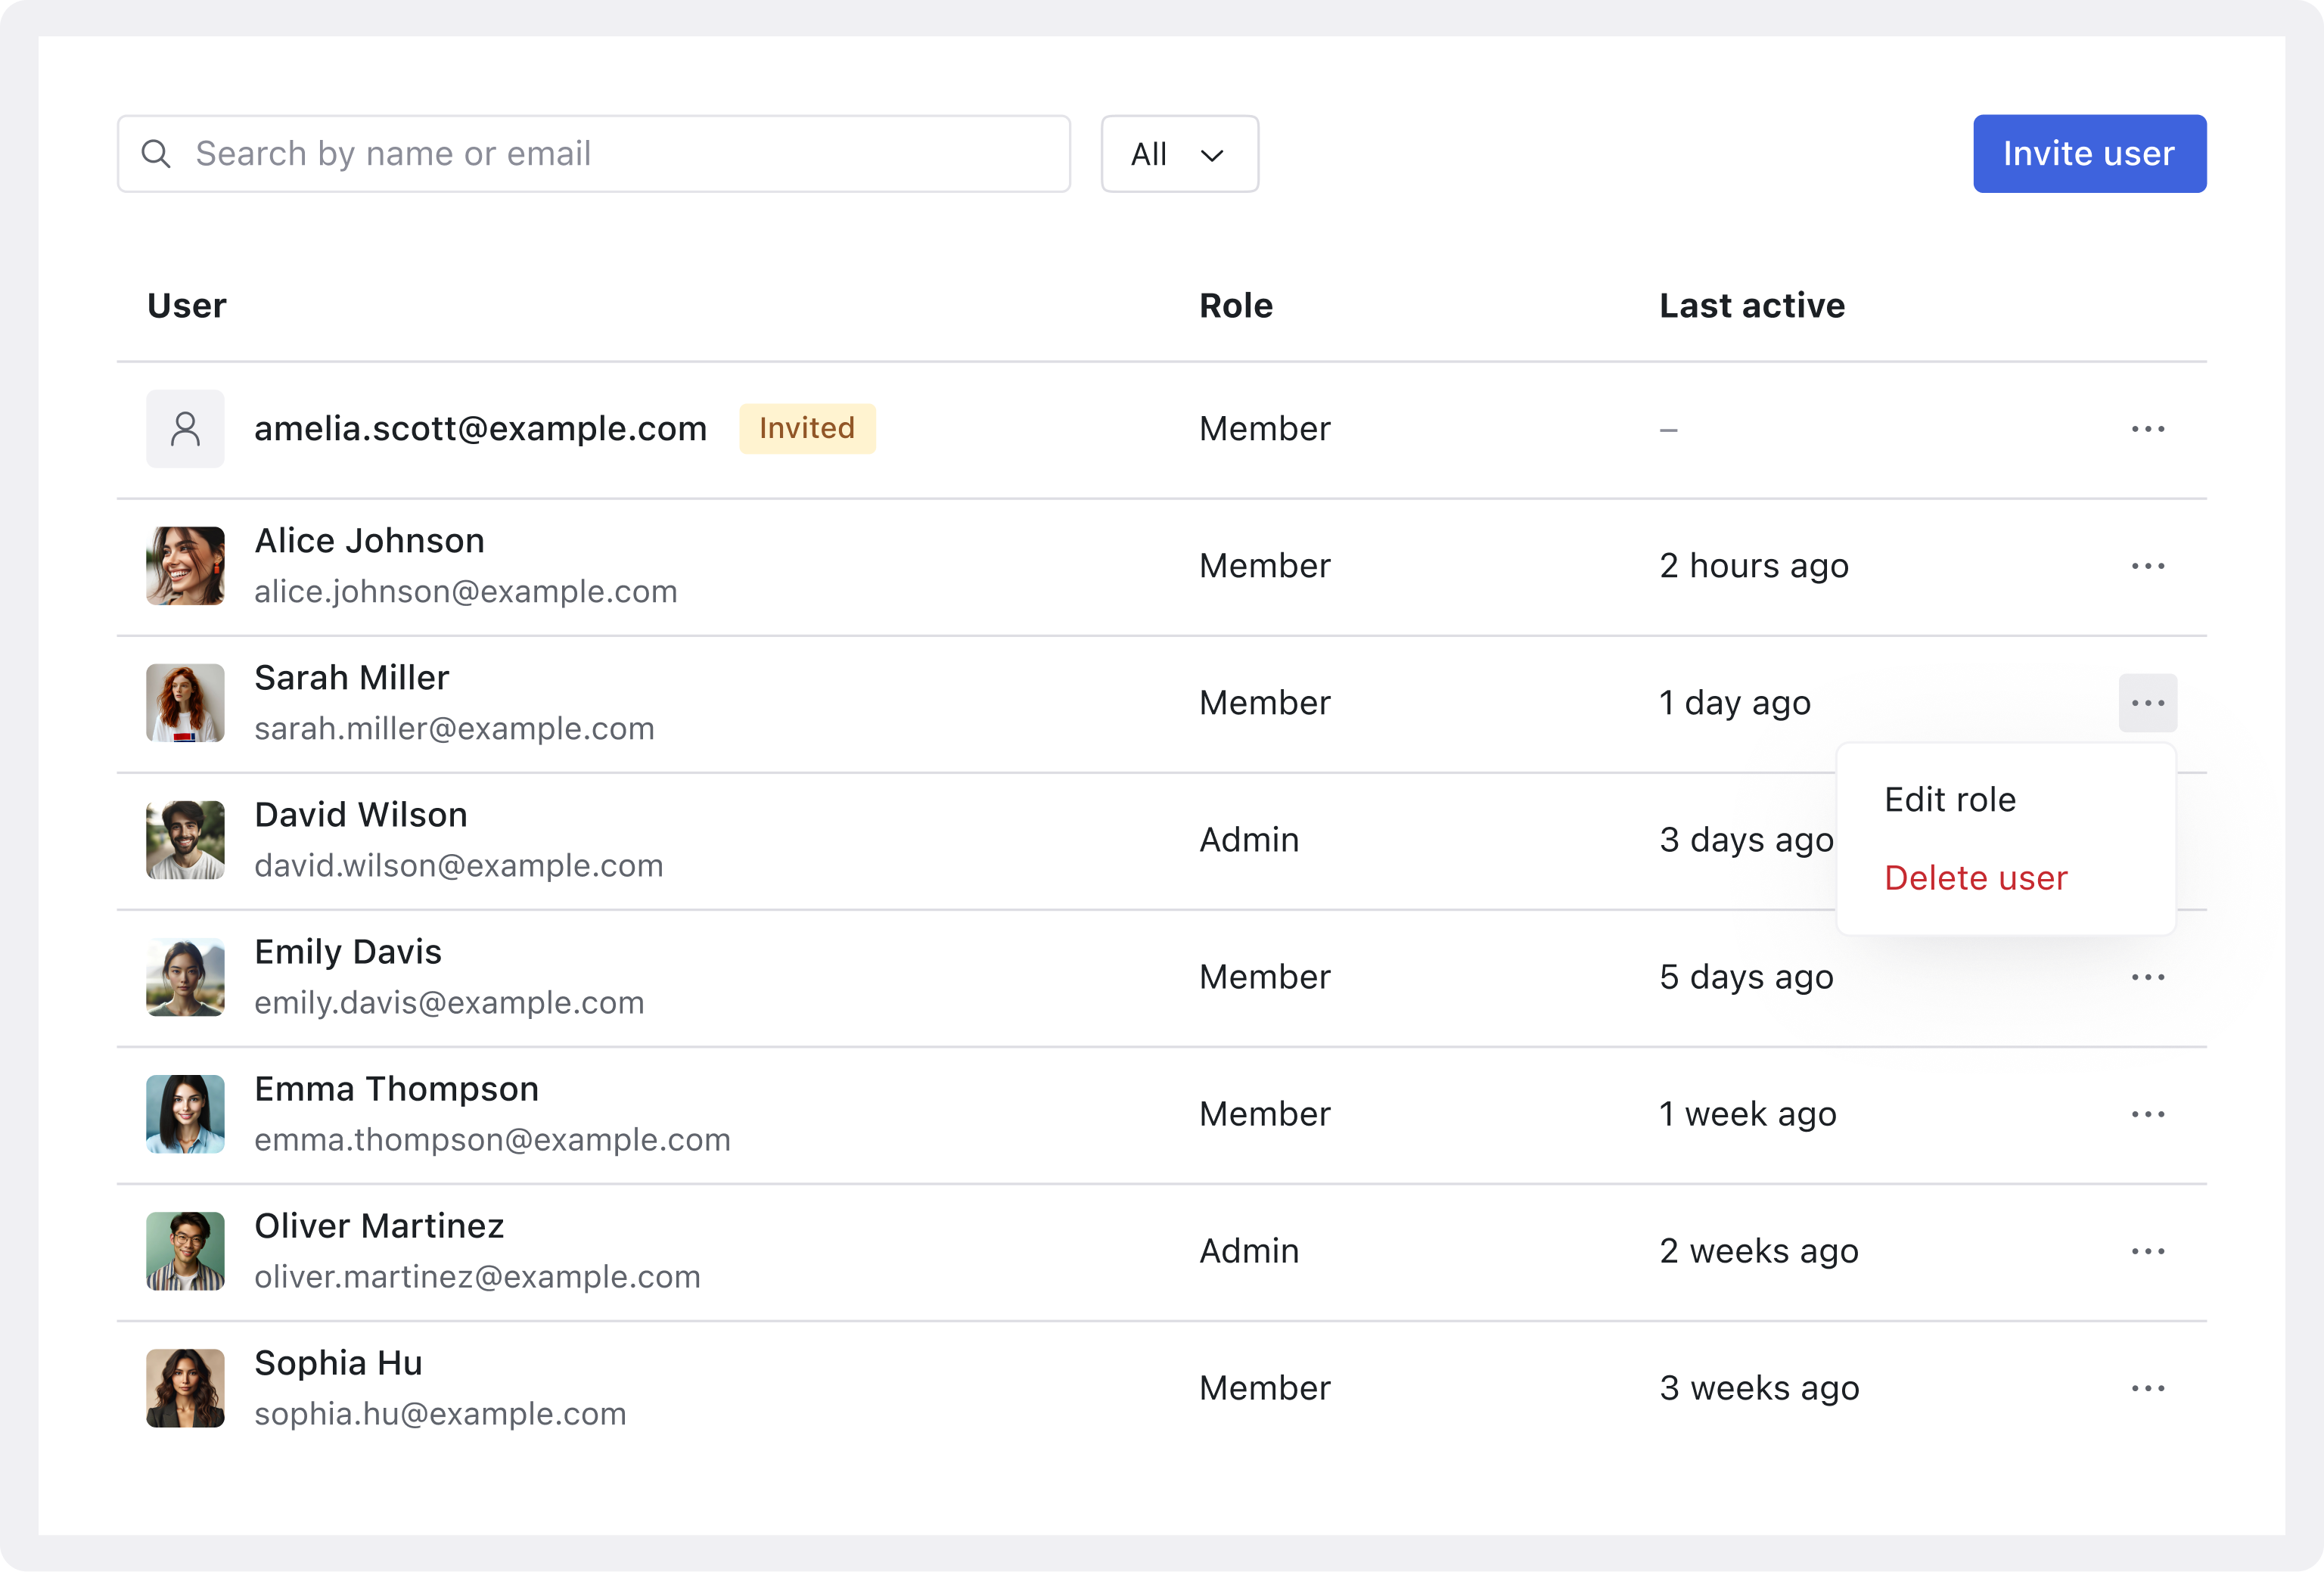
WorkOS Widgets are React components that provide complete functionality for common enterprise app workflows, for example a Users Management Widget that provides a UI for inviting, removing and editing users.
This guide will cover how to add a widget to your app, configure CORS, and supply an authorization token for the widget.
First, install the @workos-inc/widgets package from the npm registry, along with its peer dependencies:
npm install @workos-inc/widgets @radix-ui/themes @tanstack/react-query
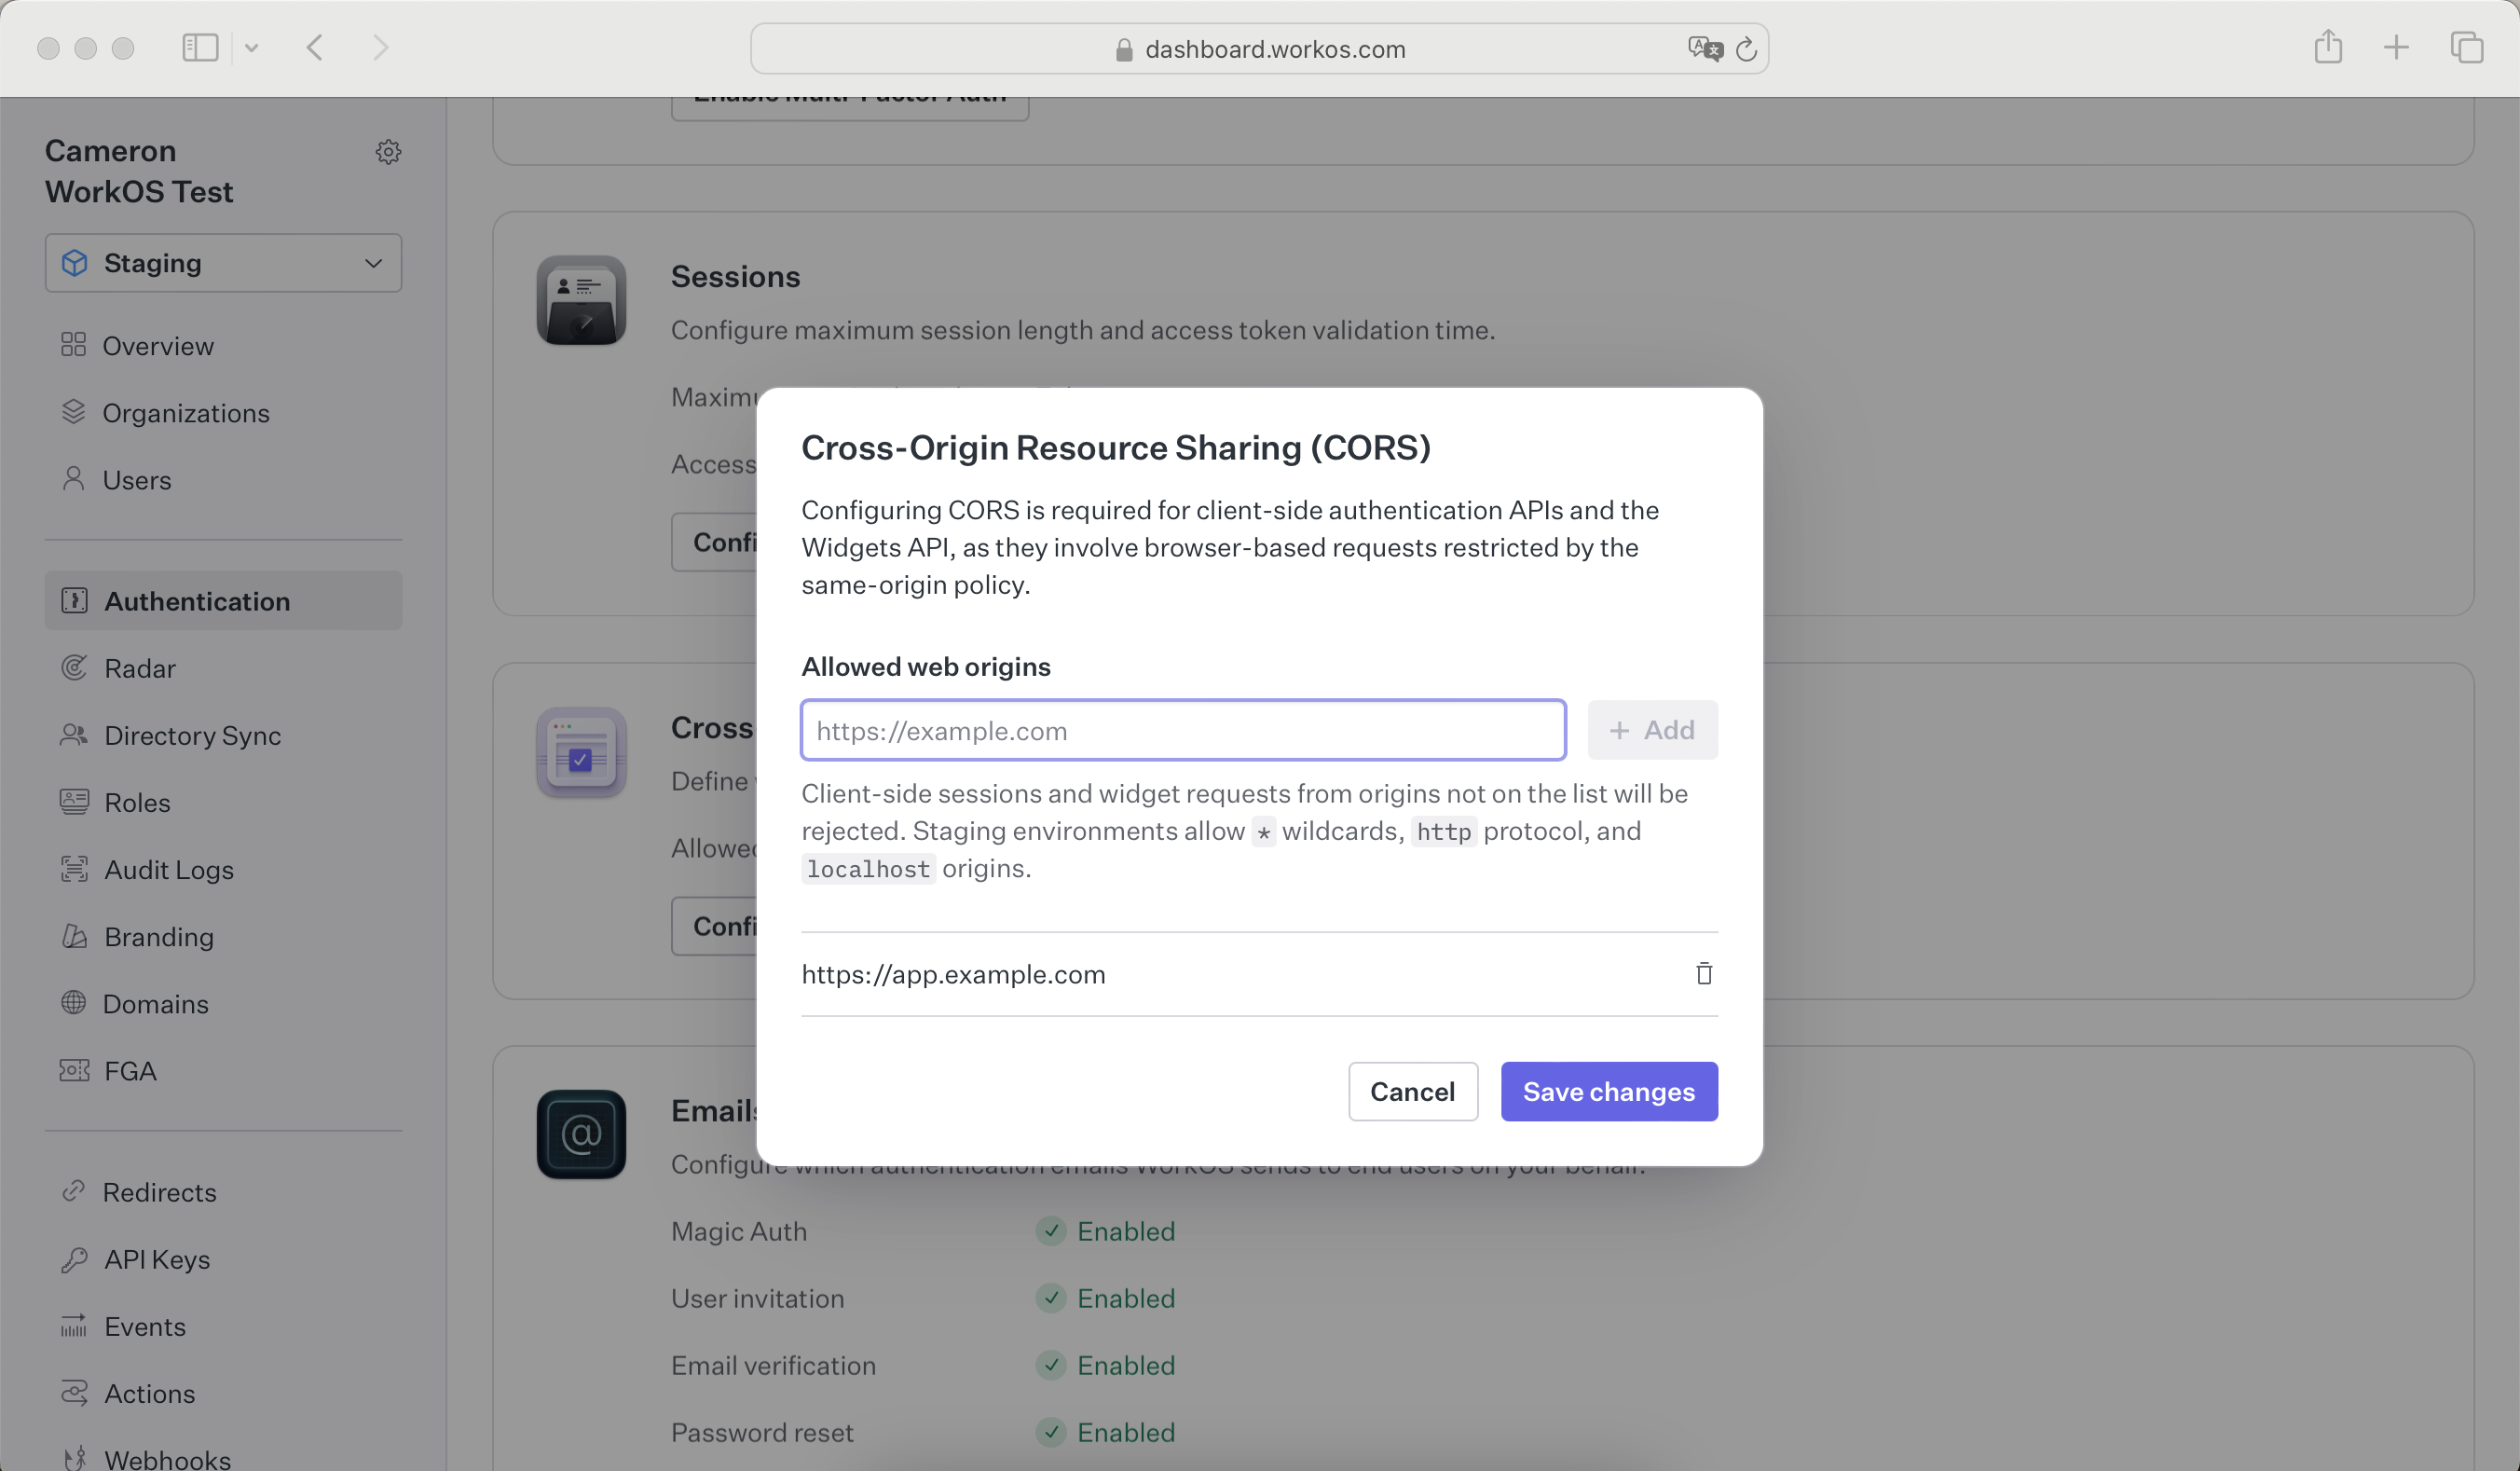
Because WorkOS widgets issue client-side requests to WorkOS, it is necessary to configure your site as an allowed web origin. Adding this in the Authentication section of the dashboard will prevent CORS issues when using the widget.

Widgets must be supplied with an authorization token. The token can be acquired in one of two ways:
- If you are using the
authkit-jsorauthkit-reactlibraries, you can use the provided access token. - If you use one of our backend SDKs, use the “get token” method in the SDK to request a token with the appropriate scope for the widget you want to use. Widget tokens expire after one hour.
const authToken = await workos.widgets.getToken({ userId: user.id, organizationId, // scopes corresponds to the permissions required for each widget (see below) scopes: ['widgets:users-table:manage'], });
New WorkOS accounts are created with an “Admin” role that has all Widget permissions assigned. Existing accounts will need to assign the proper permissions to a role. This can be done on the “Roles” page of the WorkOS Dashboard. See the Roles and Permissions guide for more information.
To successfully generate a token, the user must be assigned a role with the correct permissions for the widget.
WorkOS Widgets are powered by Radix Themes, which are styled out-of-the-box when you import its CSS in your app. You’ll also need to import an additional CSS file from the WorkOS Widgets package to get everything looking just right.
import '@radix-ui/themes/styles.css'; import '@workos-inc/widgets/styles.css';
You can customize Widgets by passing a theme prop to WorkOSWidgets. This prop accepts an object with the same options as Radix themes.
function UsersTable({ authToken }) { return ( <WorkOsWidgets theme={{ appearance: 'dark', accentColor: 'green', radius: 'medium', fontFamily: 'Inter', }} > <UsersManagement authToken={authToken} /> </WorkOsWidgets> ); }
If you choose not to use the theming capabilities in Radix Themes, you can style Widgets using CSS. We recommend starting with the layout.css stylesheet from Radix Themes, as well as the base.css stylesheet from WorkOS Widgets. These styles provide a base level of functional styling without opinionated design choices.
import '@radix-ui/themes/layout.css'; import '@workos-inc/widgets/base.css';
Individual elements in Radix themes are accessible via CSS class selectors prefixed with woswidgets-. For example, you can add your own button styles by selecting the woswidgets-button class.
.woswidgets-button { border-radius: 4px; color: hsl(0 0% 100%); background-color: hsl(272deg 81% 56%); background-image: linear-gradient( to top right, hsl(272deg 81% 56%), hsl(271deg 91% 65%) ); /* ... */ }

The <UsersManagement /> widget allows an organization admin to manage the members in an organization. Admins can invite new users, remove users, and change roles all within the widget.
In order to use the User Management widget, a user must have a role that has the widgets:users-table:manage permission.
import { UsersManagement, WorkOsWidgets } from '@workos-inc/widgets'; /** * @param {string} authToken - A widget token that was fetched in your backend. See the * "Tokens" section of this guide for details on how to generate the token */ export function UserTable({ token }) { return ( <WorkOsWidgets> <UsersManagement authToken={token} /> </WorkOsWidgets> ); }
import { useAuth } from '@workos-inc/authkit-react'; import { UsersManagement, WorkOsWidgets } from '@workos-inc/widgets'; export function UserTable() { const { isLoading, user, getAccessToken } = useAuth(); if (isLoading) { return '...'; } if (!user) { return 'Logged in user is required'; } return ( <WorkOsWidgets> <UsersManagement authToken={getAccessToken} /> </WorkOsWidgets> ); }
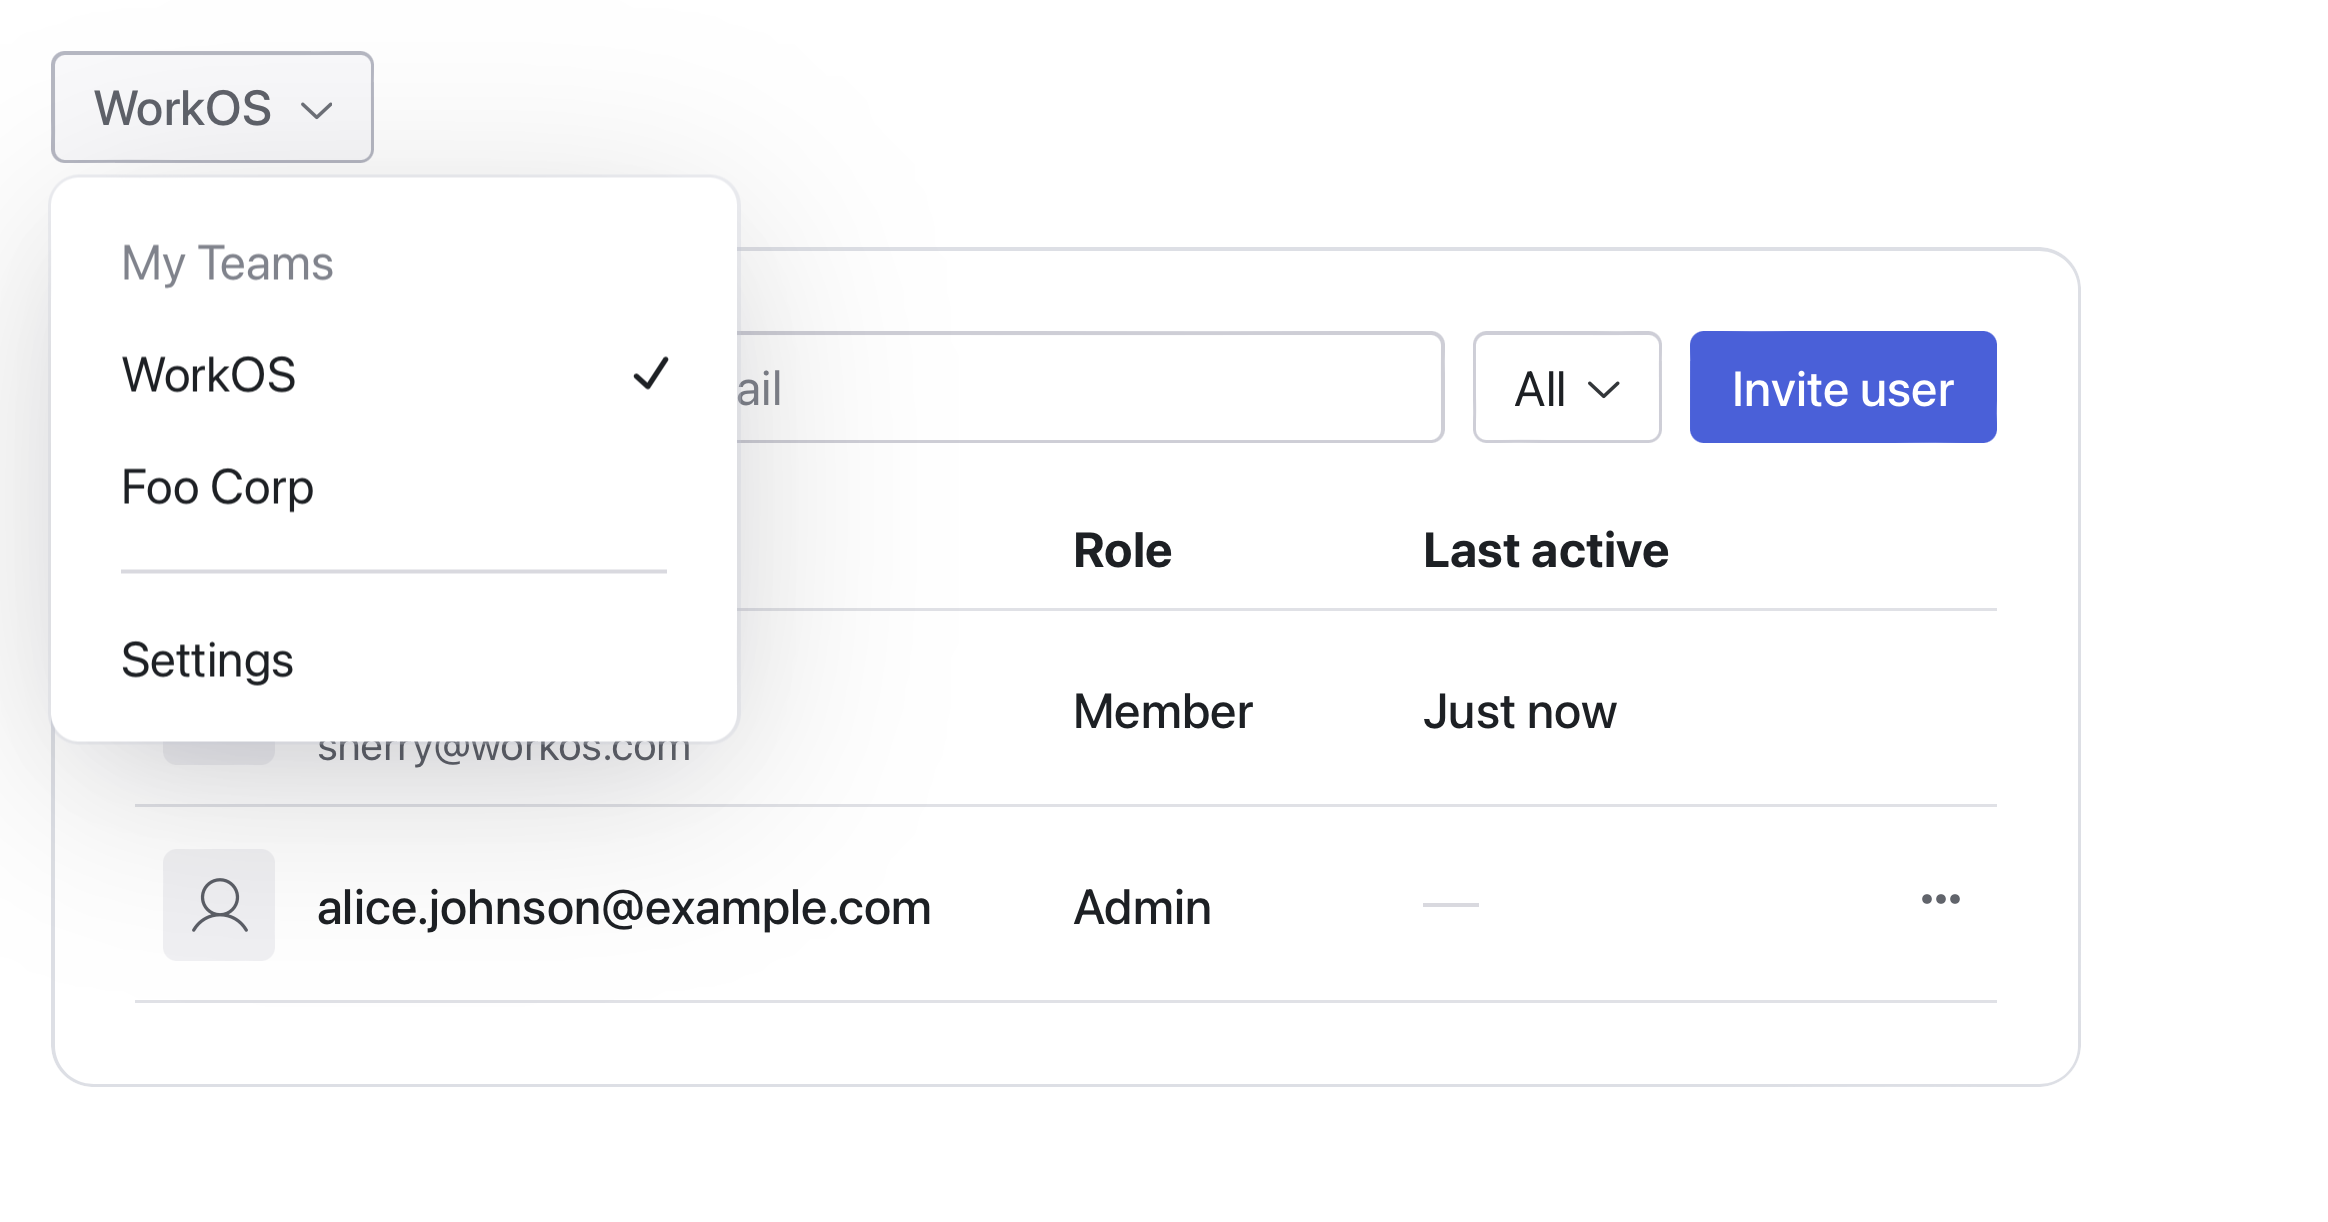
The <OrganizationSwitcher /> widget allows users to switch between organizations. There are no special permissions required to use this widget as users can switch between organizations they have access to. If an organization requires SSO or MFA, the user will be redirected to reauthorize with the new organization.

There are multiple ways to integrate with the Organization Switcher widget depending on your library choice. If you are using either the authkit-js or authkit-react libraries, you can use the useAuth hook to get the current organization and pass it to the widget.
import { useAuth } from '@workos-inc/authkit-react'; import { OrganizationSwitcher, WorkOsWidgets } from '@workos-inc/widgets'; import { CreateOrganization } from '~/app/components/CreateOrganization'; export function OrganizationSwitcherWrapper() { const { getAccessToken, switchToOrganization } = useAuth(); return ( <WorkOsWidgets> <OrganizationSwitcher authToken={getAccessToken} switchToOrganization={switchToOrganization} /> </WorkOsWidgets> ); }
If you are using one of the backend SDKs, you can build the organization switcher action in the backend and pass it in as a prop to the widget to be called when the user attempts to switch organizations. See the Switching Organizations guide for more information to set up the backend actions. This can then be passed in as a prop to the widget.
import { useAuth } from '@workos-inc/authkit-react'; import { OrganizationSwitcher, WorkOsWidgets } from '@workos-inc/widgets'; import { redirect } from 'next/navigation'; // authToken is a widget token that was fetched in your backend. See the // "Tokens" section of this guide for details on how to generate the token export function OrganizationSwitcher({ authToken }) { const handleOrganizationSwitch = async (organizationId, pathname) => { try { // this is some API endpoint defined in your backend that would // call the WorkOS APIs to switch the organization or return a redirect URL // if the user needs to reauthorize with the new organization const response = await fetch('/api/organizations/switch', { method: 'POST', headers: { 'Content-Type': 'application/json', }, body: JSON.stringify({ organizationId }), }); if (!response.ok) { throw new Error('Failed to switch organization'); } // if the backend returns a redirect URL to reauthorize the user, redirect the user to the new organization const { redirectUrl } = await response.json(); if (redirectUrl) { redirect(redirectUrl); } revalidatePath(pathname); redirect(pathname); } catch (error) { console.error('Error switching organization:', error); // Handle error (show toast, etc.) } }; return ( <WorkOsWidgets> <OrganizationSwitcher authToken={authToken} switchToOrganization={handleOrganizationSwitch} /> </WorkOsWidgets> ); }
The widget accepts children components that can be used to either redirect the user to create an organization or to show a modal with a form to create an organization. You can use this to integrate with your existing organization creation flow that uses the WorkOS APIs to create organizations.
import { useAuth } from '@workos-inc/authkit-react'; import { OrganizationSwitcher, WorkOsWidgets } from '@workos-inc/widgets'; import { CreateOrganization } from '~/app/components/CreateOrganization'; export function OrganizationSwitcherWrapper() { const { getAccessToken, switchToOrganization } = useAuth(); return ( <WorkOsWidgets> <OrganizationSwitcher authToken={getAccessToken} switchToOrganization={switchToOrganization} > <CreateOrganization /> </OrganizationSwitcher> </WorkOsWidgets> ); }
The <UserProfile /> widget allows users to view and manage their personal information.
Users can see their profile details and edit their display name.
This widget provides a simple, user-friendly interface for basic profile management.
No special permissions are required to use this widget.
import { UserProfile, WorkOsWidgets } from '@workos-inc/widgets'; /** * @param {string} authToken - A widget token that was fetched in your backend. See the * "Tokens" section of this guide for details on how to generate the token */ export function ProfilePage({ authToken }) { return ( <WorkOsWidgets> <UserProfile authToken={token} /> </WorkOsWidgets> ); }
import { useAuth } from '@workos-inc/authkit-react'; import { UserProfile, WorkOsWidgets } from '@workos-inc/widgets'; export function ProfilePage() { const { isLoading, user, getAccessToken } = useAuth(); if (isLoading) { return '...'; } if (!user) { return 'Logged in user is required'; } return ( <WorkOsWidgets> <UserProfile authToken={getAccessToken} /> </WorkOsWidgets> ); }
The <UserSessions /> widget provides users with visibility into their active sessions across different devices and browsers. Users can view session details and sign out of individual sessions as needed. No special permissions are required to use this widget.
import { UserSessions, WorkOsWidgets } from '@workos-inc/widgets'; /** * @param {string} authToken - A widget token that was fetched in your backend. See the * "Tokens" section of this guide for details on how to generate the token * @param {string} currentSessionId - The ID of the current session */ export function SessionsPage({ authToken, currentSessionId }) { return ( <WorkOsWidgets> <UserSessions authToken={token} currentSessionId={currentSessionId} /> </WorkOsWidgets> ); }
import { useAuth } from '@workos-inc/authkit-react'; import { UserSessions, WorkOsWidgets } from '@workos-inc/widgets'; export function SessionsPage() { const { isLoading, user, getAccessToken } = useAuth(); if (isLoading) { return '...'; } if (!user) { return 'Logged in user is required'; } return ( <WorkOsWidgets> <UserSessions authToken={getAccessToken} /> </WorkOsWidgets> ); }
The <UserSecurity /> widget enables users to control their security settings. With this widget, users can:
- Set or change their password
- Configure and reset Multi-Factor Authentication
No special permissions are required to use this widget.
import { UserSecurity, WorkOsWidgets } from '@workos-inc/widgets'; /** * @param {string} authToken - A widget token that was fetched in your backend. See the * "Tokens" section of this guide for details on how to generate the token */ export function SecurityPage({ authToken }) { return ( <WorkOsWidgets> <UserSecurity authToken={token} /> </WorkOsWidgets> ); }
import { useAuth } from '@workos-inc/authkit-react'; import { UserSecurity, WorkOsWidgets } from '@workos-inc/widgets'; export function SecurityPage() { const { isLoading, user, getAccessToken } = useAuth(); if (isLoading) { return '...'; } if (!user) { return 'Logged in user is required'; } return ( <WorkOsWidgets> <UserSecurity authToken={getAccessToken} /> </WorkOsWidgets> ); }