How to set up AD FS SAML SSO: Relying party trust, claims rules and metadata
A step-by-step walkthrough of the AD FS console work behind a SAML SSO connection, plus the claims and metadata details that cause failed sign-ins later.

Active Directory Federation Services (AD FS) is Microsoft's on-premises identity provider, configured from a Windows management console instead of a web dashboard. Connecting it to your app over SAML takes three things: a relying party trust built from your service provider metadata, a claims issuance rule that sends the right LDAP attributes, and the AD FS federation metadata handed back to WorkOS. Each step has a failure mode that stays invisible until someone tries to sign in.
Forward the relying party trust, claims and metadata sections below straight to the customer's Windows admin. They own the console work, and the sequence follows the order the AD FS wizard presents it.
What do you need before you start?
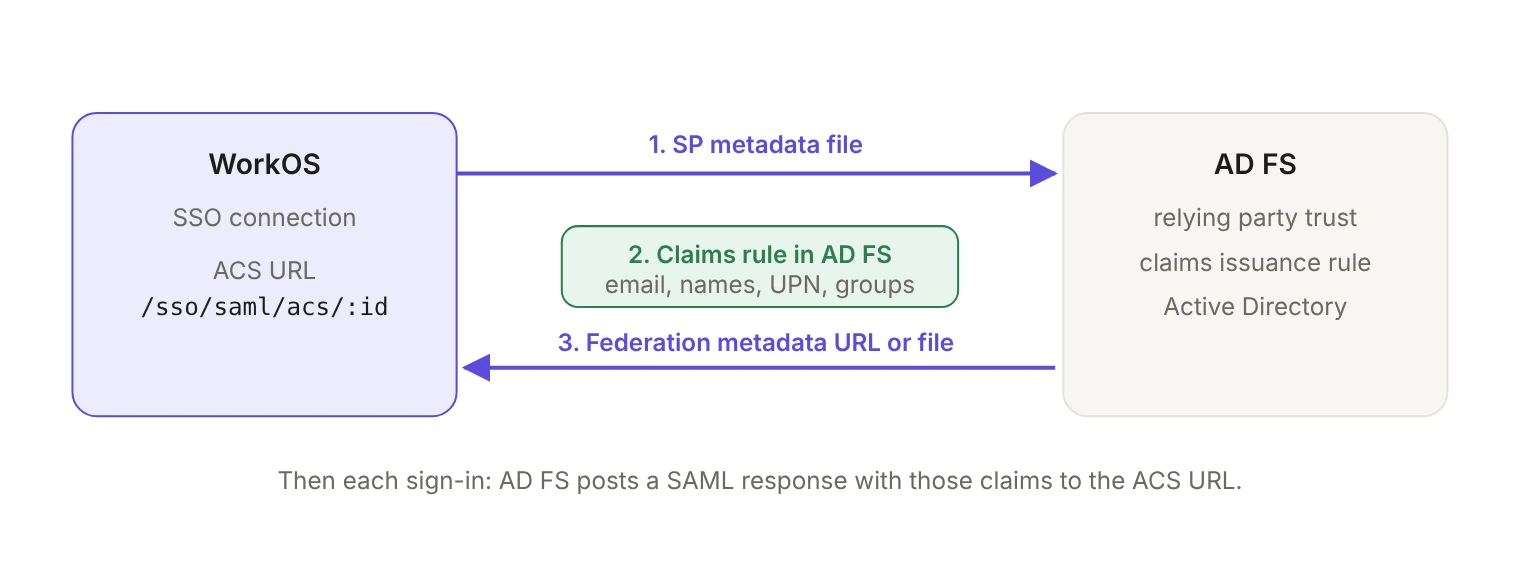
Two artifacts, moving in opposite directions.
The first is SP metadata: an XML file describing your application as a service provider, which identity providers use to make onboarding easier. In WorkOS, you download it from the SP Metadata link on the connection page in the Dashboard. Importing that file is what tells AD FS where to post SAML responses and what audience to assert.
The second is IdP metadata: the URL or XML file carrying everything relevant to the identity provider. AD FS publishes this itself, and you give it back to WorkOS at the end.
You also need the right person at the keyboard. Creating a relying party trust requires membership in Administrators, or the equivalent, on the federation server. If your customer's IT contact can't open AD FS Management with those rights, the setup stops before it starts.
One value is worth copying down before you switch windows: the Assertion Consumer Service URL, the endpoint where the identity provider posts SAML responses. WorkOS uses the HTTPS form auth.workos.com/sso/saml/acs/:id, with the connection's own identifier at the end. Importing the SP metadata file sets it automatically, but you'll want it on hand to verify.
How do you create the relying party trust?
Open AD FS Management. Click "Relying Party Trusts" in the left sidebar, then "Add Relying Party Trust..." in the right sidebar to launch the wizard.
- Claims aware. On the welcome page, select "Claims aware" and click "Start".
- Import the SP metadata. Select "Import data about the relying party from a file" and choose the file you downloaded from the WorkOS Dashboard. AD FS can also import from a published metadata address instead of a file, if you host yours at a URL.
- Choose the access policy. This happens inside the wizard, not afterwards. The WorkOS integration guide uses "Permit everyone". If your customer wants to restrict the application to a subset of staff, or require MFA, this is the screen where that decision gets made, so don't click past it on autopilot.
- Finish. On the final page, clicking "Close" opens the Edit Claim Rules dialog, which is where the next section picks up.
Before you leave the trust, open its "Endpoints" tab and confirm that the SAML Assertion Consumer Endpoint matches the ACS URL shown for your connection. A trust that imported cleanly almost always has this right. A trust someone built by hand, or one that was pointed at a staging environment months ago, may not, and the symptom is a sign-in that fails without ever reaching your app.
Which claims does AD FS need to send?
A relying party trust by itself sends nothing. Claims come from a claims issuance rule, and AD FS gives you a template for exactly this case: "Send LDAP Attributes as Claims," which pulls attributes from an LDAP store such as Active Directory and issues them as claims to the relying party. Microsoft documents the template for Windows Server 2016, 2019, 2022 and 2025.
In the "Edit Claims Issuance Policy" window, click "Add Rule" and select "Send LDAP Attributes as Claims". Name the rule "Attributes," set the attribute store to "Active Directory", and add these four rows:
Each attribute needs its own row; the rule doesn't accept more than one claim type per line. If you need to reopen this later, right-click the relying party trust and choose "Edit Claim Issuance Policy".
Two of those rows do more work than they look like they do.
E-Mail-Addresses feeds the profile's email, which is required on every WorkOS SSO profile, alongside the identity provider's own identifier for the user. That identifier, idp_id, is assigned by the identity provider and takes a different form on each one. On an AD FS connection it comes from the UPN claim, which is why dropping the User-Principal-Name row or renaming its outgoing claim type breaks the connection rather than just thinning the profile.
Given-Name and Surname populate first and last name, which are configurable rather than strictly required. Leave them out and the connection still works, but any attribute AD FS doesn't send arrives as null on the profile. Anywhere your app renders a user's name, that null is what shows up.
If you need more than the standard set, WorkOS supports additional predefined and custom attributes on all SAML SSO connections. Define them first, then have the IT contact map them during setup.
When do you need the group claim?
Groups are optional for sign-in and required for role assignment. Decide which case you're in before you add the rule, because a half-configured group claim looks identical to a working one until roles come out wrong.
To send groups, select "Group" as the outgoing claim type and map an LDAP attribute to it. To send all of a user's groups, map the Token-Groups - Unqualified Names attribute. The LDAP attributes template is the right one for sending every group membership; AD FS has a separate "Send Group Membership as a Claim" template if you only want to issue one specific group.
On the WorkOS side, identity provider role assignment requires that you configure roles first. After that, you finish setup on the SSO connection page in the Organization section of the Dashboard: create SSO groups by referencing the IdP Group ID, then assign roles to those groups. You can also enable SSO group role assignment in the Admin Portal, which lets IT contacts assign roles to groups themselves during connection setup. It's an environment-level setting that can be configured per organization.
Once that's in place, SSO profiles come back with a role attribute reflecting the user's highest-priority group membership, recalculated at every sign-in. A user who belongs to no mapped group gets the default role, which is the usual explanation for "SSO works but everyone is a viewer": the group claim never arrived, so nothing matched.
Two limits are worth knowing before you promise this to a customer. The group attribute has to be explicitly mapped during SSO setup for your app to see it in the profile. And group changes in Active Directory only reach your app the next time that user signs in with SSO, which can leave someone holding a stale role in between. For customers who also run Directory Sync, group-based role assignment from the directory avoids both problems and is the preferred path; use one method or the other, not both.
How do you hand the federation metadata back to WorkOS?
AD FS publishes its metadata at a standard path. By default it lives at https://SERVER/federationmetadata/2007-06/federationmetadata.xml, where SERVER is the federation service FQDN. To confirm the exact value rather than assume it, AD FS Management lists it under "AD FS → Service → Endpoints" in the Metadata section.
Use the fully qualified domain name, not a short internal hostname. Microsoft's own guidance is blunt about this: certificates with unqualified host names have no security value and can let an attacker impersonate a federation service that's publishing federation metadata.
Then go to the connection settings in WorkOS, click "Edit Metadata configuration," and enter the metadata URL. Uploading the XML file works as an alternative when the AD FS server isn't reachable from the public internet, though you then own re-uploading it whenever the AD FS signing certificate changes. AD FS calls that certificate the Token Signature; SAML calls it the X.509 certificate used to authenticate assertions.
Finish with an actual sign-in, using an account that sits inside a mapped group. A test user outside every group tells you the trust works and nothing about whether the claims do.
Why do AD FS connections fail?
These are the failures the steps above are designed to prevent, and two screens account for most of them: the trust's Endpoints tab and the claims issuance rule.
What should you send the customer's IT team?
Most of the work above belongs to someone you'll never talk to directly. The Admin Portal exists for that handoff: an out-of-the-box UI where IT contacts verify domains and configure SSO and Directory Sync connections, with walk-through documentation for each identity provider. A setup link shared from the Dashboard stays valid for 30 days or until the connection is configured, and only one link can be active at a time. Links generated through the API expire after 5 minutes, so WorkOS recommends redirecting the IT contact to one immediately rather than emailing it, behind an endpoint in your app that only IT contacts can reach.
If you're weighing how much of this to keep in your own codebase, the case for supporting the protocol at all is covered in Trail of Bits is right about SAML. You still have to support it., and the question of where the sign-in starts is covered in SP-initiated vs. IdP-initiated SSO. For this setup, the shortest path to a working connection is the same every time: get the Endpoints tab and the claims rule right, then test with an account that actually belongs to a group.