How to build browser-based OAuth into your CLI with WorkOS
Ever wondered how tools like GitHub's CLI let you authenticate with a single gh auth login command? In this tutorial with companion code repo, we go through the implementation step by step.

Ever wondered how tools like GitHub's CLI let you authenticate with a single gh auth login command? You're in the terminal one moment, and a browser window opens the next. Seconds later, you're authenticated and can call secured endpoints from your laptop.
In this tutorial, we'll step through building the same OAuth-based login experience into a command-line tool using WorkOS AuthKit and give you a starter repository you can use to test or extend into your own project.
You’ll learn how to authenticate users, obtain access tokens, securely store them in your system keychain, and retrieve them when making requests to secured endpoints.
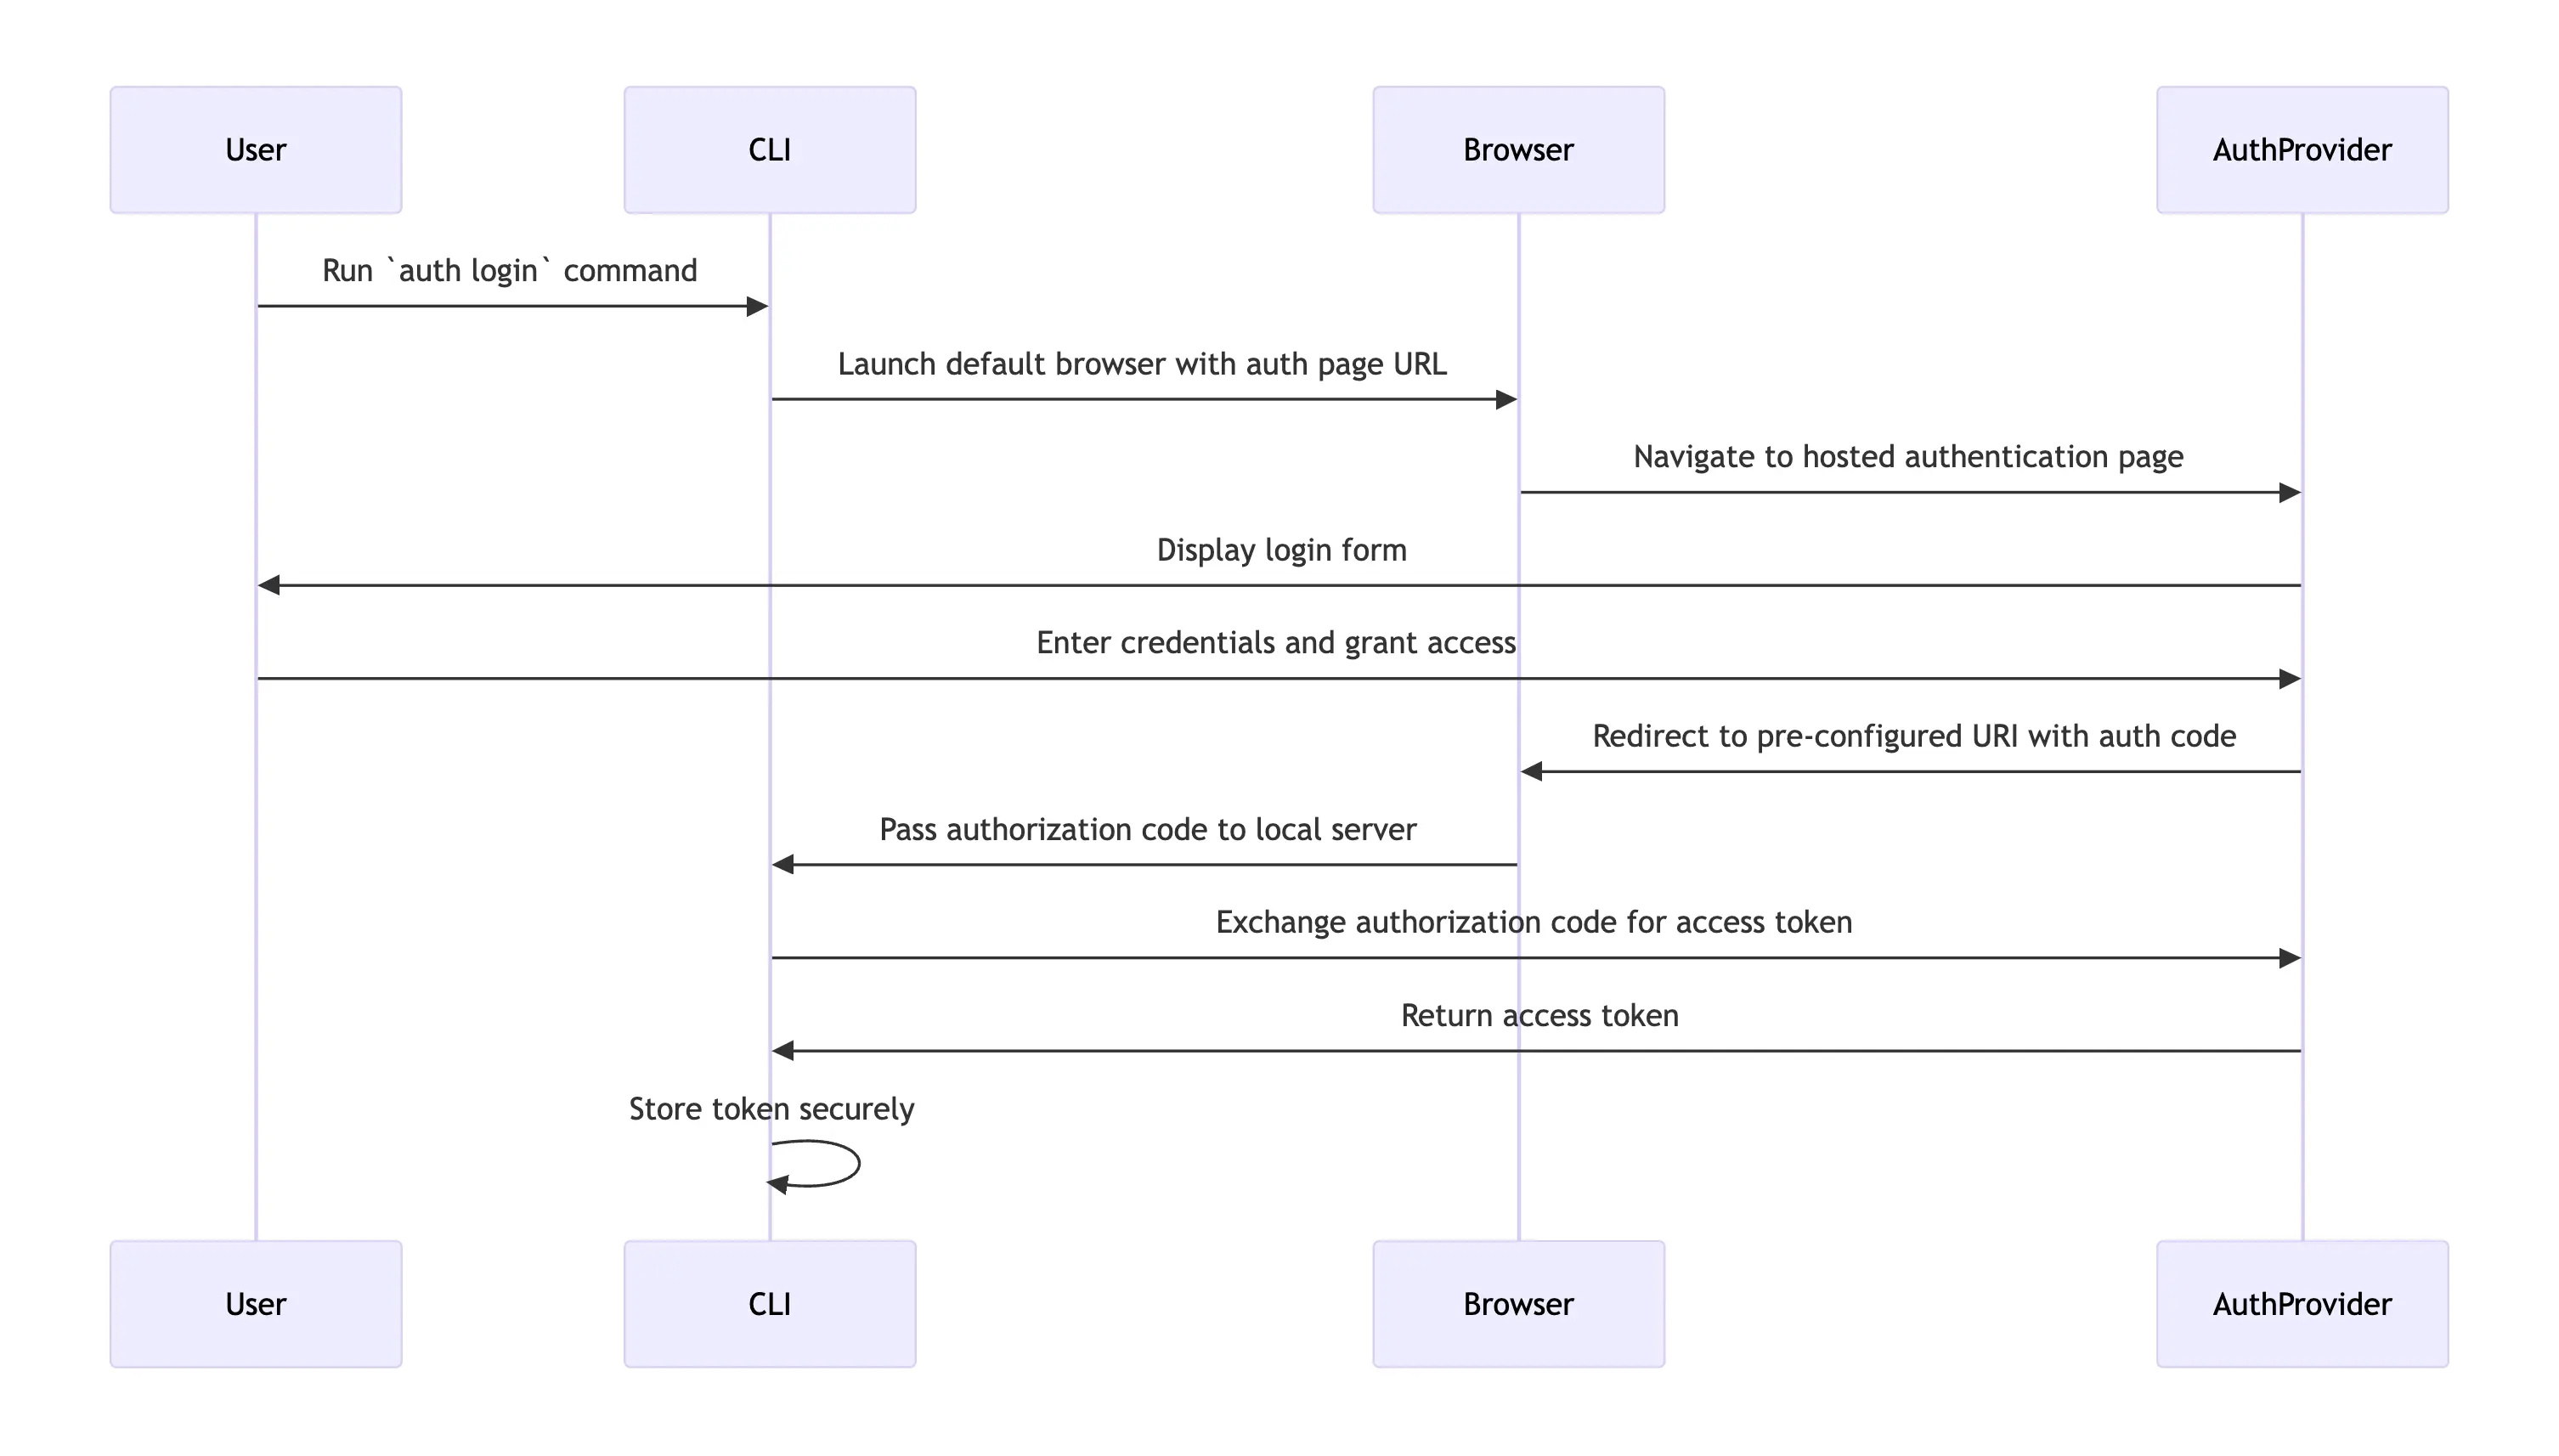
Understanding the browser-based OAuth flow
Here’s the experience we’re going to build:

- Initiate Login: The user runs a login command in the CLI such as
gh auth loginornpm start login - Open Browser: The CLI launches the default browser and navigates to a hosted authentication page.
- Authenticate: The user logs in to their Identity Provider (IdP), such as Google, and grants access.
- Redirect: The authentication provider redirects the browser back to a pre-configured URI on localhost with an authorization code in a query string parameter. For example,
http://localhost:3000/auth/callback?code=379803ewhdwdugaidfigd - Local Server: The CLI runs a lightweight local server on http://localhost, listening for the redirect and capturing the authorization code from the query string parameter.
- Token Exchange: The CLI exchanges the authorization code for an access token using AuthKit
- Secure Storage: The token is securely stored for future use in the operating system’s secure keychain. If storing the user’s access token in the system keychain fails, then the CLI falls back to write the user’s access token and user ID to a “dotfile,” e.g.
~/.workos/token.
Set up the CLI tool
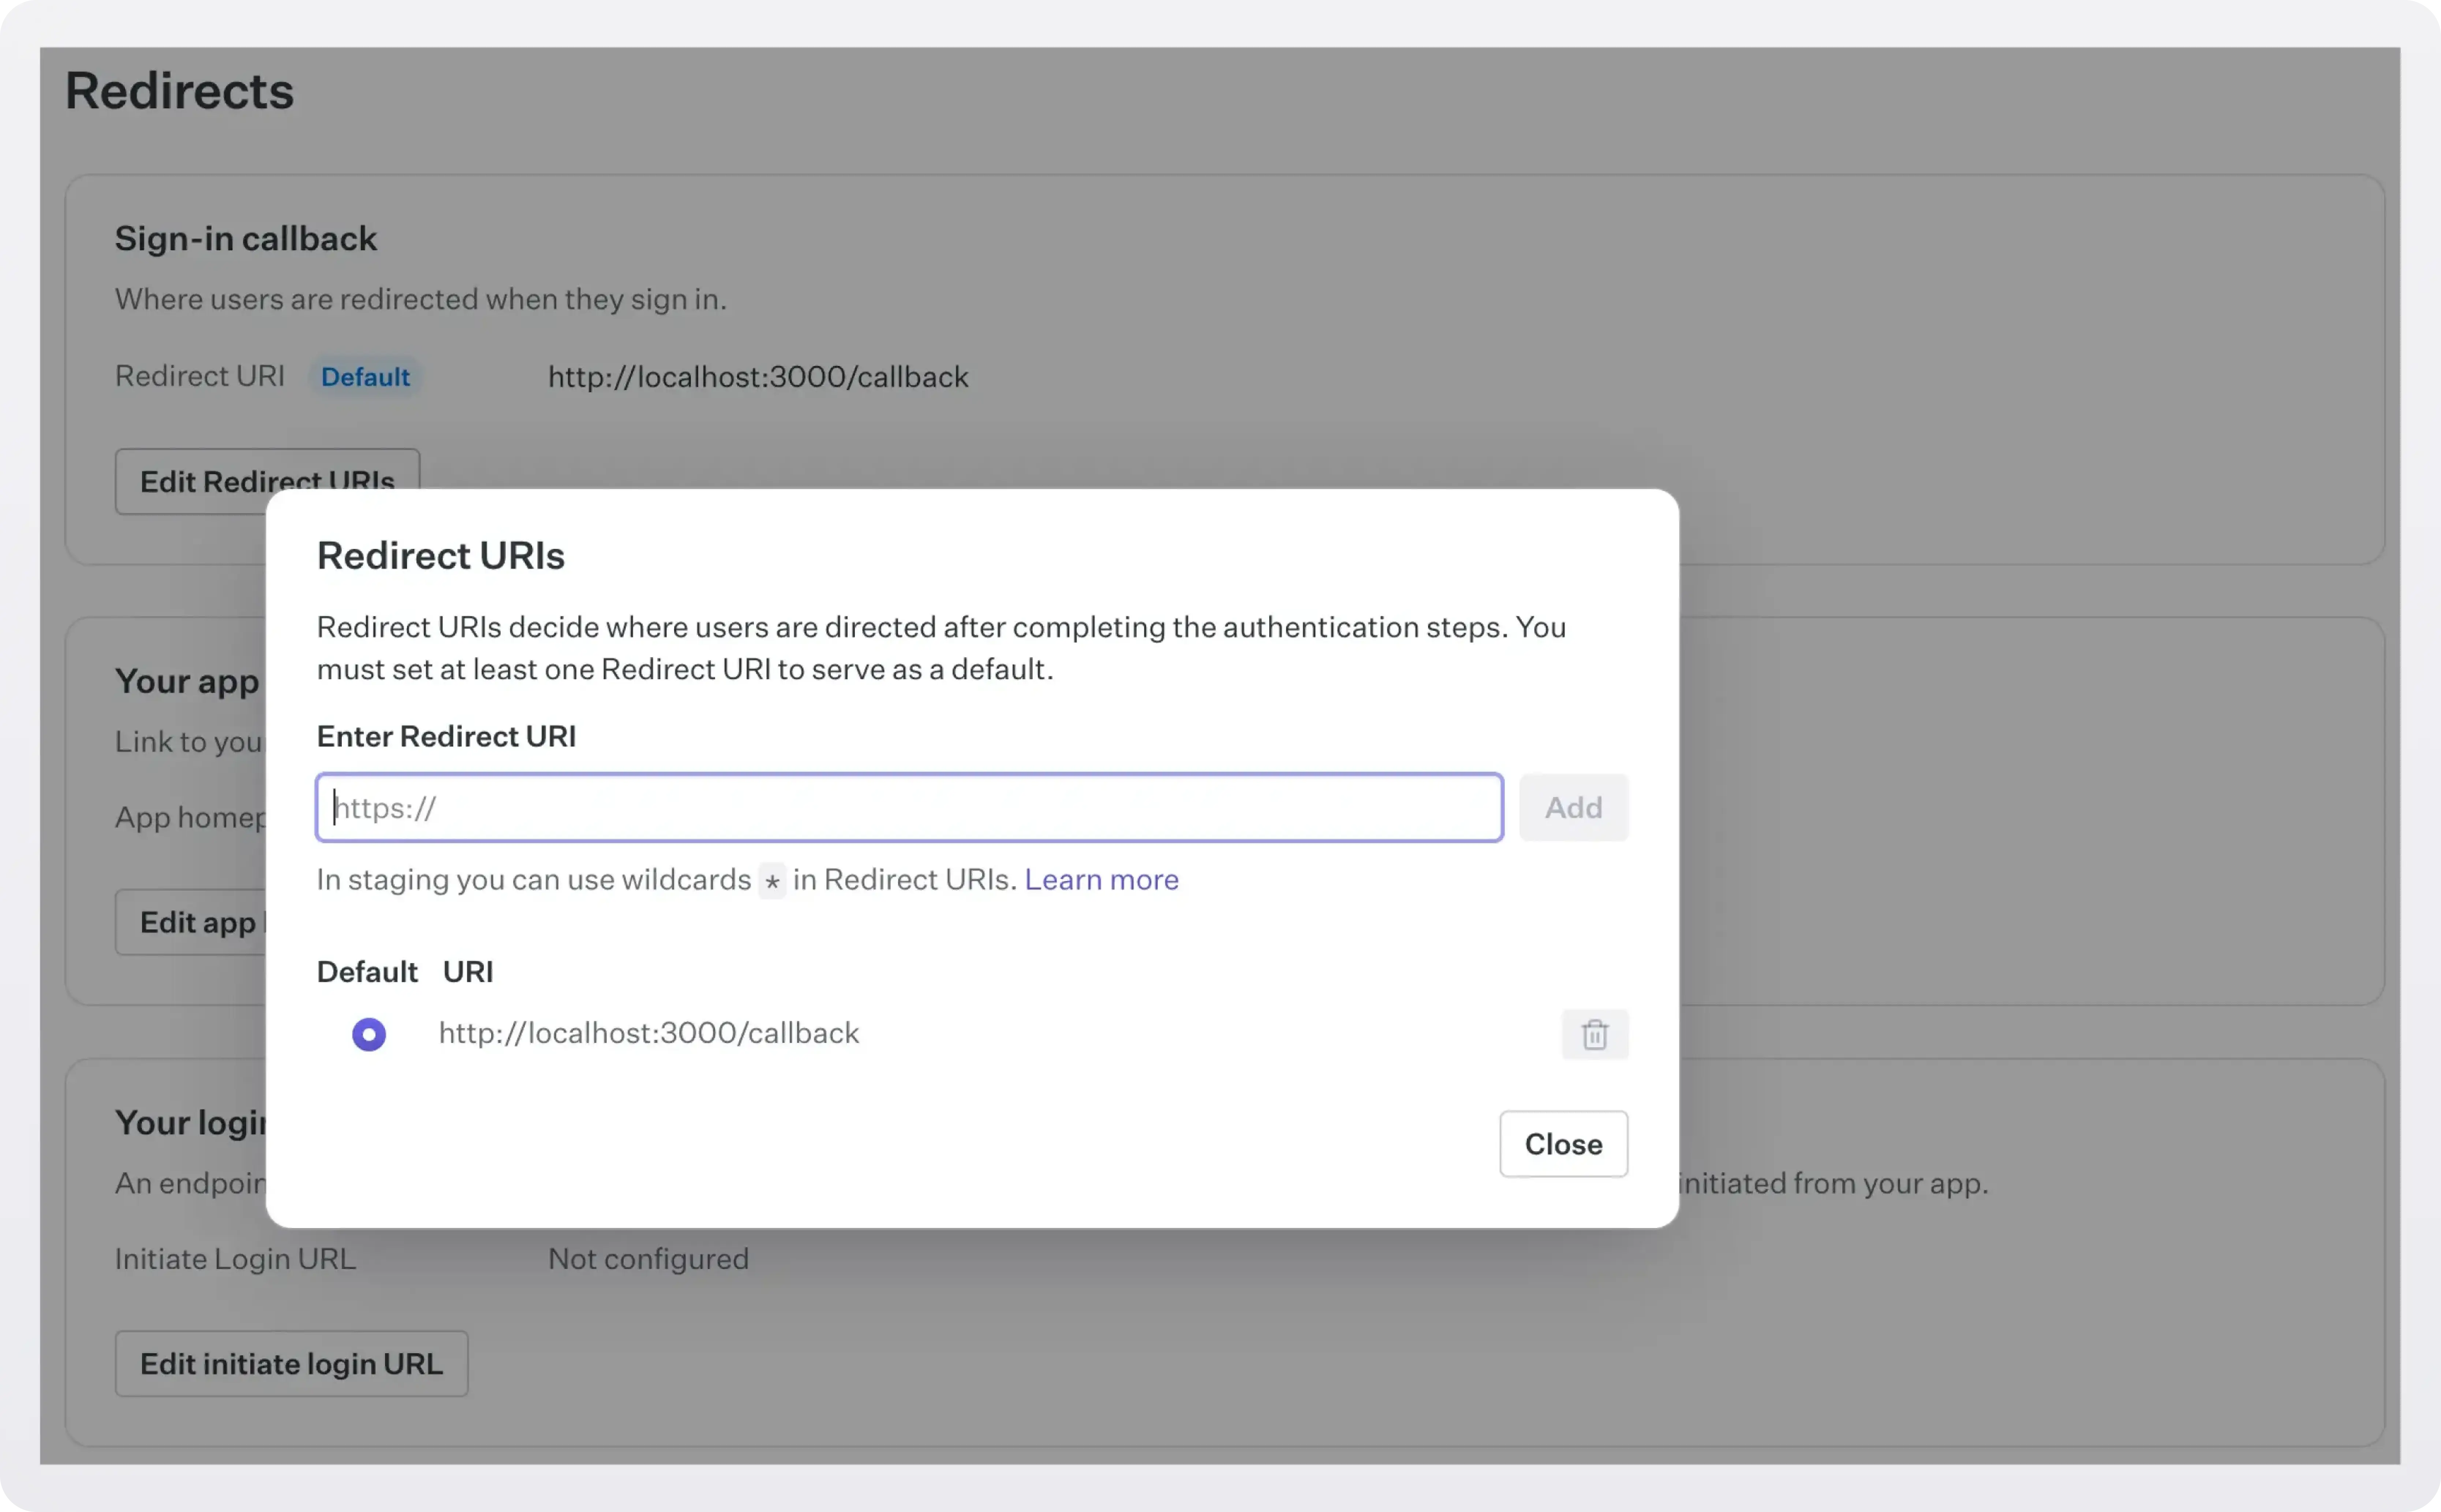
Create a WorkOS Organization and set your redirect URI
- Sign into your WorkOS account
- Create an organization
- Configure a redirect URI configured in the WorkOS dashboard. Use http://localhost:3000/callback for local testing

Clone the Repository
Clone the repository and install dependencies:
git clone https://github.com/zackproser-workos/cli-auth-example
cd cli-auth-example
npm install
Update the .env file with your WorkOS credentials, which you can find in the WorkOS dashboard:
WORKOS_CLIENT_ID=your-client-id
WORKOS_CLIENT_SECRET=your-client-secret
REDIRECT_URI=http://localhost:3000/callback
Try the authentication flow
Once configured, you can experience the full authentication flow:
Step 1. Start the authentication process:
npm start login
This command initiates the OAuth flow, launching your browser and displaying a progress indicator in your terminal. You'll see something like:
⠋ Starting authentication flow...
→ Local server started
→ Opening browser for authentication
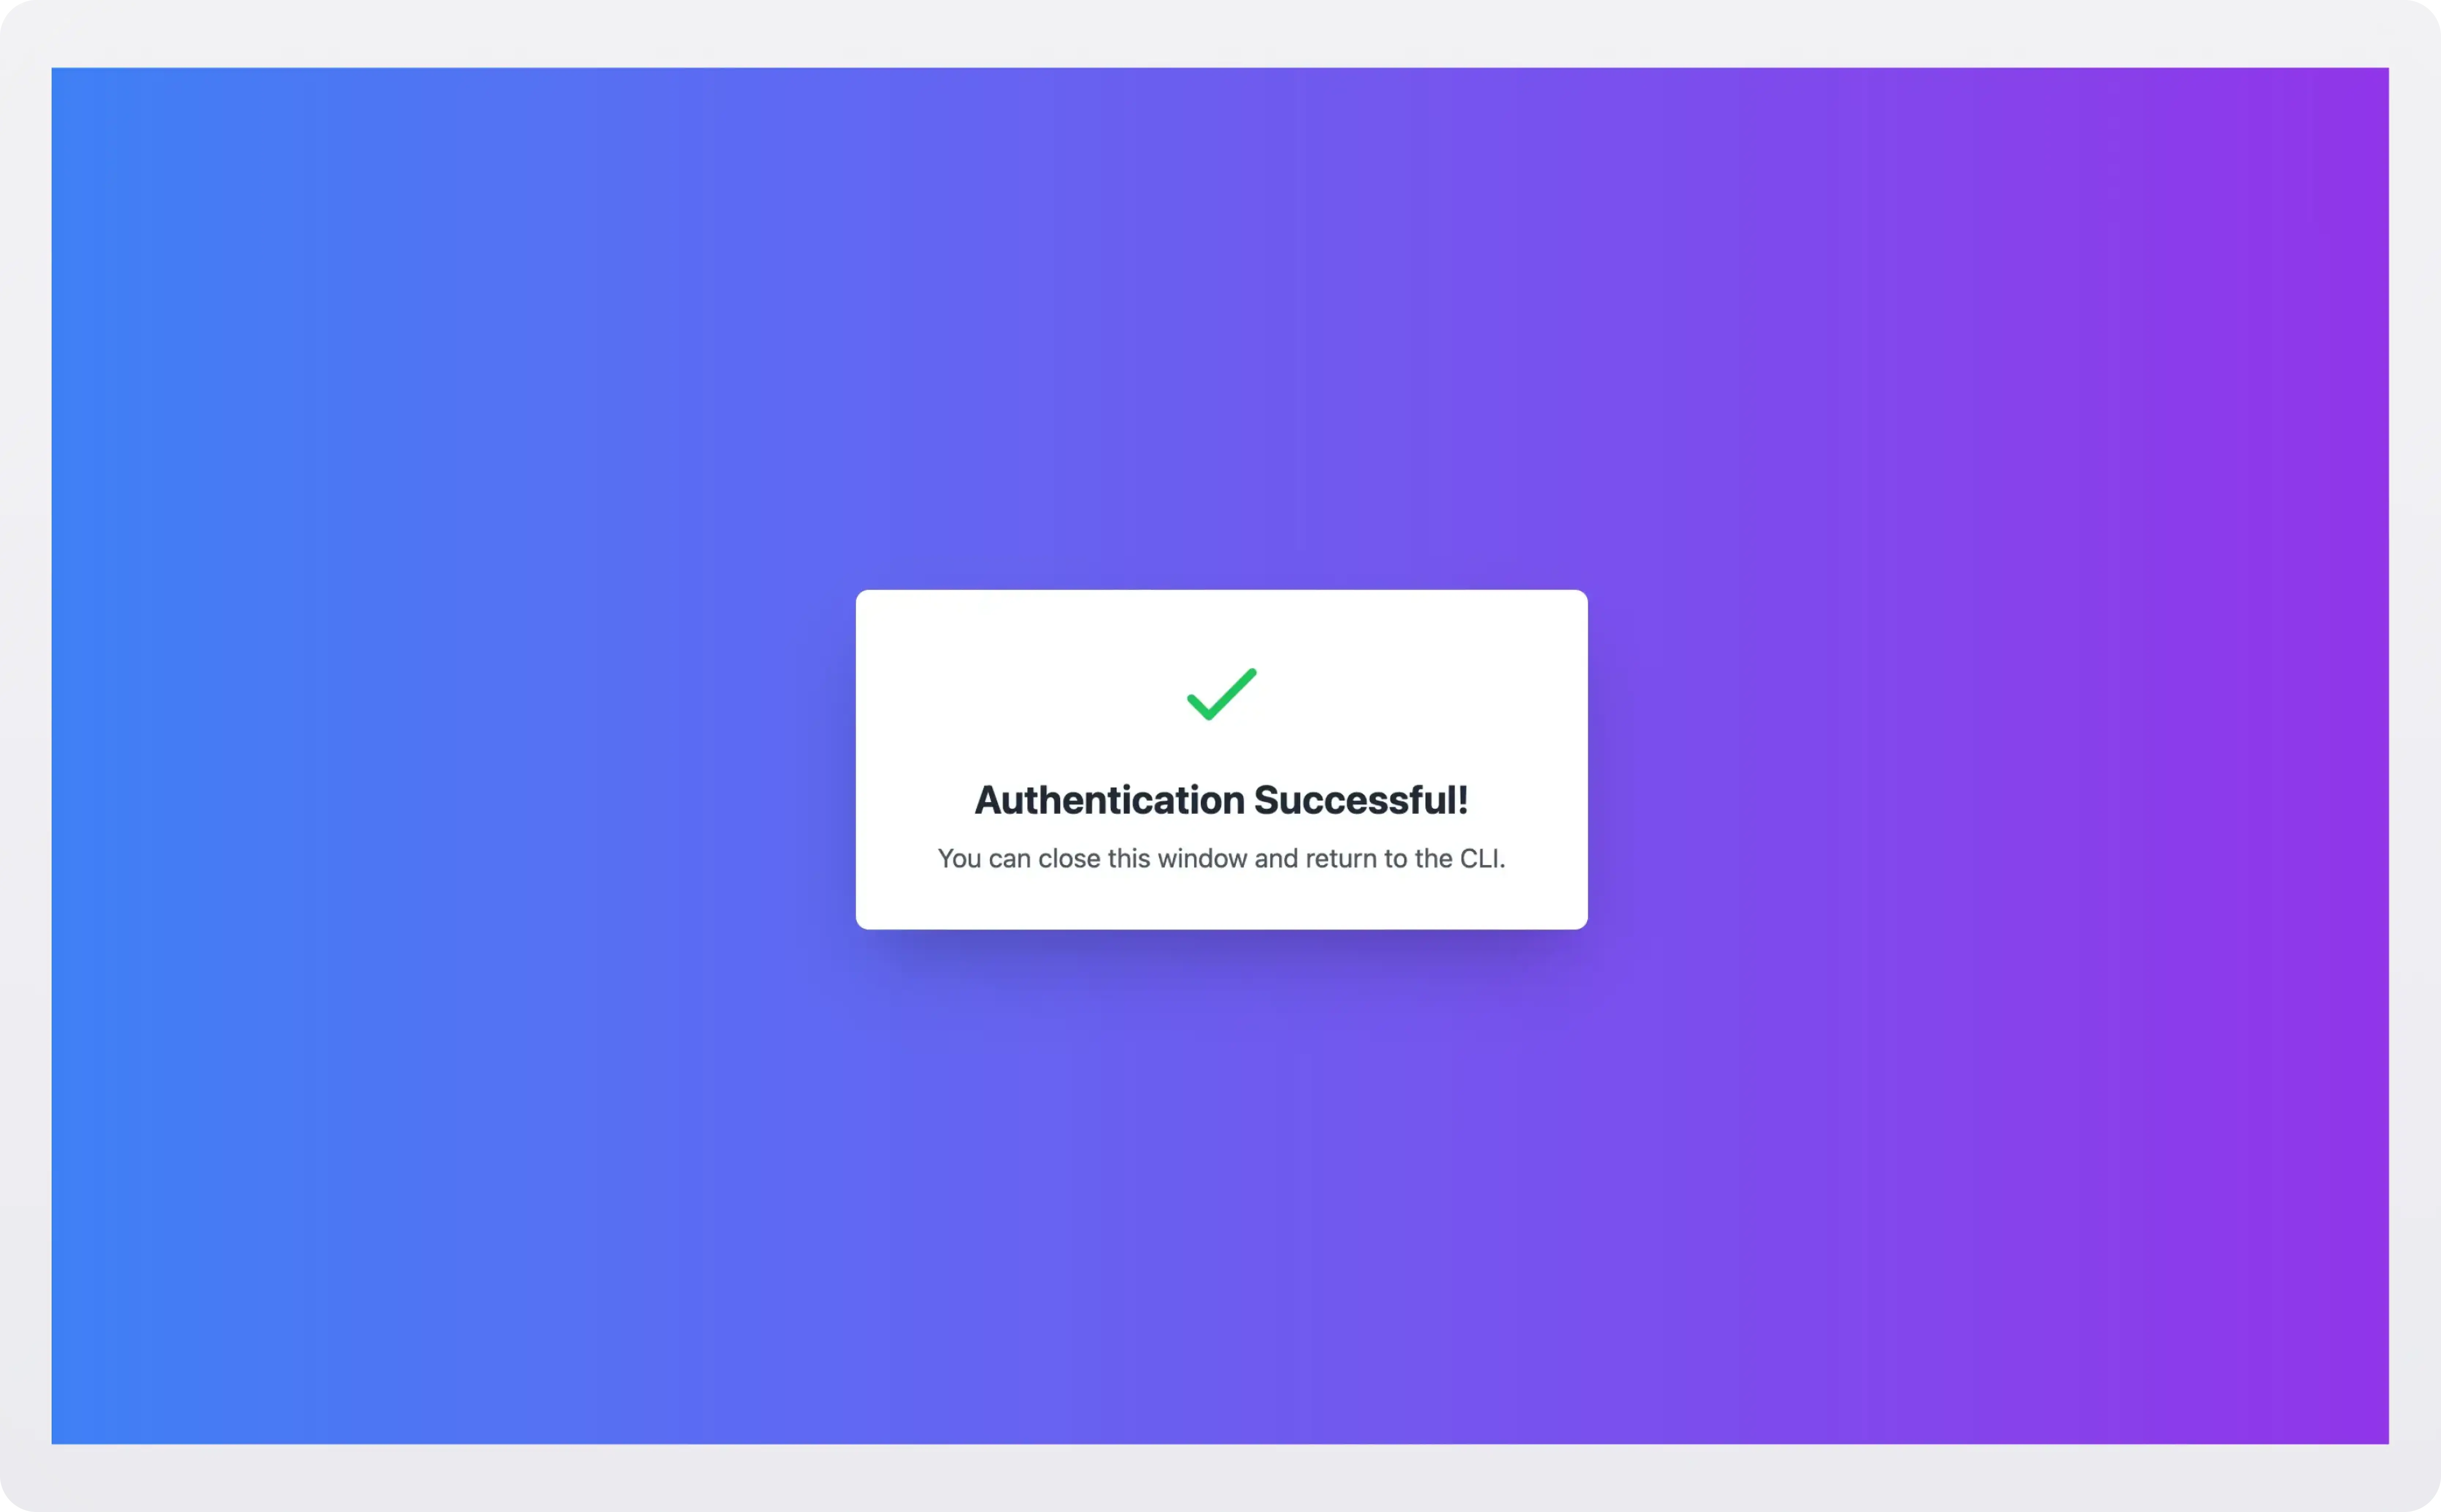
Once you sign into your IdP successfully, you’ll see the authentication success page:

Step 2. Test authentication:
After successful authentication, test the stored credentials by fetching your profile:
npm start meThis command uses your stored user ID to make an API call via AuthKit, returning your user profile:
🧑 User Profile:
Email: booker@example.com
First Name: Booker
Last Name: DeWitt
ID: user_02JCQ1E9ZV4JQXNCT0TD4V7DJ3
Created At: 11/14/2024, 11:30:56 PM
During the token storage step, WorkOS AuthKit returns your access token, user ID, and other fields you can optionally retrieve or ignore:
{
  "user": "User",
  "organizationId": "string (optional)",
  "accessToken": "string",
  "refreshToken": "string",
  "authenticationMethod": "string (enum)",
  "impersonator": "object (optional)",
  "sealedSession": "string (optional)"
}
Even though we’re not using the access token in this request, this is the exact same pattern of retrieval you would use to fetch the access token from secure storage each time you make a request via the command line interface.
Step 3. Verify your stored credentials:
npm start keychainThis shows the securely stored credentials in your system keychain:
🔐 Keychain Contents:
Service: workos-cli
Account: default
Status: Entry found
Contents: {
  "accessToken": "eyJhbGc...X_YphjyXXXXX",
  "userId": "user_02XXXXXXXXXXXXX"
}
If your token wasn’t able to be stored in your system keychain due to an error, then your access token and user ID will have been written to ~/.workos/token by default or the value of WORKOS_TOKEN_DIR if you set that environment variable.
Browser-based OAuth in a command line tool: step-by-step
The example repo demonstrates the key components of the browser-based OAuth flow. Let’s walk through each part.
Launching the Browser
When the user initiates authentication, the CLI opens their default browser and navigates to the WorkOS-hosted authentication page:
export async function startOAuthFlow(): Promise<string> {
  // Log a pretty banner message
  console.log(boxen(chalk.bold('WorkOS CLI Authentication'), {
    padding: 1,
    margin: 1,
    borderStyle: 'round',
    borderColor: 'blue',
    textAlignment: 'center'
  }));

  const spinner = showSpinner(chalk.blue('Starting authentication flow...'));

  return new Promise((resolve, reject) => {
    const server = createServer(async (req, res) => {
      console.log('Received request:', req.method, req.url);

      req.on('error', (error) => {
        handleError(error, 'Request error', spinner, server, res, reject);
      });
      // Ensure the URL starts /callback
      if (!req.url?.startsWith('/callback')) {
        console.log('Non-callback request received');
        res.writeHead(404, { 'Content-Type': 'text/plain' });
        res.end('Not found');
        return;
      }
      // Process the response from the IdP: exchange the code for a
      // logged in user profile via AuthKit
      handleCallback(req, res, spinner, server, resolve, reject);
    });

    server.on('error', (error) => {
      console.error('Server error:', error);
      spinner.fail('Server error occurred');
      reject(error);
    });

    server.listen(3000, async () => {
      logStep('Local server started');
      // WorkOS AuthKit gives us the URL to redirect the user to so they can
      // sign in with Google or GitHub...
      try {
        const authorizationUrl = workos.userManagement.getAuthorizationUrl({
          provider: 'authkit',
          redirectUri: REDIRECT_URI,
          clientId: process.env.WORKOS_CLIENT_ID || '',
        });

        logStep('Opening browser for authentication');
        spinner.text = chalk.blue('Waiting for authentication...');
        await open(authorizationUrl);
      } catch (error) {
        spinner.fail(chalk.red('Failed to start OAuth flow'));
        server.close();
        reject(error);
      }
    });
  });
}
Handling the redirect from the identity provider
After the user logs in, WorkOS redirects the browser to http://localhost:3000/callback with an authorization code. The callback route handles this URL, extracting the authorization code returned by the IdP and using WorkOS AuthKit to exchange it for a logged-in user profile.
To enhance the experience for our users, we also read our custom HTML success page, a static HTML page styled with Tailwind CSS, into memory and write it to the response so the user knows they have successfully logged in:
async function handleCallback(
  req: any,
  res: any,
  spinner: any,
  server: any,
  resolve: (value: string) => void,
  reject: (error: Error) => void
) {
  try {
    const url = new URL(req.url, 'http://localhost:3000');
    const code = url.searchParams.get('code');
    console.log('Received callback with code:', code);

    if (!code) {
      handleError(new Error('No authorization code received'), 'No code in callback URL', spinner, server, res, reject);
      return;
    }

    logStep('Received authorization code');
    console.log('Code:', code);
    spinner.text = chalk.blue('Processing authentication...');

    // Exchange the authorization code for a logged-in user profile
    const authResponse = await workos.userManagement.authenticateWithCode({
      code,
      clientId: process.env.WORKOS_CLIENT_ID || '',
    });

    console.log('Authentication response received:', authResponse.accessToken ? 'success' : 'failed');

    console.log('About to save token...');
    const storageResult = await saveAuthData({
      accessToken: authResponse.accessToken,
      userId: authResponse.user.id
    });
    console.log('Token saved successfully');

    // Send success page response
    const successHtml = readFileSync(join(process.cwd(), 'dist/auth/success.html'), 'utf-8');
    res.writeHead(200, { 'Content-Type': 'text/html' });
    res.end(successHtml);

    spinner.stop();

    displaySuccessMessage(storageResult);

    server.close(() => {
      console.log('Server closed successfully');
      resolve(authResponse.accessToken);
    });
  } catch (error) {
    handleError(error, 'Authentication error', spinner, server, res, reject);
  }
}
The CLI runs the server temporarily while waiting for the redirect and then shuts it down after retrieving the code.
Securely storing the access token
The example uses @napi-rs/keyring to store the token securely in the operating system's keychain.
A system keychain is a secure storage mechanism provided by the operating system to store sensitive data, such as passwords, cryptographic keys, and access tokens. It leverages strong encryption and access control policies to protect secrets from unauthorized access.
Let’s examine the saveAuthData function. First, it attempts to create a new entry in the system keychain to store the entire JSON object returned by WorkOS.
If that fails for any reason, a flat-file fallback is used. This is the same pattern the official GitHub CLI used up until it adopted the device code flow:
export async function saveAuthData(data: AuthData): Promise<{ tokenPath: string; dirCreated: boolean }> {
  try {
    // Try to store in system keychain first
    const entry = new Entry(SERVICE_NAME, ACCOUNT_NAME)
    await entry.setPassword(JSON.stringify(data))
    logStep('Successfully stored credentials in system keychain')
    return { tokenPath: 'system keychain', dirCreated: false }
  } catch (error) {
    // Fall back to file storage
    console.warn(chalk.yellow('Failed to store credentials in system keychain, falling back to file storage'))
    console.warn(error instanceof Error ? error.message : String(error))

    let dirCreated = false
    try {
      await fs.mkdir(WORKOS_DIR, { recursive: true })
      dirCreated = true
    } catch (error: any) {
      if (error.code !== 'EEXIST') {
        throw error
      }
    }

    await fs.writeFile(TOKEN_PATH, JSON.stringify(data), 'utf-8')
    logStep(`Stored credentials in file: ${TOKEN_PATH}`)
    return { tokenPath: TOKEN_PATH, dirCreated }
  }
}
Tokens can later be retrieved when making requests to secured endpoints. The system keychain is tried first, and if no entry is found there, the flat file is read for the same information:
export async function getAuthData(): Promise<AuthData | null> {
  try {
    // Try system keychain first
    const entry = new Entry(SERVICE_NAME, ACCOUNT_NAME)
    const stored = await entry.getPassword()
    if (stored) {
      logStep('Successfully retrieved credentials from system keychain')
      return JSON.parse(stored)
    }
  } catch (error) {
    console.warn(chalk.yellow('Failed to retrieve credentials from system keychain, trying file storage'))
    console.warn(error instanceof Error ? error.message : String(error))
  }

  // Fall back to file storage
  try {
    const data = await fs.readFile(TOKEN_PATH, 'utf-8')
    logStep(`Retrieved credentials from file: ${TOKEN_PATH}`)
    return JSON.parse(data)
  } catch (error) {
    logStep('No credentials found in file storage')
    return null
  }
}
With that, we’ve securely retrieved, stored, and reused access tokens via browser-based login in a developer-facing command-line tool.
Thanks for reading!
With browser-based OAuth, you can deliver a secure, seamless authentication experience for your CLI users.
WorkOS AuthKit handles OAuth and user management so that you can focus on building an excellent experience.
Sign up for WorkOS today and start selling to enterprise customers tomorrow.