How to verify JWTs in a Next.js App Router app
Picking a library, choosing where to verify, and avoiding the mistakes that quietly break security.
JWT verification is the seam where "authenticated user" becomes a fact your code can rely on. Get it wrong and the failure mode is silent: requests succeed, the wrong user gets in, and nothing in your logs flags it until you find out the hard way.
Next.js complicates the picture in two specific ways. Verification can land in middleware, a server component, a route handler, or a server action, and the right place depends on what the route is doing. Middleware also runs on the Edge runtime, which rules out the most popular Node-based JWT library. So beyond getting the cryptography right, you have to decide where verification belongs and pick a library that works everywhere you need it.
This article walks through the practical decisions you need to make to verify JWTs safely in a Next.js App Router project: which library to pick, where verification belongs, and the pitfalls that quietly break security.
What's in a JWT
A quick refresher before getting into Next.js specifics.
A JWT is a string with three base64url-encoded parts joined by dots: header.payload.signature.
The header declares the signing algorithm and token type. The payload (also called the claims) holds the data. The signature is a cryptographic hash of the first two parts using the signing key, and it is what gives the token its integrity guarantee. Change a single character in the payload and the signature no longer matches.
Most tokens carry a standard set of claims defined by RFC 7519:
sub(subject): who the token is about, usually a user IDiss(issuer): who created the tokenaud(audience): who the token is intended forexp(expiration): when the token stops being validiat(issued at): when the token was creatednbf(not before): when the token starts being valid
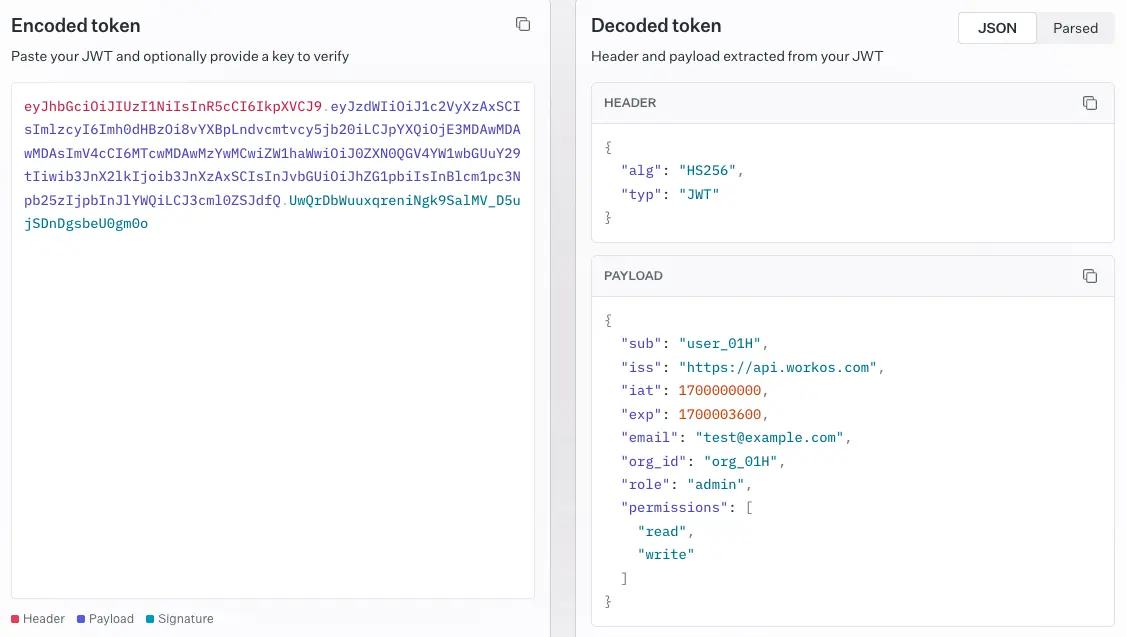
You can also add your own custom claims (email, role, organization ID, anything JSON-serializable). Verifying a JWT means checking the signature, checking the time-based claims, and checking that the issuer and audience are who you expect. Skipping any of those steps is how vulnerabilities sneak in.
!!If you want to see what an actual token you've been issued contains, the WorkOS JWT debugger decodes any JWT in the browser and shows the header and claims.!!
Pick the right library
Doing those checks safely means using a vetted library; rolling your own JWT parsing is the easiest way to ship a vulnerability. The biggest gotcha in Next.js is the runtime split. Middleware and any code marked export const runtime = 'edge' runs on the Edge Runtime, which does not include Node's crypto module. The popular jsonwebtoken package depends on Node crypto, so it will fail to bundle for Edge.
Use jose instead. It is built on the Web Crypto API, runs on Edge, Node, and the browser, and is actively maintained by the author of node-jose. Unless you have a strong reason otherwise, standardize on jose across your whole project so you do not have to think about the runtime each time.
If you are only verifying tokens in Node-only code (a route handler with the default Node runtime, for example), jsonwebtoken works fine. The cost of mixing is mental overhead, not performance, so most teams pick one.
Symmetric or asymmetric?
With a library picked, the next decision is which signing algorithm your tokens use. The signature is the part of the JWT the algorithm produces: the issuer hashes the header and payload together with a key, using the algorithm declared in the header, and appends the result as the third segment of the token. The verifier reruns that computation with its own copy of the key and rejects the token if the signatures don't match. The algorithm choice decides what kind of key each side holds, and that decision shapes how you deploy verification across services.
Two algorithm families cover almost every real case.
- HS256 uses a single shared secret to sign and verify. Use it when signing and verification happen within the same trust boundary, typically a single application or a small cluster of services that already share secrets through a secure channel. The secret should be long, random, and stored in a secrets manager rather than a plain
.envfile checked into a repo. As long as the secret stays inside the boundary, HS256 is the simplest and fastest choice. - RS256 (or ES256) uses a private key to sign and a public key to verify. Use it when tokens cross trust boundaries: when a third party issues the token (any identity provider, OIDC service, or enterprise SSO setup), when multiple independent services need to verify, when external parties need to verify your tokens, or when you want robust key rotation through a JWKS endpoint. Your app fetches the issuer's public keys and uses them to verify incoming tokens. The private key should live in an HSM or a managed key service, and the public key gets published through JWKS. EdDSA (Ed25519) is a newer asymmetric option supported by
joseand worth a look if you're choosing fresh.
A common mistake is leaving the algorithm unspecified at verification time. Always pass the expected algorithm explicitly. Otherwise an attacker can swap a token signed with none or downgrade an RS256 token to HS256 using the public key as the secret.
!!For a deeper comparison of the two, including key management and rotation, see our RS256 vs HS256 breakdown.!!
Verifying an HS256 token
Here is the helper for the symmetric case: a session cookie your Next.js app mints, signs, and verifies all by itself.
Note the explicit algorithms, issuer, and audience options. All three matter. jwtVerify throws on any mismatch or on an expired token, so wrap calls in try/catch and treat any error as an unauthenticated request.
Verifying a third-party token with JWKS
When your app isn't the one signing tokens, you don't have a secret to share. The issuer signs with a private key it keeps to itself and publishes the matching public keys at a JWKS (JSON Web Key Set) endpoint, typically at a well-known URL on the issuer's domain. Each key carries a kid identifier that matches the kid in the token header, so the verifier knows which key to use, and issuers rotate keys periodically without invalidating outstanding tokens.
Fetch the keys from the JWKS endpoint and let jose handle the lookup:
createRemoteJWKSet caches keys in memory and refreshes them when it sees a kid it does not recognize, so you do not pay the network cost on every request. Define the JWKS once at module scope, not inside the function, so the cache survives across requests. (For background on what's actually in a JWKS response and how it sits next to JWS, JWE, and JWK, see our explainer on the four.)
The issuer and audience values come from your provider's dashboard. Get them right. A token issued for a different audience is still cryptographically valid, but accepting it would let any app on the same identity provider authenticate against yours.
Where to verify in Next.js
With the helper functions in place, the question is where in your Next.js app to call them. The App Router gives you several places to run verification, each with tradeoffs.
- Middleware runs before the request reaches your route. It is the natural place to gate whole sections of the app, redirect unauthenticated users to a login page, or attach claims to request headers for downstream code. Because it runs on Edge, you must use
joseand you cannot do anything Node-specific. Middleware should be fast, so cache JWKS lookups (jose does this for you) and avoid extra network calls. - Server components can verify tokens directly when they need user-specific data. This works well for pages that render different content per user. The catch is that server components run on every request unless you cache them, so verification cost adds up. Pull the verified payload into a small helper that you call once per request and pass down.
- Route handlers (
app/api/*/route.ts) are where you verify bearer tokens on API calls, especially for tokens passed from mobile clients or third-party integrations. Run verification at the top of the handler and return 401 cleanly if it fails. - Server actions follow the same pattern as route handlers. Verify before touching any data.
A reasonable default: use middleware for coarse routing decisions (logged in or not, redirect to login), and re-verify inside server components or route handlers for any code that actually reads the user's claims. Middleware can be bypassed by misconfiguration, so do not rely on it as your only line of defense.
Middleware pattern
Starting with middleware, since it sits in front of everything else. The minimum here reads the session cookie, verifies it, redirects to /login on any failure, and passes the verified user ID through as a request header for downstream code.
A few details worth calling out. The matcher keeps middleware off public routes so you do not pay verification cost on /, /login, static assets, and similar paths. Setting a request header like x-user-id is fine for passing data to downstream handlers, but never trust headers like that in code that did not run behind your middleware. For server components and route handlers that need the full payload, re-verify the cookie there rather than reading the injected header.
Reading the cookie in a server component
Middleware handles the "logged in or not" gate, but as soon as a server component needs to render user-specific content (greeting, role-gated UI, account details), it has to read the actual claims. Re-verify the cookie inline and use the returned payload directly. Don't trust the x-user-id header set by middleware here, because nothing prevents a request from reaching this component along a code path that bypassed your middleware config.
In Next.js 15, cookies() is async, so remember to await it.
Verifying a bearer token in a route handler
Cookies are the right default for first-party browser sessions because they can be httpOnly and unreachable from JavaScript. For mobile apps, server-to-server calls, and third-party API consumers, the convention is to send the token in the Authorization header instead.
The Bearer prefix is convention; strip it before passing the value to jwtVerify. One thing to avoid: do not accept tokens in URL query parameters or path segments, even as a fallback. URLs end up in server access logs, browser history, analytics platforms, and HTTP Referer headers, none of which should ever see a credential.
Common pitfalls
Several mistakes show up over and over.
- Storing tokens in
localStorage. Anything readable by JavaScript is reachable by an XSS payload. UsehttpOnly,secure,sameSite=laxcookies for session tokens. Our JWT storage guide covers the tradeoffs across cookies, in-memory storage, andlocalStoragein more depth. - Skipping audience and issuer checks. These are not optional. Without them, a valid token from a different tenant or a different API in the same identity provider will pass.
- Not handling clock skew. If your server's clock drifts, freshly issued tokens can appear to be from the future.
joseaccepts aclockToleranceoption (in seconds) for exactly this case. A few seconds is usually enough. - Verifying inside a
useEffect. Never verify a JWT in client code. The client cannot be trusted with the secret, and it cannot be trusted to enforce the result. Verification belongs on the server. - Putting verification logic in shared client/server modules. If you import a module that uses
joseinto a client component, your secret may end up in the client bundle. Keep auth helpers in files that are only imported from server code, and consider addingimport 'server-only'at the top to make accidental client imports throw at build time. - Forgetting to refresh. JWTs expire by design. Pair short-lived access tokens (minutes) with longer refresh tokens stored as
httpOnlycookies, and rotate refresh tokens on use. Most identity providers handle this for you if you use their SDK.
Wrap-up
For most Next.js apps, the recipe is short:
- Use
joseeverywhere. - For tokens that cross a trust boundary (any third-party identity provider, multiple verifiers, or anything needing JWKS rotation), use RS256 with JWKS. For tokens that stay inside one app, HS256 is fine, just keep the secret in a real secrets manager.
- Verify in middleware for routing decisions and again in server components or route handlers for anything that reads claims.
- Always pass
algorithms,issuer, andaudienceexplicitly. - Keep tokens in
httpOnlycookies, never inlocalStorage, and never on the client.
Get those pieces right and JWT handling becomes one of the boring parts of the codebase, which is exactly what you want from your auth layer.
What you can offload
JWT verification itself is something every app has to do for itself. The token shows up in your request, you check the signature, you read the claims. There's no library that gets you out of doing this correctly.
What you can offload is everything that surrounds it: sign-up and sign-in flows, password reset, MFA, session lifecycle, social login, enterprise SSO over SAML and OIDC, directory sync via SCIM, and the user management dashboards you'd otherwise build from scratch.
If you're building a Next.js app that needs to support business or enterprise customers, WorkOS AuthKit is worth a look. It handles the auth UI, hosted sign-in, and user management out of the box, with first-class Next.js support through @workos-inc/authkit-nextjs. You still own JWT verification in your own code (and the patterns in this article apply directly to the access tokens AuthKit issues), but you stop owning the rest of the auth stack.