Session management for frontend apps with AuthKit
AuthKit now supports sessions for public clients, like mobile and single-page apps. Use the WorkOS React SDK to keep your users logged in for longer while keeping them safe from attacks.
Session management can have a powerful impact on user experience. Once authenticated, users expect to stay logged in and navigate smoothly across your app without frequent re-authentication. On the other hand, long-lived sessions make applications more susceptible to session hijacking and cross-user web attacks, like Cross-Site Request Forgery (CSRF) and Cross-Site Scripting (XSS). Getting this balance right is a critical and challenging task.
WorkOS now supports session management for public clients, like mobile and single-page apps. In this post, we will see how this flow works and how you can implement it using AuthKit and the React SDK to ensure your users’ sessions are secure by default.
Sessions management with refresh tokens
When you authenticate a user, you get an access token that you can use to make secure calls to an API on behalf of the user (for frontend apps you would do that using PKCE). Access tokens are short-lived for security reasons, and when they expire, the user has to authenticate again to get a new one. However, this can be a very frustrating user experience. Imagine asking your users to re-authenticate every couple of minutes. Enter refresh tokens.
A refresh token is typically long-lived and enables an application to get new access tokens in the background. Users who log into your app are issued an access token and a refresh token. When the access token expires after a few minutes, the refresh token is used to get a new access token.
At the same time, if the Authorization Server implements secure practices, you also get a new refresh token. This practice is called refresh token rotation. Whenever a refresh token is used to get a new access token it gets invalidated and a new one is issued. This is done to prevent replay attacks, where someone gains access to the original refresh token and tries to use it to get an access token.
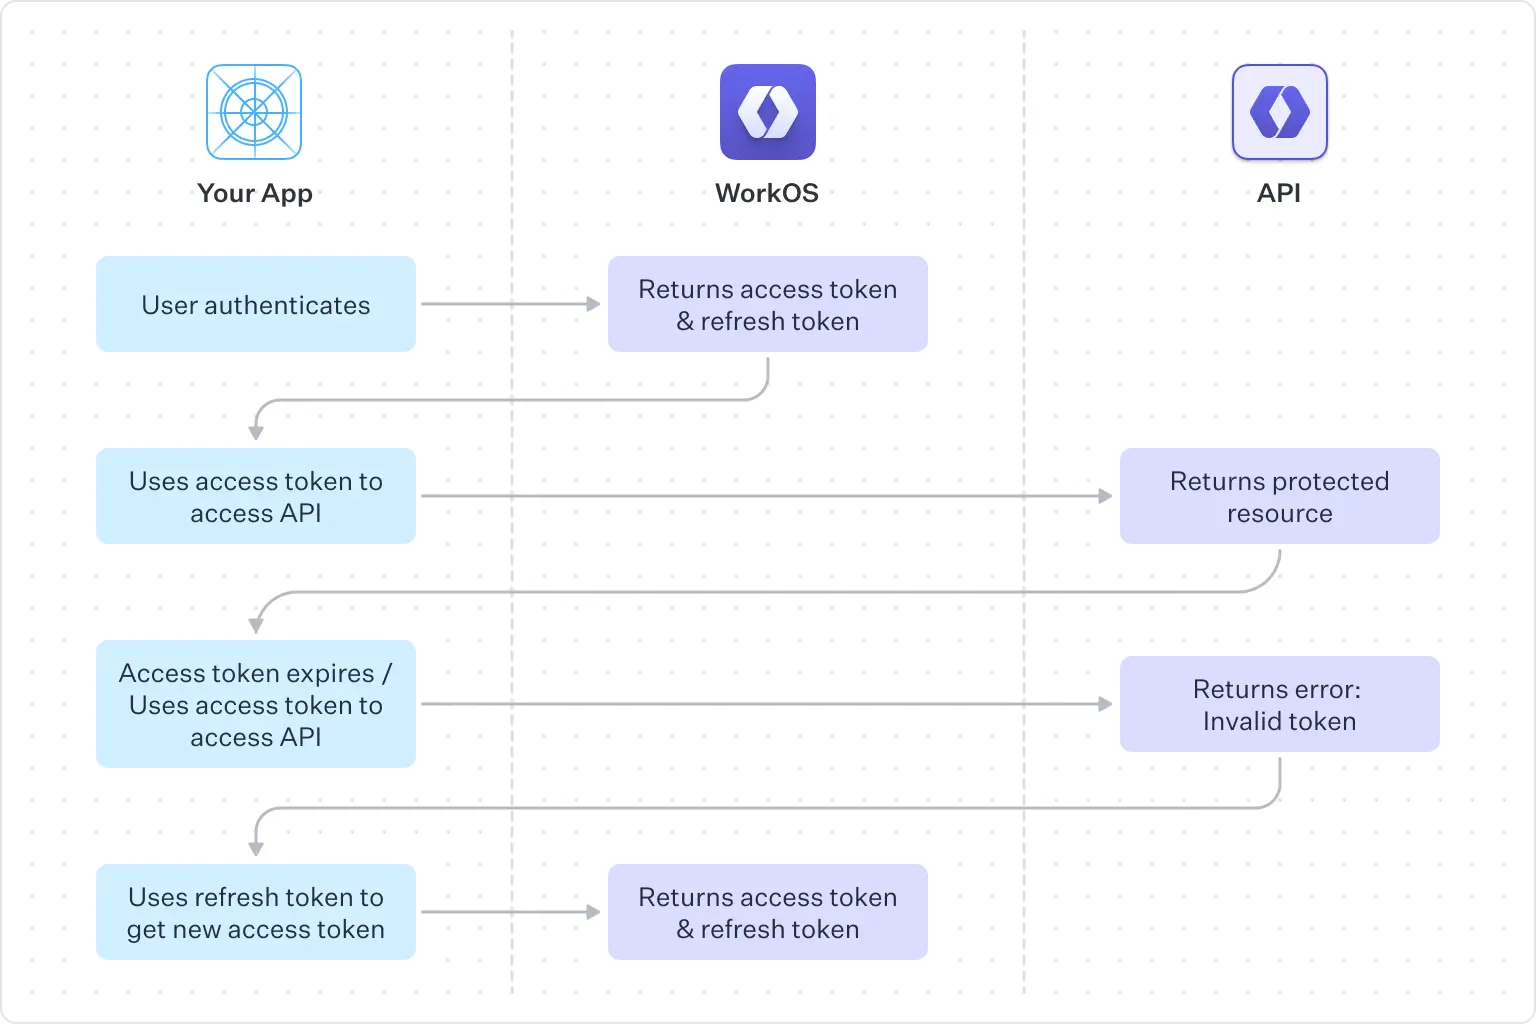
However, apps that cannot hold secrets, like single-page and mobile apps, pose an additional challenge to this flow. An attacker might steal the refresh token and use it to get new access tokens without further authentication. To ensure this does not happen, WorkOS uses an HttpOnly session cookie to store the refresh token. This ensures that the refresh token is inaccessible to client-side code. This session cookie will be accepted in place of the refresh_token parameter when you authenticate with a refresh token.
The WorkOS React SDK manages all this for you and makes session management effortless. The SDK handles refresh and access tokens, eliminating the need to check for expired tokens and refresh them. With one function call, you'll always have a valid access token, ensuring a secure and seamless user experience by default.
Implement sessions with React and AuthKit
Let’s see how to implement session management for a React app using AuthKit and the React SDK.
Go ahead and sign up if you haven’t already, and then go to your WorkOS dashboard for some configuration we need to do to enable client sessions.
Copy your app’s URL and paste it into the following sections of the dashboard:
- Redirects > Redirect URI: The callback endpoint that WorkOS will redirect to after a user has authenticated.
- Redirects > Initiate login URL: This is the endpoint from which all login requests must be initiated. It should be the one to call the
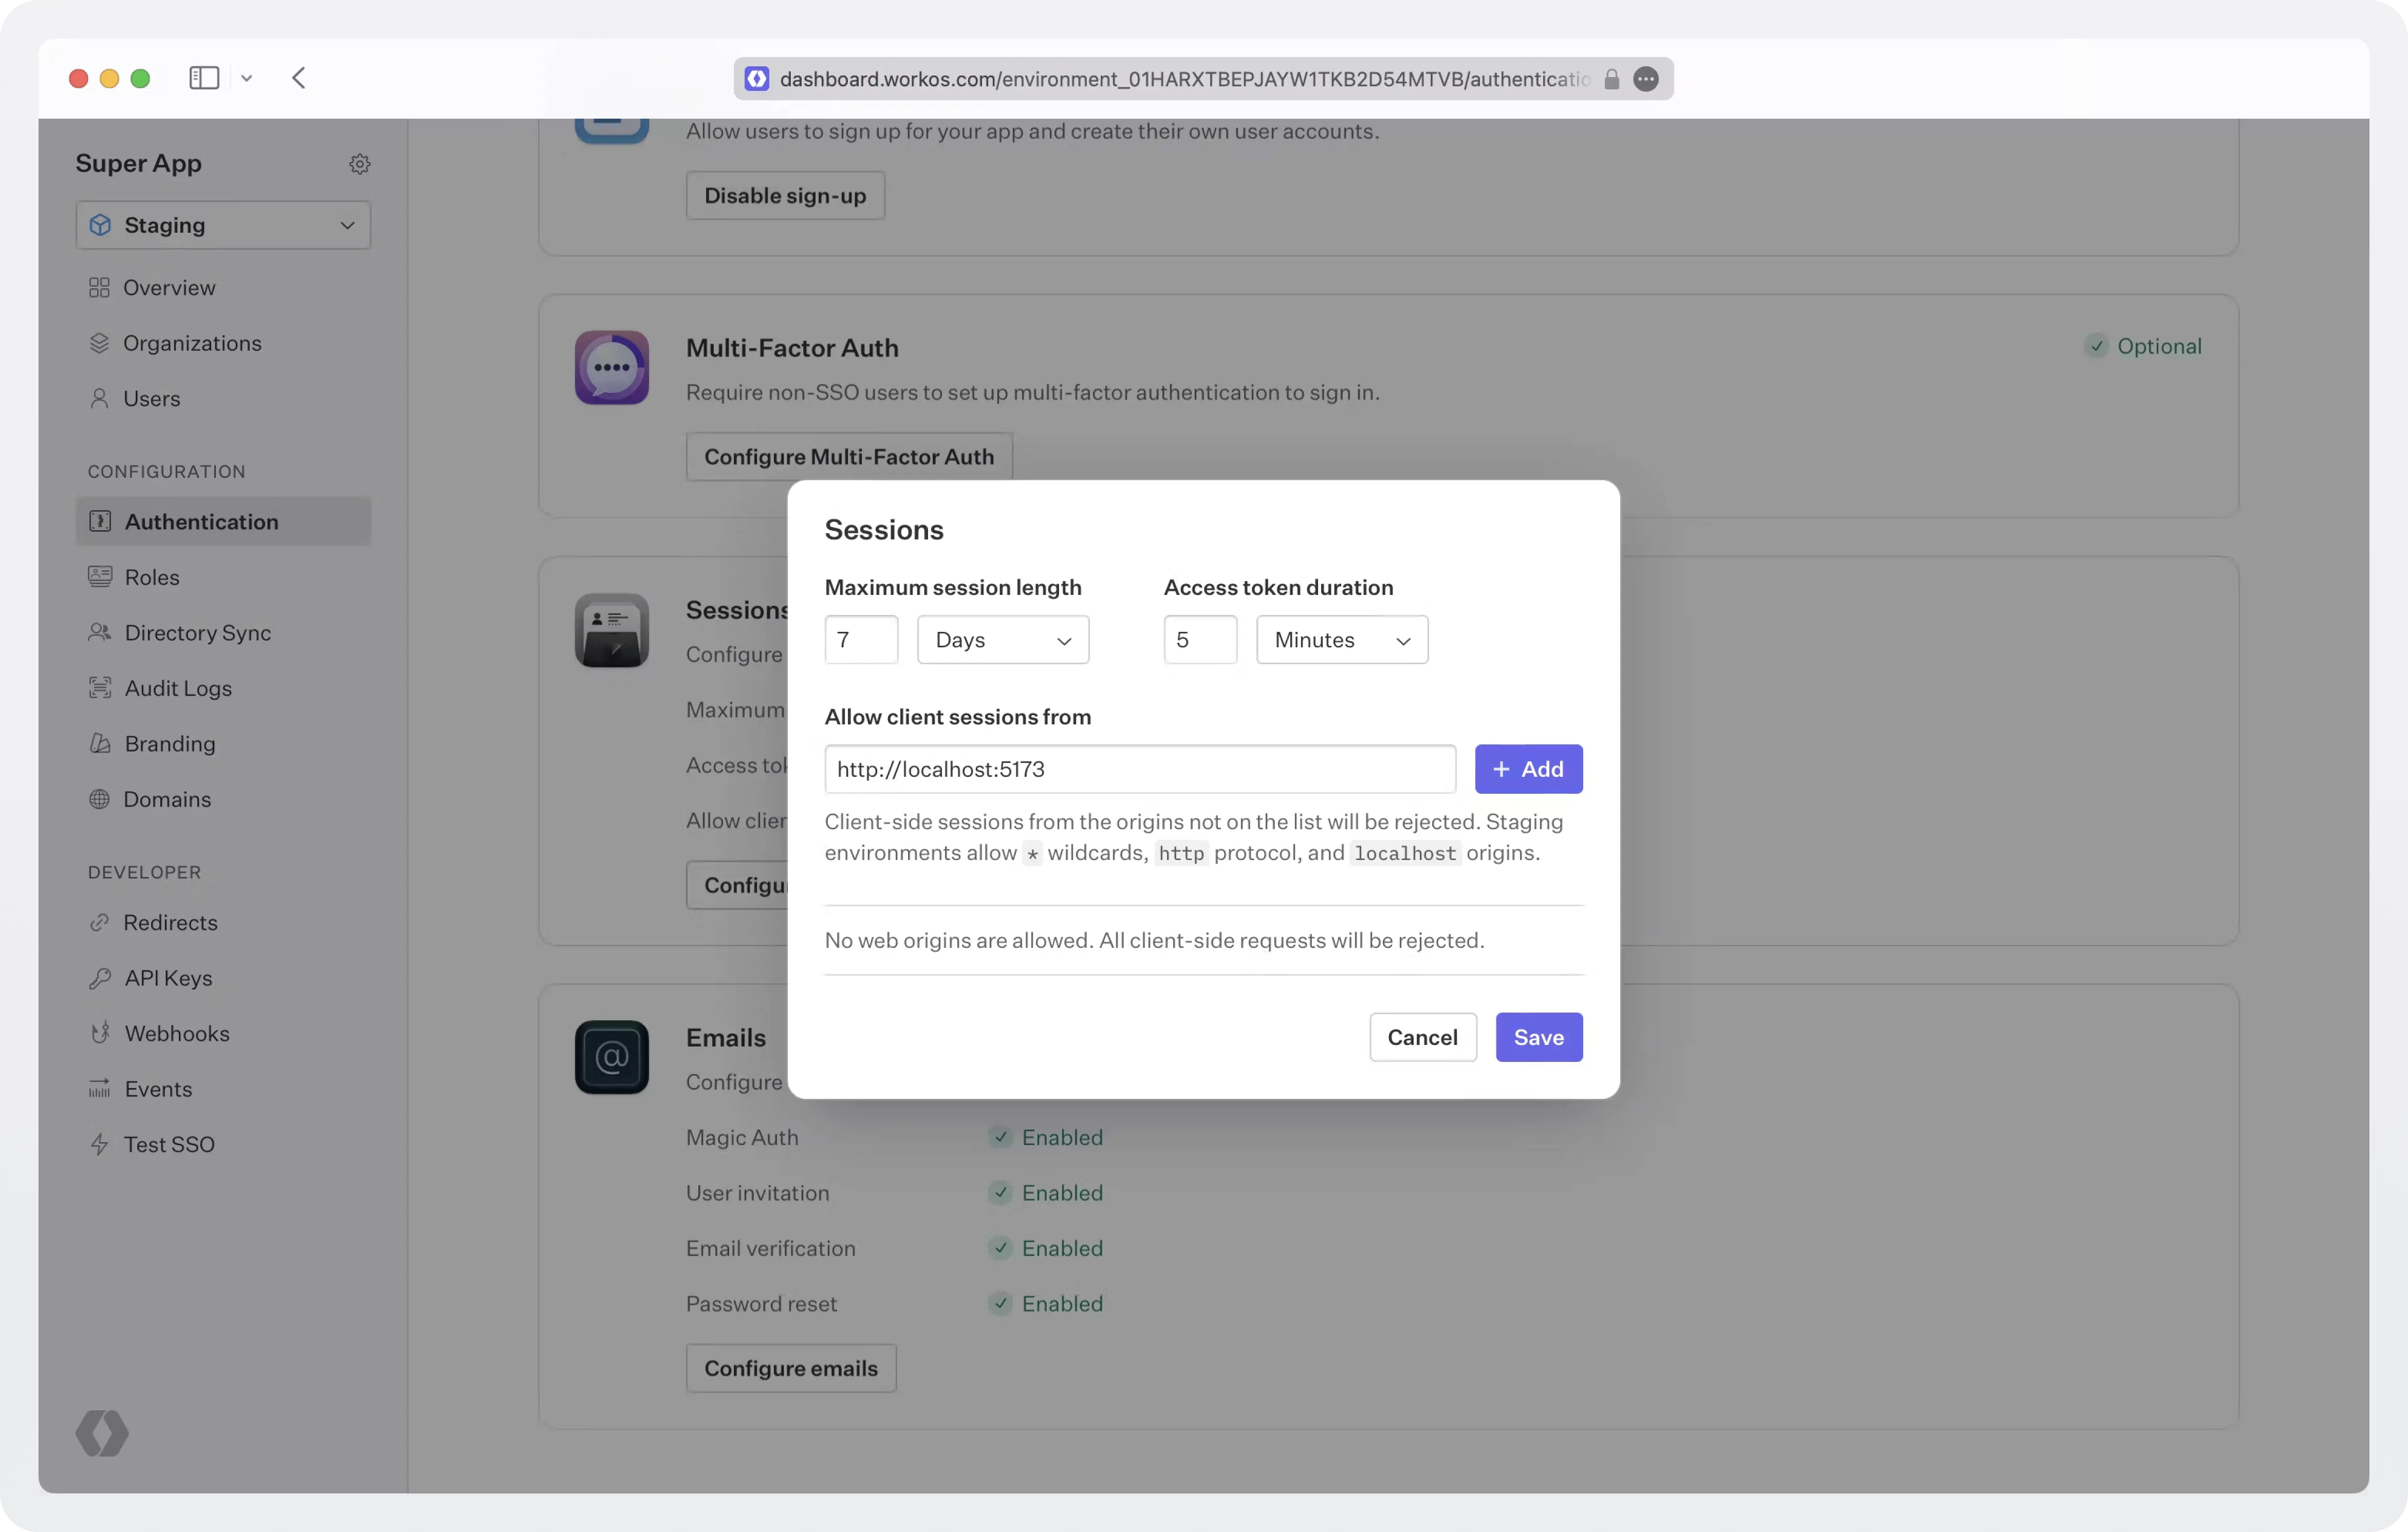
signInmethod, along with thecontextsearch parameter that may have been included in the request (see the code sample below for details). If a login request doesn’t start from your app (e.g. a password reset email or a bookmarked page) AuthKit will detect it and redirect to this endpoint. - Authentication > Configure Sessions: Since your user’s browser will be making calls to the WorkOS API directly, it is necessary to add your domain to the allow list in your WorkOS Settings. All requests not originating from it will be rejected. While in development mode add your local development URL here (e.g.
localhost:5173). No trailing backslashes.
In the Sessions dialog box, you can also configure the “Maximum session length” (for how long you can use refresh tokens before your user will have to re-authenticate), and the “Access token duration” (how long each access token will live). The default values are 7 days for refresh tokens and 5 minutes for access tokens.
Now let’s add some code to our app.
We will start by wrapping our application with the AuthKitProvider component which will handle the redirect from AuthKit, refresh the session when needed, and provide context for hooks used in the components of your app.
Initialize it with your client ID, which you can find in the WorkOS dashboard, and your custom Authentication API domain in production.
Next, use the useAuth hook in your components.
The useAuth hook returns user information and loading status. It also provides functions to retrieve the access token and sign in and sign out the user:
isLoading:truewhile user information is fetched during the initial load.user: The WorkOS User object for this session.getAccessToken: Returns an access token. It will fetch a fresh access token if the current one has expired.signIn: Redirects the user to the AuthKit sign-in page. Takes an optionalstateargument. The state is an arbitrary string that can be used to help restore the application state between redirects. If included, the redirect URI received from WorkOS will contain the exactstatevalue passed.signUp: Redirects the user to the AuthKit sign-up page. Takes an optionalstateargument.signOut: Ends the session.
If you have routes that you wish to be accessible only to logged-in users, you can use a custom React hook.
That’s it! For more details check out the React Quickstart, the sample React app, or the following YouTube video that walks you through these steps.