The developer’s guide to auth sessions
Learn what sessions are and how you can implement them from scratch or using an auth provider like WorkOS.

Everyone already hates logging in with a username and password. But imagine if you had to log in with a username and password every single time you did something in an application? Sessions help us avoid this nightmarish reality by persisting user data across HTTP requests in a browser. And though most developers have probably touched session logic at some point, 201 topics like 3rd party auth and security can be more obscure. This post will guide you through everything you need to know to implement sessions in whatever you’re building.
Sessions 101
Most developers have probably implemented some kind of basic authentication scheme before, but if you haven’t (or if you just want a refresher), this section is for you.
Sessions exist because HTTP is stateless, but apps are not. Without some sort of persistence, you would need to force users to authenticate on every single request to your backend, which would of course be untenable. Sessions give you a way of remembering a user’s authenticated status for a fixed length of time. This way, a user authenticates, you decide how long you want them to stay logged in for, and you can check your own systems on each request to see if they have an active session or not. Pretty simple.
The core of building out a sessions system is a table in your database to keep track of active sessions. A typical sessions table might look something like this:
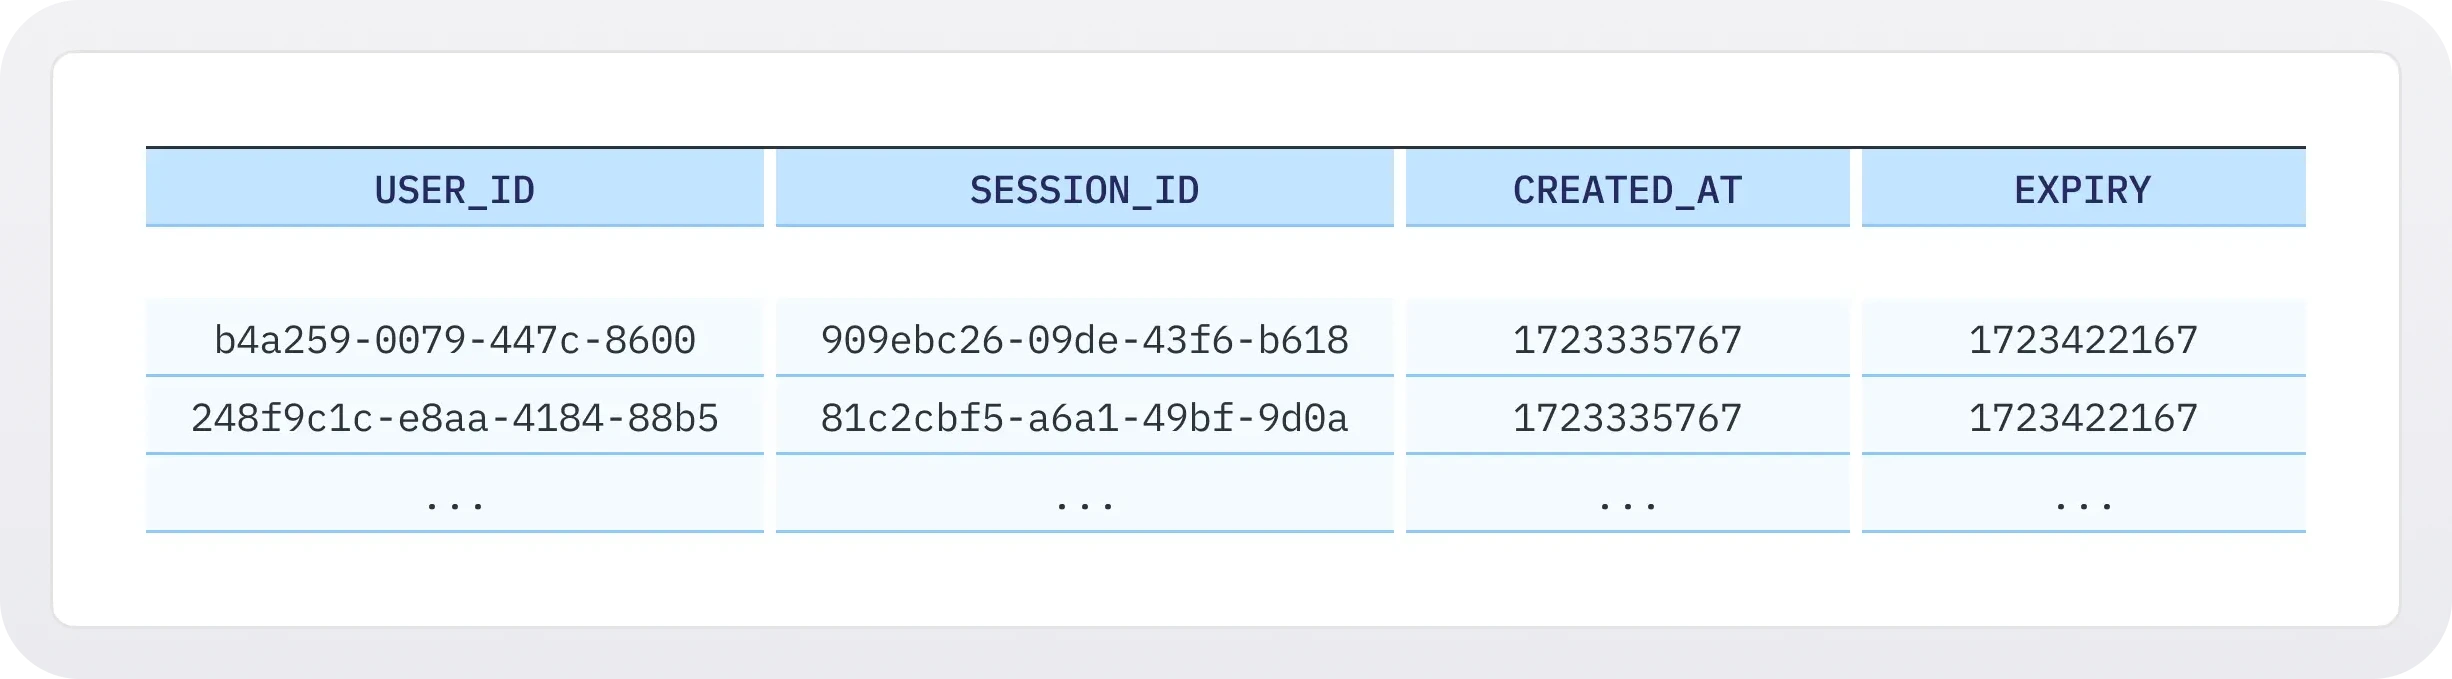
Each row represents one active user session, with a unique ID as the primary key.
Once you’ve got your sessions table in tow, here’s the basic workflow:
- When a user authenticates, you add a new row to your sessions table.
- You set a browser cookie that contains the session’s ID and the user’s ID too.
- On every subsequent request, you include the session ID from the cookie in the request.
- You check against your sessions table that this session ID matches a real, active session for the given user.
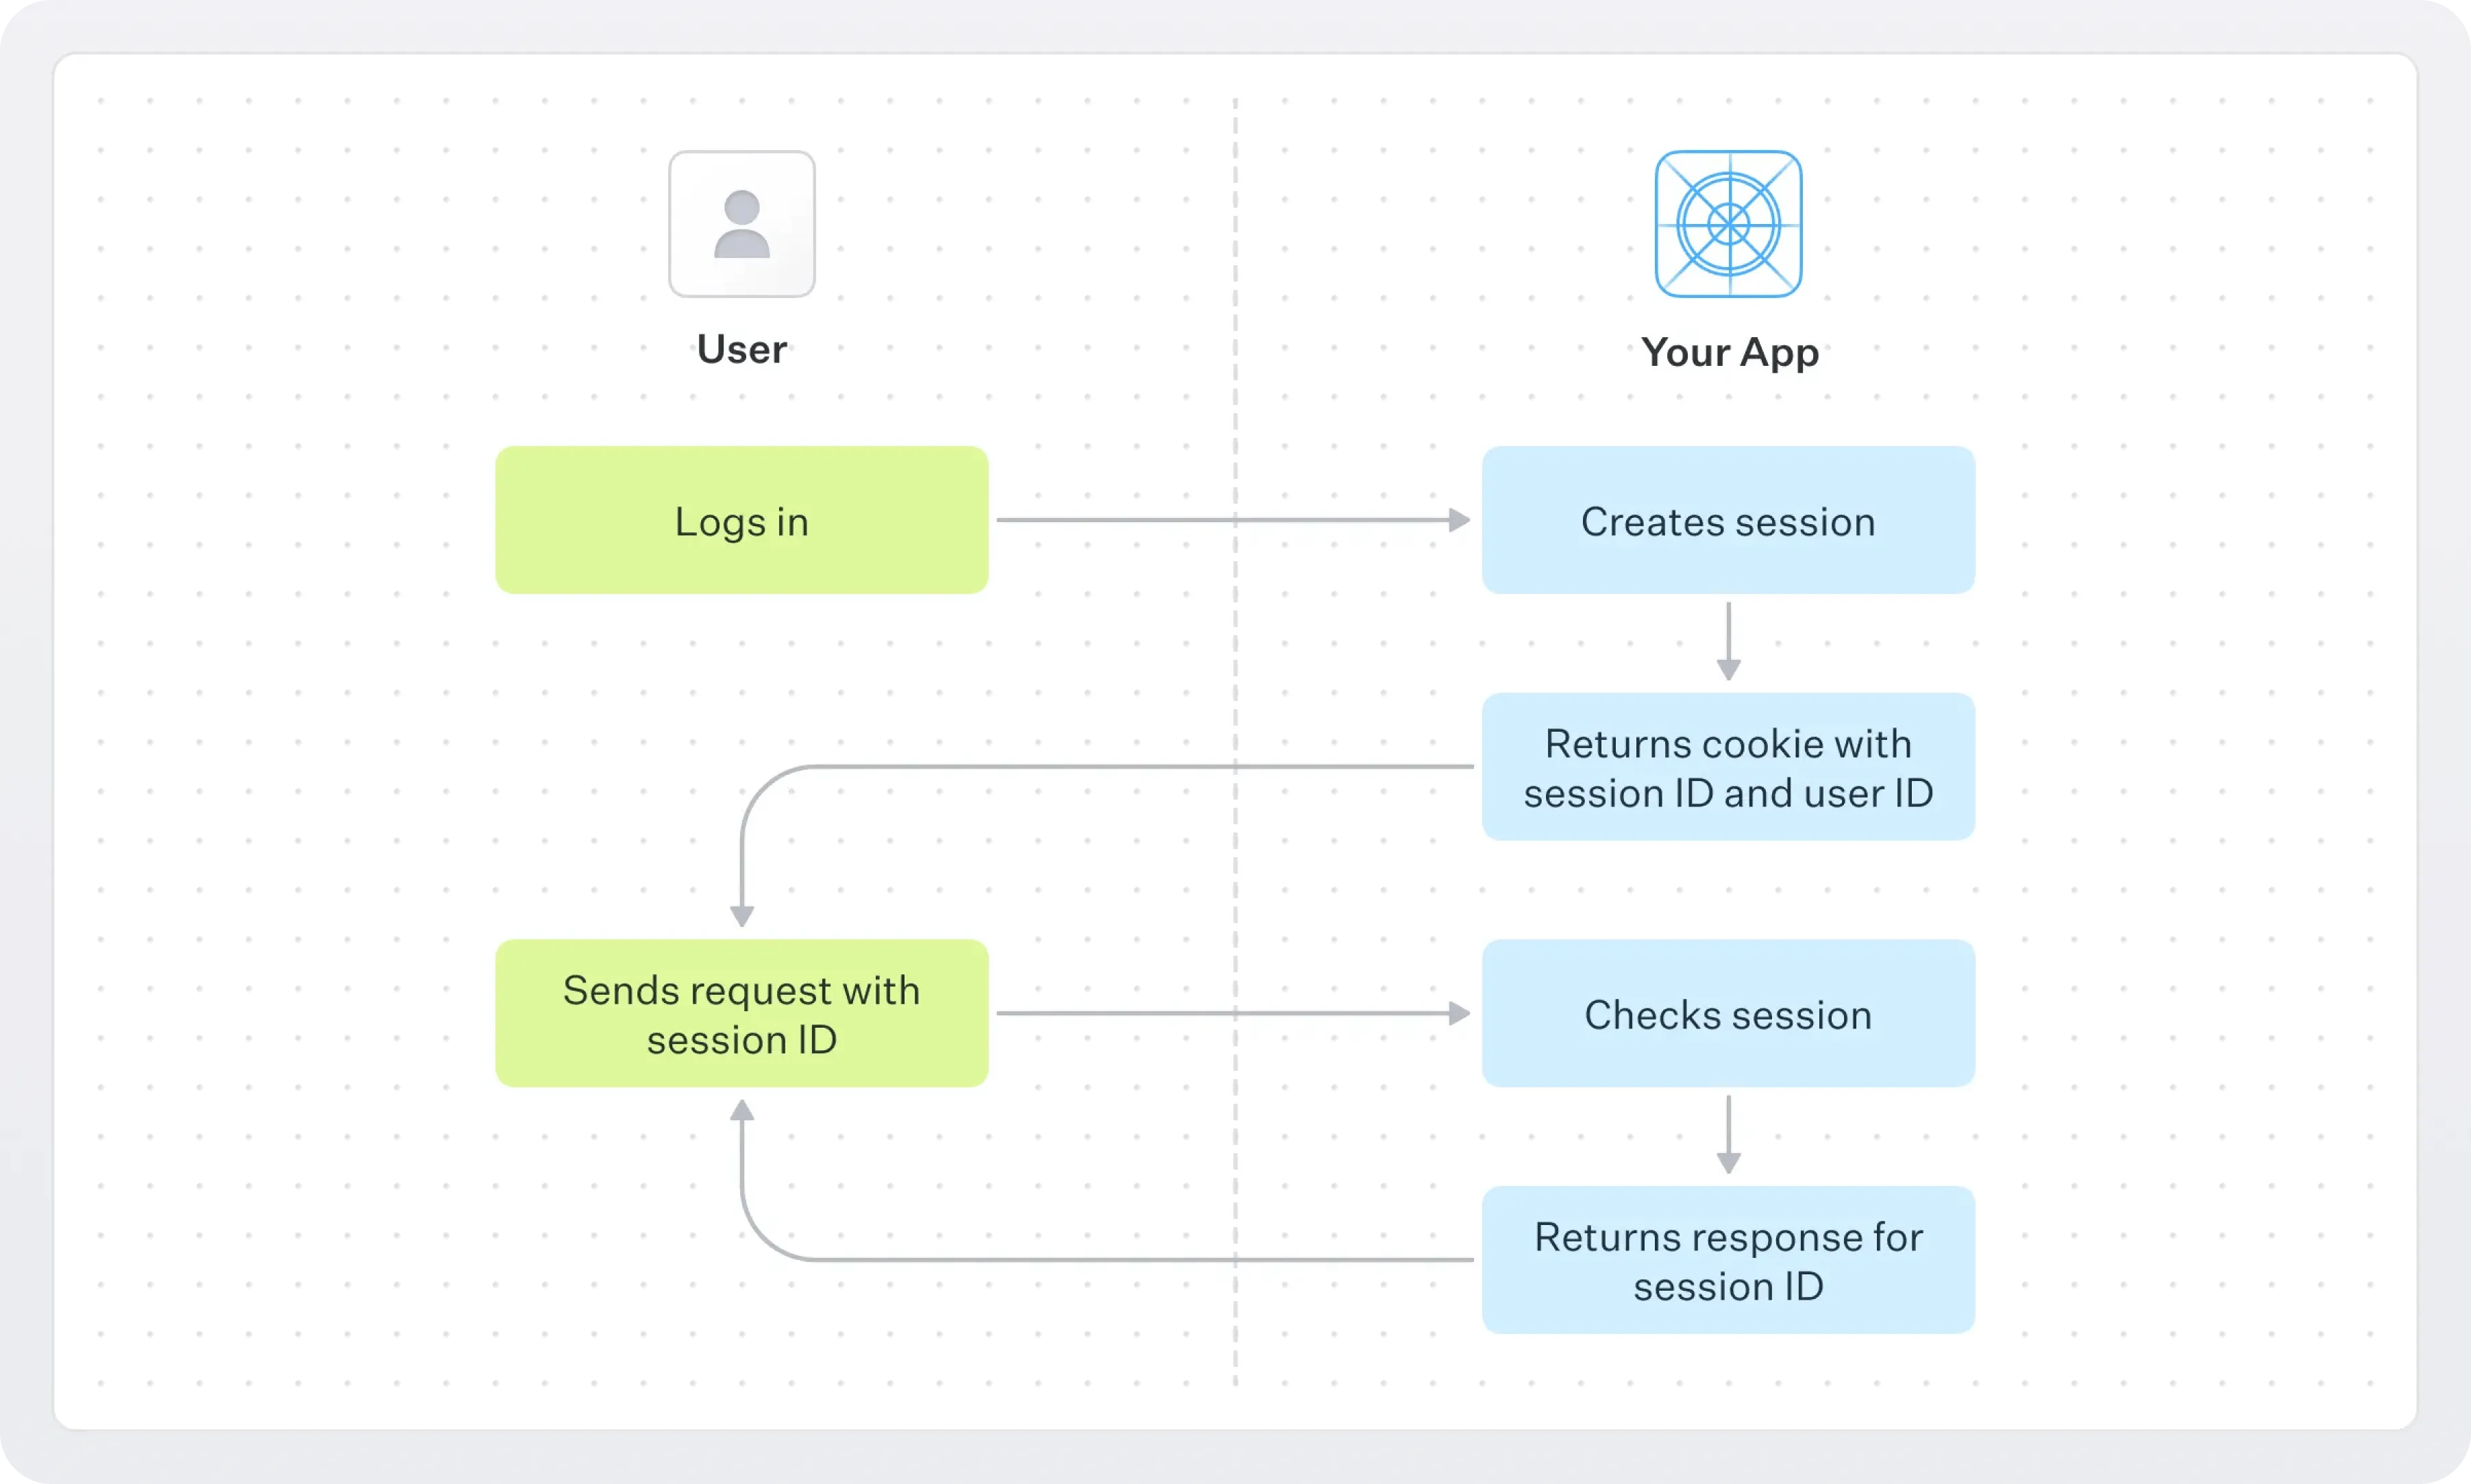
After that, the world is your oyster.
For obvious security reasons, sessions need to eventually expire so a user can be forced to re-authenticate and prove that they’re not someone else. Different domains call for different expiration lengths. In B2B software, it’s not uncommon for sessions to expire after more than one minute of inactivity. In consumer social, and especially on mobile, they can last for a good deal longer.
When a session does expire, there are two ways of handling it with respect to your data model. You can either hard delete the session from the sessions table, or keep every historical session in there and add expiration logic to your checks. Then your check might be something like:
- Does this user have a session in the table?
- Does that session’s ID match the one in the cookie?
- Is it before the session’s expiration date?
Soft delete is better for compliance use cases, but your table can get big fast.
Authentication status isn’t the only reason you might want to keep track of a session. It’s common for session cookies to include information about the user, like their roles and permissions. Localization, like setting a different language and persisting it, is another good use case.
Sessions and 3rd party auth providers
The above walkthrough is how you’d build sessions from scratch. But today, you usually don’t have to. If you’re building on a web framework like Rails or NextJS, they will usually handle sessions for you. Rails handles sessions as encrypted cookies. Django does a more traditional version with a table and cookies. NextJS is less opinionated, and you have to do most of the work yourself.
In addition to web frameworks, today developers have this very nice option of not building authentication themselves at all, and instead outsourcing it to a 3rd party like our very own AuthKit. When you aren’t running your own authentication system, handling sessions is a bit tricky.
When a user authenticates, you make a call that looks something like this:
The auth provider has their own sessions table (for your app) that keeps track of who recently authenticated, how long ago, and things of that nature. So in theory, they could just give you access to that table – either directly, or via some sort of doesThisUserHaveASession() endpoint. You’d then do a check every time a user makes a request to your backend to make sure they have a session. But you definitely do not want to do this, both for the obvious yet-another-opportunity-for-latency reason, but also because it’s not great to have every single request to your app rely on a third party service.
Instead, the way most 3rd party auth providers handle session management is via access tokens. When a user authenticates, the provider issues a signed token that essentially proves that when the token was issued, the user had a valid session. The longer it has been since the token was issued, the less confidence you have that the session is still valid; these tokens usually have configurable expiration windows, so developers have a choice about how they want to prioritize security.
In AuthKit, we use the OAuth-like pattern of an access token and a refresh token. When a user authenticates, we generate two tokens: an access token with information about the session, and a refresh token to pass back to AuthKit when you want to get a new access token. You can sort of think of using the refresh token as the metaphysical equivalent of hitting the auth provider’s session table. Although if you’re using our NextJS or React SDKs, this work is all done for you automatically.
Sessions and security
Perhaps the most overlooked, but important 201 topic when it comes to sessions is security. Poorly implementing session logic can open your app and users to a bunch of different types of vulnerabilities. We’ll run through a few, and how to go about preventing them.
The most common one is session hijacking. In a session hijack attack, an attacker will gain access to your session cookie and use it to make their own requests. This can happen in a bunch of different ways:
- Guessing and brute force attacks: the session ID is just a string of numbers and characters, so with enough zeal, someone can potentially guess it
- Sniffing: monitoring / capturing all packets passing through a network (including your requests)
- XSS attacks: using malicious client side code to steal the information in cookies
- …and so on and so forth
Luckily for you, it’s decently straightforward to do your part in preventing attacks like this.
Use secure attributes on your cookies
Cookies have a few attributes you can use to make them more secure, though they are poorly documented for some reason.
The HTTP-only setting tells the browser to prevent any client side scripts from accessing a cookie. It’s important to note that this is a browser-level setting, not something inherent to the cookie itself.
The Secure attribute on a cookie means it will only allow sending to a secure web server with HTTPS. This is generally less of a concern today when most sites have a cert, but still helps present against man in the middle attacks.
Finally, the SameSite attribute restricts cookies to being sent only to the site that the user is currently on. This also helps prevent against man in the middle attacks or any third party site getting access to your cookies. The entire ad industry exists on these third party cookies (i.e. cookies without the SameSite attribute), and Chrome almost banned them this year.
Tie session information to user information
An attacker gaining access to a session ID is only harmful if your backend only requires a session ID to pass a check. But if you require some combination of the session ID and information about the authenticated user, you can make it that much harder for attackers to hijack the session. For example, if you bind a session ID to the client’s IP address and make your check require both to match the initial set data for when the client authenticated, attackers will need to spoof the IP as well.
.webp)

.webp)


.webp)
.webp)

_.webp)
.webp)
.webp)


.webp)


.webp)

