The developer's guide to RBAC
Authorization often takes a backseat to authentication, but it becomes critical as applications scale and and require finer access control. This article is a practical guide for developers on how to design, scale, and integrate role-based access control (RBAC): from simple roles to enterprise-ready systems with IdP syncing.

Authorization is kind of like authentication’s scary cousin – it’s not something most developers worry about day 1, but you know it’s coming. Enterprises – and increasingly, smaller companies too – have rigid permissions requirements. They won’t even consider a product without granular access management. Building a robust, performant authorization system isn’t an if, it’s a when. But it’s complicated, opaque, and a lot of the science isn’t quite settled.
Like our guide to authentication, this blog will walk through what developers need to know before implementing authorization, where it gets hard, and a sort of 201 perspective. First, we will talk about authorization basics, and then focus specifically on working with identity providers (IdPs) via SCIM (or otherwise).
Why does my app need authorization in the first place?
Authentication is a Day 0 problem; you essentially cannot build a useful app that doesn’t have user management in some way, shape, or form. But authorization is more like a Day 5 problem – you don’t run into it until you start selling your product into more serious customers. Most apps start with all users having the same levels of access and permissions, until a deal you’re trying to close says that they need a separation between admin and user roles. At this point, congrats, you need to build authorization.
There are two camps of philosophy for how to build authorization into your app:
- Role-based: users are assigned a role, and each role comes with a set of permissions. This is commonly acronym-ized as RBAC, or role-based access control.
- Resource-based: each user has individual relationships with resources (like a repository in GitHub, or a base in Airtable). This is commonly referred to as fine grained authorization, or FGA.
Consider the following journey of a team of developers building a completely fictional source code management platform – affectionately named BitHub – where you can host your code in cloud-based repositories. Like auth, which can be as simple or complex as your customers require, authorization starts out pretty basic.
Stage 1: no authorization
In the first version of your app (and most apps), there is no authorization at all. Every page is accessible by every user. This is a completely reasonable way of modeling reality, and doesn’t become a barrier until the organizations you sell to demand a permissions scheme. In fact, there are some smaller SaaS apps out there that to this day have successfully stayed in Stage 1 of authorization; it all just depends on who your customers are.
For our team of BitHub developers, this would mean that every member of a given organization has full access to every repository. Not ideal, but also not completely untenable for smaller companies.
Stage 2: admins, and everyone else
The most common initial authorization-related request from customers is to add the concept of an admin. In its simplest form, admins can view certain pages that non-admins cannot.
The difference between having no authorization and having the “admin” concept is not massive. The easiest way to implement it is by adding an `is_admin` column into your users table, and then adding a check to the pages that you want to gate to admins only. As long as the only difference between these two roles is viewing an entire page or not, the logic in code remains relatively simple.
Though it should be common sense, a surprising number of companies forget to show anything more than a 500 error when an un-authorized, non-admin user tries to access a page they don’t have access to. Take the time to communicate to your visitor why they can’t see the page!
Stage 3: n>2 roles
BitHub is taking off and getting in front of larger customers with more nuanced team structures. The time has come to move beyond is_admin and add other roles like repository owner, contributor, etc. Congrats, you have now entered the realm of permissions. A permission just means that a user is able to do a specific thing: it could be as simple as viewing a page, or as complex as editing a specific row in an Airtable base. Implementing permissions well is quite complicated and will require a completely new data model (more on this later).
At this stage, most teams adopt role-based access control (RBAC) in earnest. A common pattern is mapping 3–10 roles to cover the majority of use cases, things like admin, manager, contributor, and viewer. But as your product and customer base grow, requests for role variations will start to surface. For example, a customer may want “read-only admins,” “project-specific leads,” or “special reviewers.” This is the first sign that your RBAC model needs to evolve into something more flexible and layered.
Stage 4: the great beyond
The more customers you acquire, the more complex their needs are and the more adjustments you need to keep making to your authorization data model. Your largest customer has 17 different types of software engineers and all need custom configurations of repo permissions. Your product surface area grows, and the number of “things” a user could conceivably need permission for grows exponentially.
At this point, simple role definitions (admin, viewer, contributor) are no longer enough. You’ll need to support more advanced RBAC patterns:
- Multiple roles per user: Instead of forcing a single role, allow users to be both a “team lead” and a “contributor,” depending on context. This prevents unnecessary role proliferation.
- Role hierarchies: Define relationships between roles (e.g. “admin” automatically inherits all “contributor” permissions). This reduces duplication and makes audits easier.
- Custom roles: Many enterprise customers will want the ability to define their own roles based on your permission primitives. While this introduces complexity, it gives them flexibility without you having to hardcode every variation.
- Permission granularity: As your system expands, the set of permissions grows. Carefully design your permission model so it scales without becoming unreadable.
In other words, “the great beyond” in RBAC isn’t abandoning roles, it’s evolving your RBAC system into something more flexible, layered, and enterprise ready.
Role-based authorization: basics and not-so-basics
Role-based authorization is built on two major components:
- Each user is assigned a role, like admin or viewer. There are usually anywhere from 2-10 roles in your typical RBAC-using SaaS product.
- Each role has a set of permissions, or things that users with that role can and can’t do. Permissions can be as simple as the ability to view an entire page, or as complex as editing a specific row in a table.
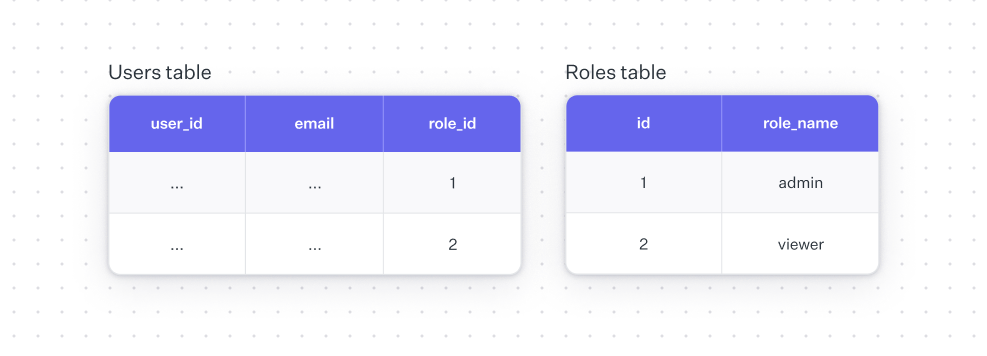
A basic data model for an RBAC setup where each user can only have one role might look like this:
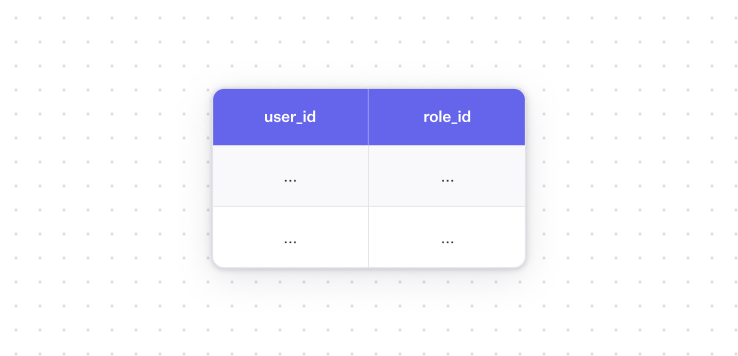
If you want to allow for more than one role, you’d need separate roles mapping table that might look like this:
For each part of your application that you’d want to restrict to specific roles, you need to add what’s called a “check” – some code that makes sure that the currently authenticated user has a role that allows them to access it.
All of this is 101. But when you get into the details of how you’d actually implement a lot of this stuff, teams vary pretty widely in how they implement things. Broadly speaking, there are two philosophies on how to handle both data storage and your permissions logic: centralized and decentralized.
Data storage: centralized vs. decentralized
The data about which roles each user has is obviously stored in your production database somewhere. But how does your application actually access it?
In decentralized systems, role information gets stored in whatever object you’re using for session management and authentication. If you’re using JWTs, you might store a user’s role (and in some cases, what permissions that role has) in the JWT itself. As long as the token is active, it’s super easy and fast to have your application logic check against it before allowing a user to take an action that you might want to be restricted.
In centralized systems, you create some sort of service that queries your database every time you want to do a check. This is how Google Zanzibar works.
It’s obviously a lot more work and complexity to build a centralized service, which is why most teams start with a decentralized implementation. But there are a bunch of downsides to storing role information in a session token:
- It’s already notoriously difficult to invalidate a JWT, so your system will not be real time when role changes are made.
- If your stack is more complex and has several services, you need to recreate the ingestion logic for each service.
- There’s a pretty hard limit on how much data you can actually store in these tokens.
On that last point, it’s worth reading Carta’s post on how they built a system based on Zanzibar. They started with decentralized, JWT-based authorization, but over time found that tokens were getting as big as 1MB (!) and taking a prohibitively long time to build.
Permissions logic: centralized vs. decentralized
The logic that handles your checks (is the currently authenticated user allowed to do this?) can also be centralized or decentralized.
In a decentralized implementation, checks are distributed across whatever part of your application they relate to. If BitHub has an endpoint for creating a new repository, that endpoint’s code would have a check to make sure the currently authenticated user has the right permission to be able to create a repository. As discussed above, the actual role or permission information might be stored in a session object, or it might require a database query.
In a centralized implementation, you have a separate service or module that does all of your authorization checks. You either import it or call it from whichever part of your application you want to restrict access to.
Decentralized checks are obviously much simpler and straightforward to implement, but quickly become hard to manage (multiple code owners, yikes). So most teams usually start decentralized and then centralize things when the check sprawl becomes too burdensome.
Role explosion
A very real problem that teams run into when using an RBAC system is called role explosion. At some point, you have too many customers with conflicting role requirements and it starts to degrade your system.
Back to our BitHub example: when we built our V1 of authorization, we started with some basic roles: admin and viewer. Great. But as we continue to add new customers, a few here and there want adjustments. One organization asks to add a “creator” role, so users can create repositories but not have admin rights. Easy enough. But then another organization asks for a “moderator” role, a second asks for a “team lead” role, and a third has an unusual setup for their repos and needs a custom role that allows team members to manage only certain repositories. And so on and so forth…
The basic idea is that if you’re running multi-tenant SaaS, every time a customer asks for a specific new type of role, you’re faced with a choice:
- Implement the role as a sort of “override” just for that organization, which means you need to bifurcate your data model (bad), or
- Denormalize all of your data, have custom roles for each organization, and voila, you’ve got role explosion.
Once this gets hairy enough, many teams opt to give their customers the ability to create their own custom roles. The data model for this is essentially one giant roles table that needs to link out to some sort of permissions table:
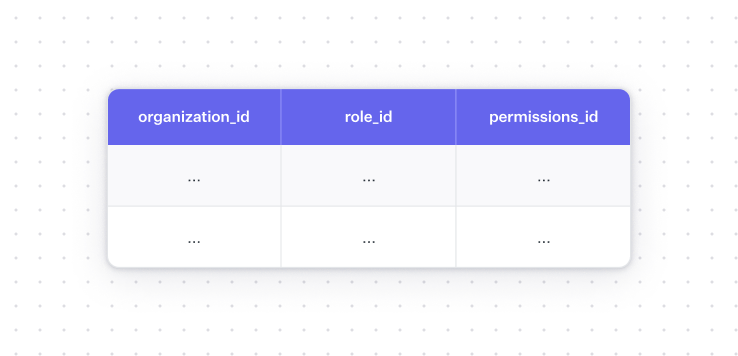
And then each organization’s rows can only be edited by that organization. By the time you have 1000 customers, this table already has 1M rows and starts to slow down all of your authorization checks.
How to solve role explosion in RBAC
Instead of abandoning RBAC altogether, teams can evolve their implementation:
- Role hierarchies: Reduce duplication by letting higher-level roles inherit lower-level ones.
- Custom roles with guardrails: Allow enterprises to define their own roles, but based on a limited set of permission primitives you provide.
- Dynamic grouping: Use attributes (like department or project) to cluster users into roles automatically, avoiding a manual sprawl of nearly identical roles.
- Multiple-role assignment: Let users hold more than one role simultaneously (e.g. “team lead” and “contributor”) instead of creating new hybrid roles.
By introducing these strategies, your RBAC system can grow with your customers without collapsing under role explosion.
From RBAC to IdPs
Once you’ve built out an advanced RBAC system that can scale with your customers, the next major challenge is integrating with the tools enterprises already use to manage identity.
Large organizations don’t want to define roles and permissions separately in every SaaS product they adopt. Instead, they rely on identity providers (IdPs) like Okta, Azure AD, or Google Workspace to centralize this information.
To support these customers, your app will need to sync user and group data from IdPs into your RBAC model, which introduces a whole new set of complexities.
The basic concept of syncing with an IdP
The easiest way to think about the difference between regular authorization and IdP-based authorization is to consider the source:
- For run of the mill authorization systems, the data source for roles, resources, and permissions are generated inside your app by your users
- For IdP-based authorization systems, the data source for roles, resources, and permissions is an external data store (Okta, Azure AD, etc.)
Enterprises want to manage their organization’s roles and permissions from a single place instead of having to deal with tens (or hundreds) of different SaaS tools and their unique permissions schemes. So they designate different roles and groups in an IdP like Okta for each employee. An engineer might be in the engineering group, while a team lead for engineering might be in both the engineering group and the admin group.
Here’s where you come in: your app needs to be able to pull that user data from Okta and then map it to the relevant roles that exist in your scheme. For example, you might want everyone in the engineering group at a customer of yours to have view-only access to resources in your product, while admins have write access. We’ll talk more about this mapping layer later, since you will likely need to build a custom UI for it down the road.
IdP syncing and SCIM: push, not pull
IdP syncing does not work the way you’d expect it to. Instead of publishing an API that you can poll on a regular basis, most IdPs actually push data to you when they want (and sometimes the timing can be wonky). Putting yourself in the shoes of an IT admin for a brief moment, the process to integrate a new application (yours) looks something like this:
- You create a new application in Okta and name it BitHub
- You assign the relevant users who should have access to BitHub (either directly, or using groups)
- This can be very un-fun for IT admins. Because if you’re a huge company, but only a few people need access to a new app, you either need to assign them directly or create an entire new group just for this app called something like “BitHub users.”
- You get a unique URL and key from BitHub and give it to Okta. This is how Okta knows where to send data
Okta then starts publishing information to BitHub. There’s usually an initial sync, and then subsequent updates when things change on Okta’s end (a group update, a last name change, etc.). You’re at the mercy of the IdP now and when they decide to publish data: you cannot just query an endpoint and get the information you need as you please. Because of this, you also need to store all of this data on your own immediately once you get it, so your app can have persistent permissions that don’t rely on a third party for every check.
The most ubiquitous protocol for handling this sync – and the culprit for why the data sync flow is so odd – is called the System for Cross-Domain Identity Management, or SCIM for short. It’s a specification for a hierarchy of users and groups, and (for better or worse) is the standard for how IdPs like Okta communicate group information to apps. An example of a SCIM object might look like this (from their docs):
Read more in our guide to SCIM and directory sync.
Another fun thing is that every IdP interprets SCIM slightly differently. A good example is group changes during deactivation. Imagine someone on your team goes on parental leave, and so IT deactivates their accounts temporarily. While they’re on leave, someone changes their group from engineering to management.
- Okta doesn’t tell your app anything: because the user is deactivated, the change isn’t relevant. When the user gets reactivated, they just tell you that they’re now in the management group.
- Azure does tell your app that the user was removed from the engineering group once they’re reactivated.
When your teammate gets back, they’re now in a different group – but for whatever reason, Okta still doesn’t send any notification to your app that this user is no longer a part of engineering, just that they’re reactivated and now in management. This is a clear security flaw, because now this user will still have access to engineering resources that they shouldn’t have access to.
What all of this inevitably means is that teams end up bifurcating their application logic for different IdPs: your code will need to do something like “if they’re using Okta, do this, if they’re using Azure, do something else.”
And a final wrench: SCIM is not the only way to handle authorization syncs. We’ve written previously about SAML, the standard protocol for handling SSO. SAML is the protocol that tells applications who you are and why you should have access to a particular tool; but some companies will actually use it for authorization too. Stripe, for example, doesn’t support SCIM and instead requires enterprises to embed role and group information in SAML responses. But there’s a major vulnerability here too: you only get updates to group information when a user authenticates.
The TL;DR on all of this: if you look closely enough you can see apps out there that implement all possible permutations of SCIM, groups, attributes, and SAML. It’s kind of the wild west because of how difficult it is to build all of this stuff. Supporting just one IdP across all of these modalities is likely to be at least a month of engineering time to do it well.
!!For more details on the challenges that result from IdPs interpreting SCIM differently see SCIM challenges: navigating the idiosyncrasies of different providers.!!
Creating a mapping layer to your permissions
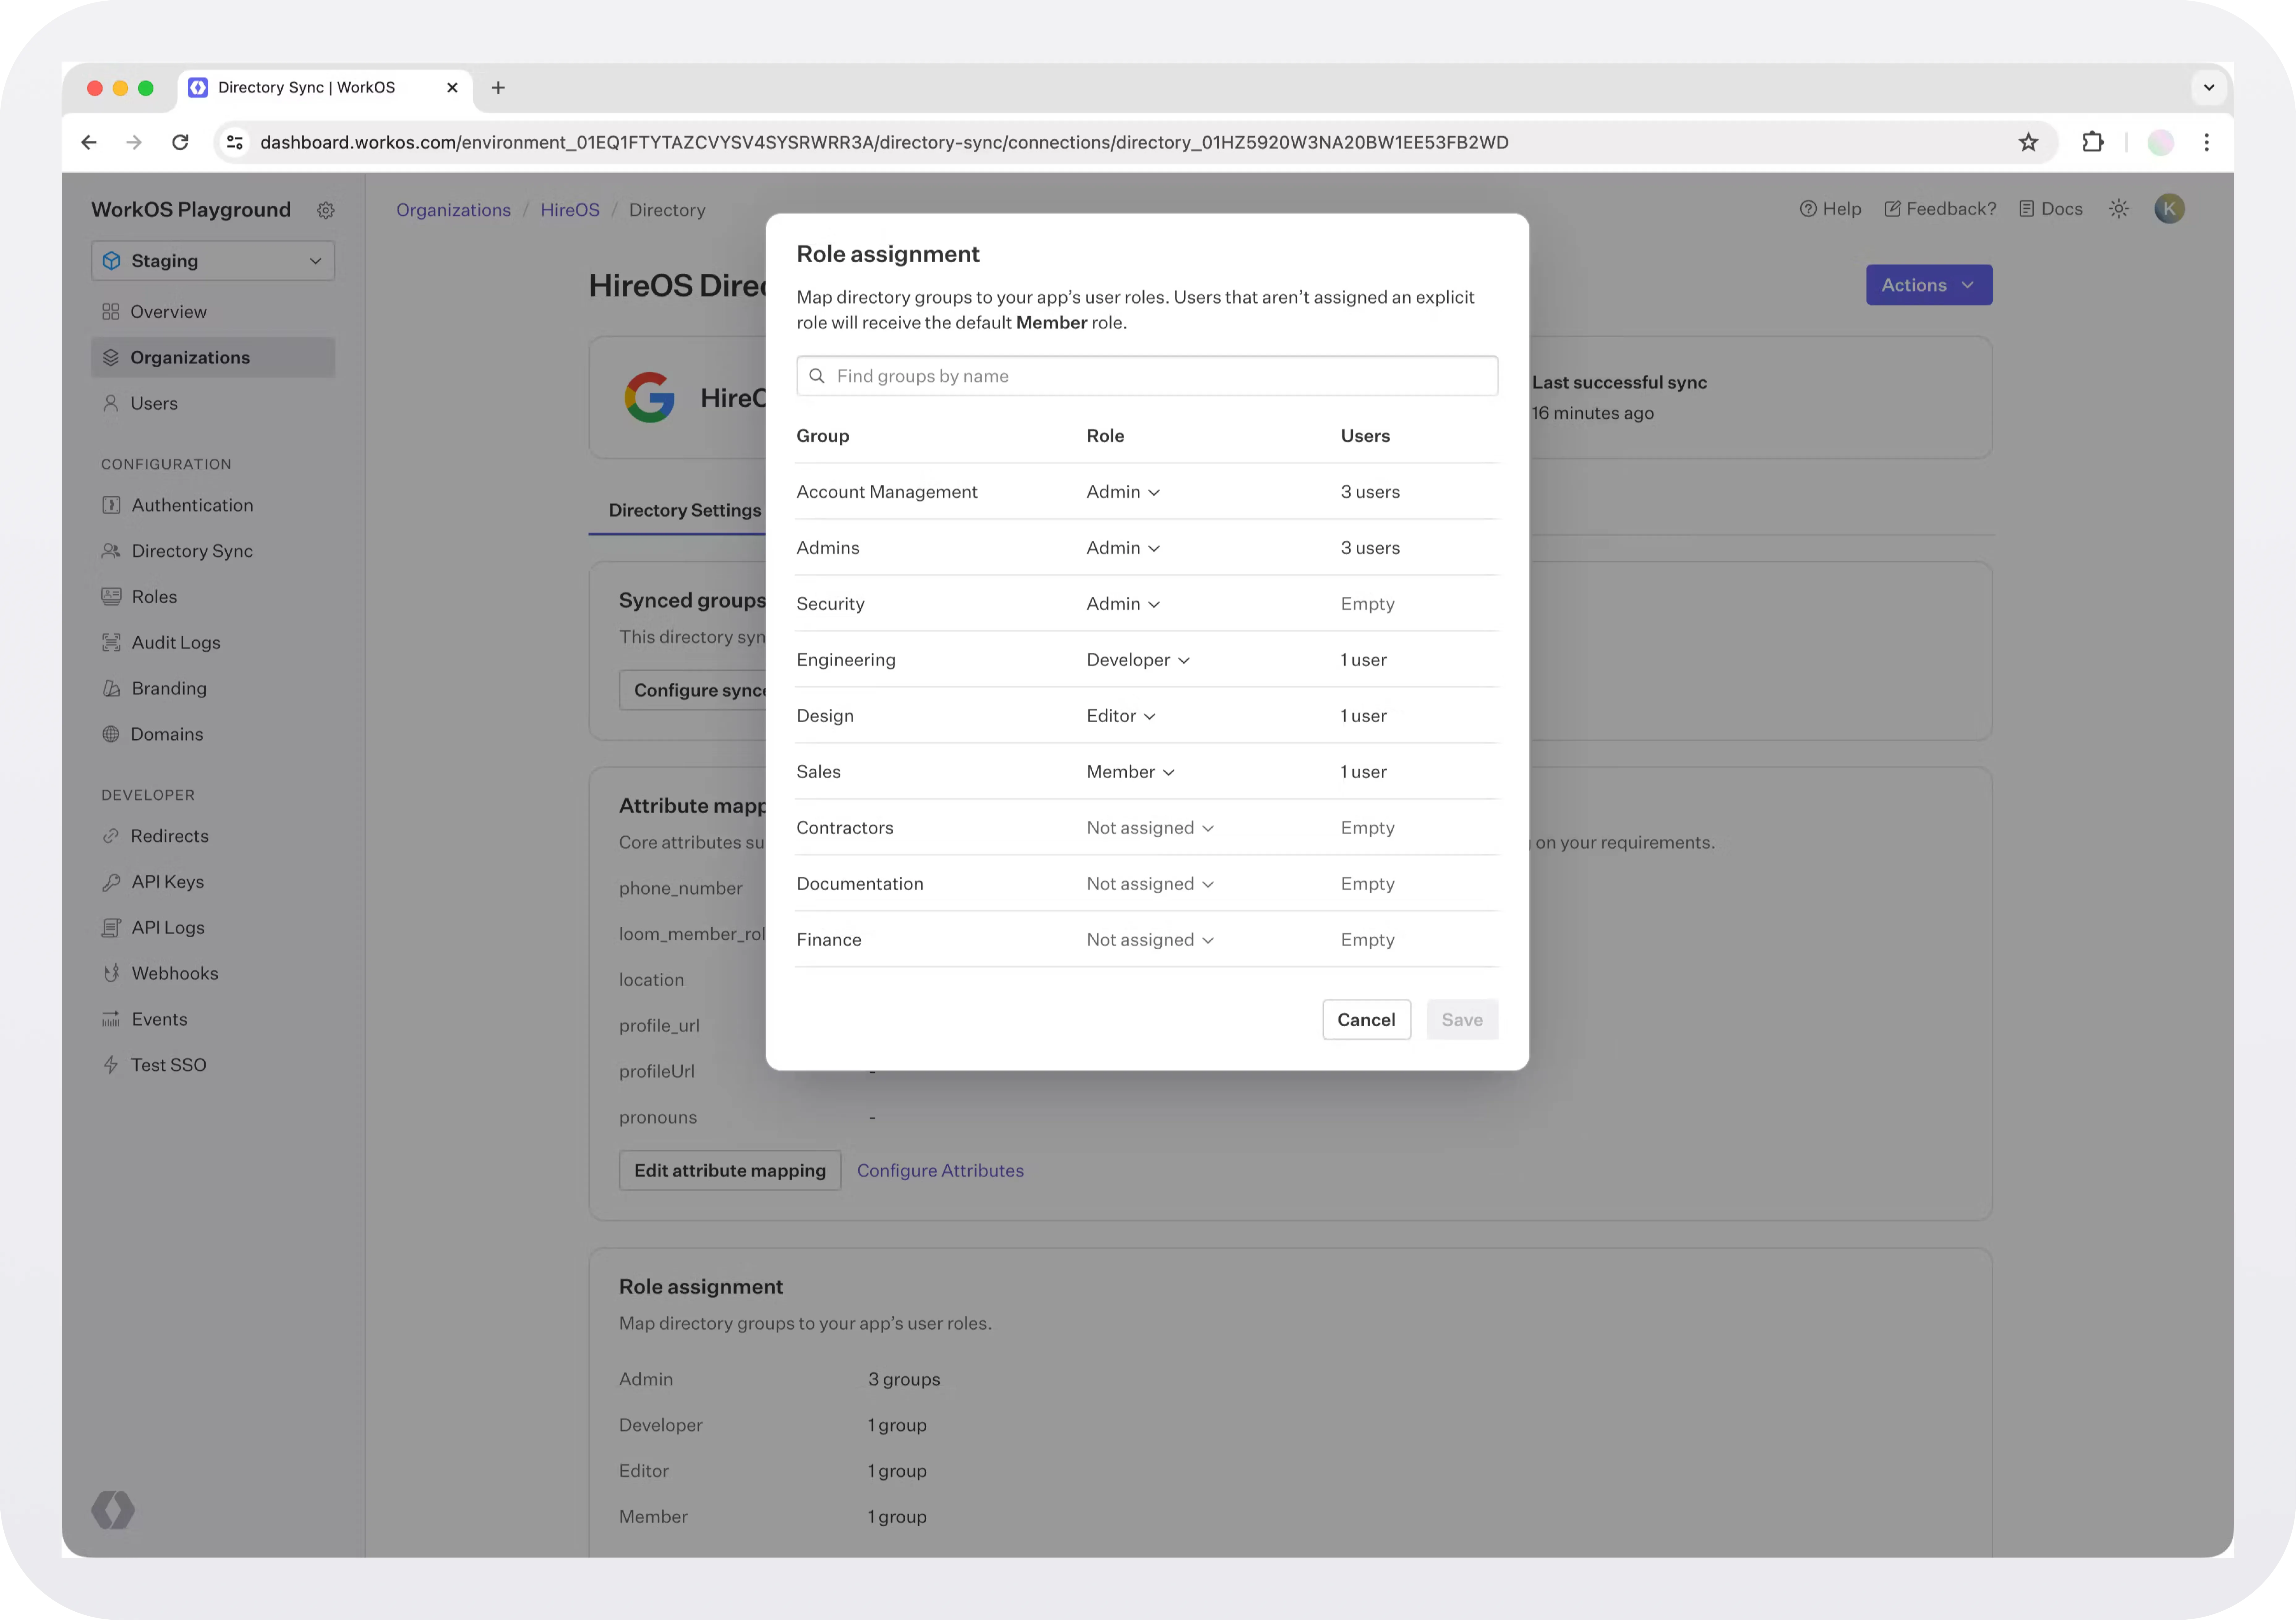
A lot of the complexity in building IdP-based permissions is in mapping the information in the IdP to your unique set of permissions. There’s no way to do this automatically, you’ll need to build a UI that allows IT admins to manually map their IdP’s groups to your app’s permissions and roles (or resources). It might look something like this:
- Show all the groups coming in from the IdP on the left side
- Show all of the available roles or resources on the right side
- Allow the admin to connect the two
Back to our BitHub example, our customer’s IdP might tell us that a user is in an engineering group, and another user is in an admin group. What does this mean for our app though, which has a creator, viewer, and admin role? We’d need to build a UI that allows an IT admin to say that everyone in the engineering group should be a default viewer, everyone in the admin group should be a default admin, etc.
It’s worth noting that in some cases, companies will try to avoid this by requiring IT admins to the lengths of creating custom roles in the IdP for your app’s roles. This would mean attaching an attribute to every user in the IdP that says something like “BitHub – admin” or “BitHub – viewer.” And in this scenario, you don’t need to build a mapping layer at all. This is how Loom’s SCIM integration works.
In some (rare) cases, IT admins will prefer this attribute-based approach. And then you’ll need to bifurcate your application logic yet again to handle both customers that want a mapping layer and customers who don’t. But this attribute-based approach is extremely brittle: if BitHub ever wants to make changes to their roles or permissions, then the customer’s IT admin needs to go make the according changes on their end (which is almost impossible). This is exactly why building for SCIM is so fragmented.
Why IdPs work best with RBAC
One important thing to understand about identity providers (IdPs) is that they assume a role-based model. SCIM and similar protocols are built around users, groups, and roles — not dynamic, per-resource permissions. This means your RBAC model will map much more naturally to the way enterprises already manage their organizations.
For example, BitHub might want someone to be an “owner” of one repository and just a “viewer” of another. Those fine distinctions are best handled inside your application, not inside the IdP. At the IdP level, IT admins care about broad, global roles like “admin” or “member.” Your RBAC system should be designed so those high-level roles sync cleanly, while still letting you layer more granular, application-specific permissions on top.
A few best practices for aligning RBAC with IdPs:
- Design global roles around IdP needs: IT admins want high-level roles (admin, member) to sync easily and reliably.
- Handle resource-level permissions inside your app: Let the application layer manage finer distinctions like “viewer” or “contributor” on specific projects.
- Build clear hierarchies: Global roles should map to sensible defaults (e.g. an org-level admin is by default an owner of all repositories).
By respecting these boundaries, you’ll make life easier for enterprise IT teams while keeping your RBAC system flexible and user-friendly.
Final thoughts
Authorization is something every serious SaaS product needs, but building it well is hard. Most teams start simple, with no roles or just an admin role, and then grow into a full RBAC system as customer demands increase. As products scale, teams face challenges like role explosion, complex hierarchies, and enterprise expectations around syncing with IdPs.
The good news is that RBAC can evolve to meet these challenges: by supporting multiple roles per user, role hierarchies, custom roles with guardrails, and clean integrations with IdPs, you can build an authorization model that scales with both your product and your customers.
RBAC remains the most practical and maintainable approach for developers today. Start simple, expand carefully, and evolve your system as customer complexity grows.


.webp)
_.webp)
.webp)


.webp)

.webp)
.webp)
.webp)