Fine-Grained Authorization (FGA)
Scalable fine-grained authorization built for B2B SaaS.

Fine-Grained Authorization (FGA) extends the existing WorkOS RBAC system to handle the complex, fast-changing authorization needs of modern B2B SaaS products.
Most products start with simple, tenant-wide roles like Admin and Member. As adoption grows, the authorization model must account for new and changing app resources and requirements, like workspaces, projects, apps, pipelines, nested tenants, custom roles, group-based collaboration, and enterprise exceptions. What used to evolve over a decade can now change in 12 – 18 months. Teams patch RBAC with special cases, multiply role variants, and eventually face full rewrites.
FGA is designed as the next step in that evolution. It keeps the mental model of RBAC – roles, permissions, assignments – while adding hierarchical, resource-scoped access control. It integrates natively with WorkOS products you’re already using: RBAC, SSO, Directory Sync, AuthKit, and IdP role assignment. It can be adopted incrementally, with no data migration or confusing schema DSL.
The goal is a single authorization foundation that adapts as your product and customer requirements change, without forcing conceptual rewrites.
FGA formalizes three building blocks:
Subjects are the users, groups, devices, or agents that can be granted access. Today FGA supports two subject types: organization memberships (users) and groups. Support for additional subject types is coming soon.
Resources are the business entities in your product – organizations, workspaces, projects, apps – arranged in a hierarchy. Permissions flow down this hierarchy automatically.
Privileges are the roles and permissions that define what subjects can do. Roles are scoped to resource types and can include permissions for child resource types, enabling powerful inheritance.
The key shift from traditional tenant-wide RBAC is that resources and their hierarchy are first-class. Roles and permissions are scoped to specific resource types and can be assigned at any level of that hierarchy.
Resource types define the schema of your authorization model. They describe what kinds of entities exist – workspaces, projects, apps – and how they relate to one another. You configure resource types in the WorkOS Dashboard, creating the blueprint for your application’s entity hierarchy.
Resources are instances of resource types created at runtime. When a user creates a workspace or project in your application, you register a corresponding resource in WorkOS with a type, an ID, and a parent.
Roles and permissions are scoped to specific resource types. A role describes what someone can do within the scope of a particular resource. Permissions can apply to the same resource type or inherit up to parent resource types.
Assignments bind a subject to a role on a specific resource. When a role includes child-type permissions, those permissions propagate down the hierarchy automatically.
Access checks answer the question: “Can this user perform this action on this resource?” You can also ask “Which resources can this user access?” or “Who has access to this resource?” FGA considers all the ways a user might have access – roles assigned directly, roles inherited from parent resources, and organization-scoped roles.
The defining feature of FGA is that permissions flow down the resource hierarchy automatically. A workspace admin can access all projects and apps within that workspace without needing separate assignments at each level.
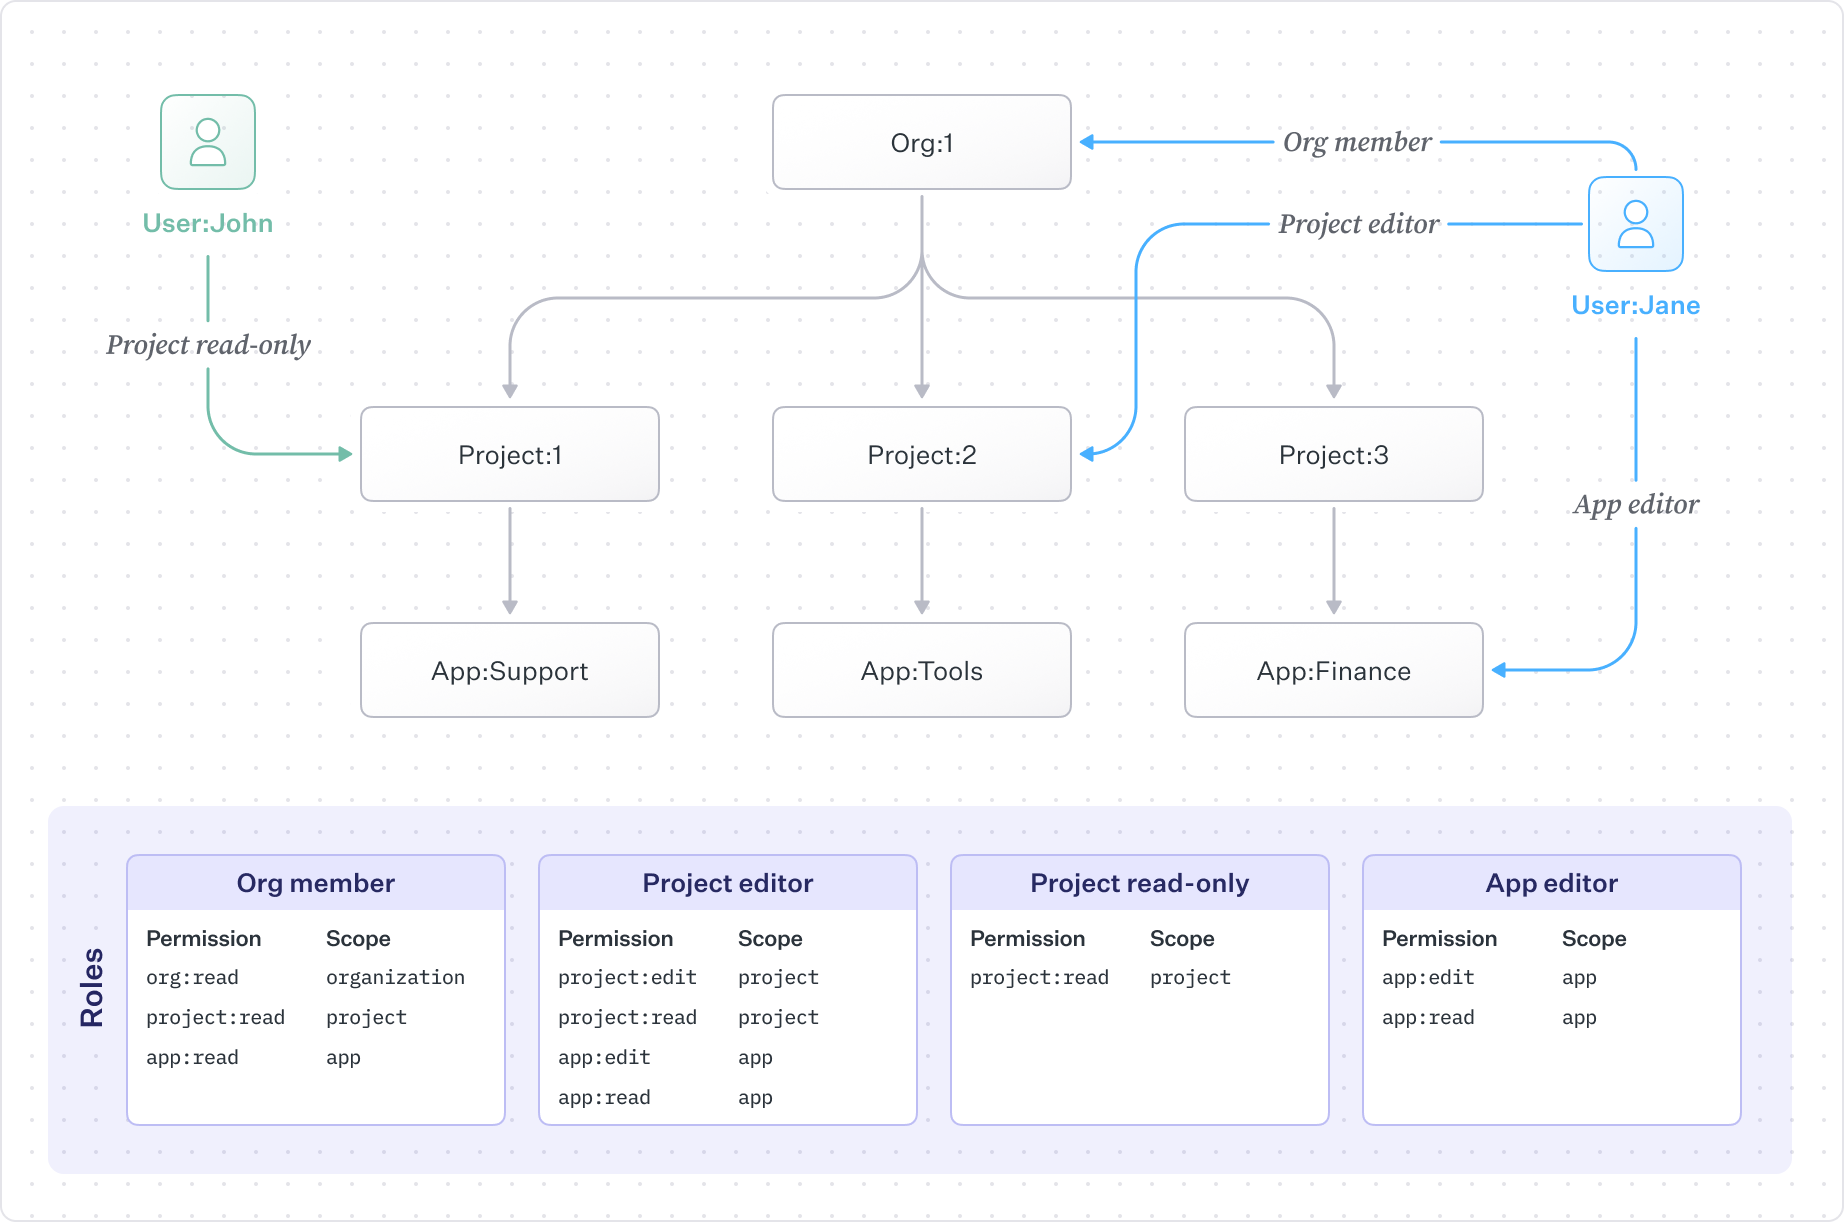
In this example, users have roles at different levels of the hierarchy. An organization member can view everything beneath the organization. A project editor can edit a specific project and its apps. An app editor has access only to a single app. The hierarchy does the work of propagating permissions – you assign a role once, and access flows down to all children.
This model reduces the number of role assignments you need to manage while giving you precise control when you need it. For a detailed walkthrough of how this works, see Roles and Permissions.
FGA works alongside the existing RBAC product. No migrations are required – existing roles and organization memberships continue working, and you can adopt FGA incrementally.
A typical rollout looks like:
- Keep using current RBAC for organization-level access
- Define resource types in the Dashboard to mirror your product structure
- Begin registering resource instances as entities are created
- Introduce resource-scoped roles like
workspace-adminorproject-editor - Add Authorization API checks where you need resource-level control
- Assign resource roles to users or groups via API
You don’t need to convert everything at once. Start with one feature, prove the model works, then expand.
FGA integrates with AuthKit to provide role-aware sessions. Organization-scoped roles and their permissions are embedded directly in access tokens, enabling instant checks for org-wide features without API calls. For resource-scoped permissions, the Authorization API evaluates against the full hierarchy.
This two-layer approach – JWT for org-wide, API for resources – gives you fast checks where possible and precise control where needed.
For enterprise customers, IdP role assignment allows organizations to map identity provider groups to organization-scoped roles. When someone joins the “Engineering” group in Okta or Azure AD, they automatically get the corresponding role.
Resource-scoped role assignments remain managed via API, giving you a clean separation: IT contacts control baseline organization access through their identity provider, while your application manages who has access to which specific resources.
FGA is designed for real-time authorization:
- Sub-50ms p95 access checks
- Strong consistency – role changes take effect immediately
- High availability for production workloads
- Warmed caches to minimize cold starts
- Edge caches for low-latency global access (coming soon)
We’re continuing to expand FGA with new capabilities:
IdP role assignment for sub-resources – Map identity provider groups directly to resource-scoped roles, not just organization-scoped roles. Your customers’ IT contacts will be able to control workspace and project access through their IdP.
Permission assignment – Assign or exclude specific permissions for a user, enabling patterns like “grant access to all resources except this one” without creating custom roles.
Further performance enhancements – Continued optimization of access check endpoints for even lower latency at scale.