SSO sign-in consent screen: What it is and how to handle denials
The sign-in consent screen shows users their email and identity provider before SSO completes. When it appears, how to handle a denial, and what to brand.

The sign-in consent screen is a page WorkOS shows during single sign-on, after the identity provider has authenticated the user and before your application receives the authorization code. It displays the email address the identity provider returned and the identity provider's domain, and asks the user to confirm or deny the sign-in. It's on by default for new environments, and the only code it asks of you is a branch for the signin_consent_denied error.
This post covers where the screen sits in the flow, when it appears, how your callback should handle a denial, how it relates to IdP-initiated logins, and what to check in your branding before your customers see it.
What problem does the sign-in consent screen solve?
A user clicks a link, authenticates somewhere, and lands inside your app. Nothing in that sequence tells them which identity provider handled the middle step. The browser shows your domain at the end of the chain, and the identity provider in between goes by too fast to read.
That gap is what login CSRF and SSO phishing rely on. The sign-in consent docs describe the risk directly:
We covered the attack itself, and the other defenses WorkOS uses against it, in Protecting against Login CSRF attacks. This post is about the consent screen specifically, and what it asks of the application on the other side.
Where does the screen sit in the SSO flow?
The screen is an interstitial page inside the SSO flow. It appears after the user has gone through the identity provider and before WorkOS redirects to your application. At that point WorkOS knows two things the user may not have noticed: the email the identity provider returned, and the identity provider's origin. The page shows both and asks the user to confirm or deny.
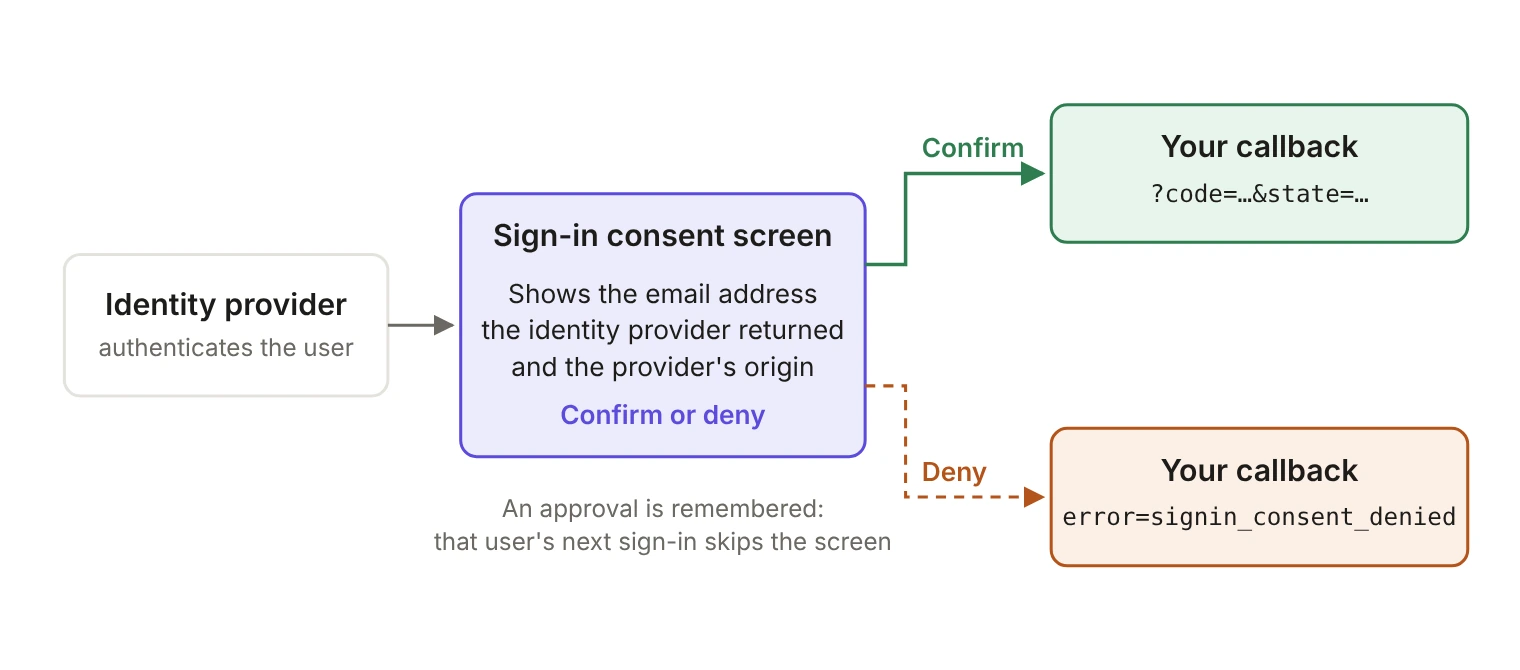
When the user confirms, the SSO flow completes and the authorization code is forwarded to your callback exactly as it would have been without the screen:
From there your app exchanges the code as usual. In the Node SDK that's workos.sso.getProfileAndToken({ code, clientId }), which returns the profile and an access token. The API reference says that access token expires five minutes after it's created, so use the profile to establish your own session right away rather than storing the token.
When the user denies, the SSO session fails and WorkOS redirects to your callback with a signin_consent_denied error instead of a code.
When does the screen appear?
Not on every login. WorkOS decides based on the identity provider, the user's fingerprint and the SSO flow parameters, and once a user approves, the approval is remembered and the page stops appearing for them. The docs single out two cases:
The remembered approval matters for testing: you get one clean look at the screen per user, and a second login won't reproduce it. Plan your QA pass around that, and don't write UX copy or analytics that assume the screen is part of every session.
Do you need to turn it on?
Probably not. The docs say sign-in consent is enabled by default for new environments, and it's available for both AuthKit and standalone SSO. For an older environment, check the sign-in consent checkbox in the Authentication section of the dashboard, under the Single Sign-On settings. Either way, start by checking its state rather than assuming you need to add something.
Exercise the flow in a sandbox environment first. Sandbox requests go to api.workos.com rather than any custom Authentication API domain you've configured for production. Don't judge the look of the page there, though: branding is configured per environment, so a sandbox pass tells you nothing about what production users will see.
How should your callback handle a denial?
This is the only code change the feature needs, and skipping it is how a security control turns into a support ticket.
When an authorization flow fails, WorkOS redirects to the original redirect URI with error and error_description query parameters, plus the state value if you passed one. A denial looks like this:
The error code reference defines it as the user rejecting the sign-in consent screen, which asks them to verify the email provided by the identity provider. A callback that only looks for code will treat that redirect as a malformed request. Branch on the error first:
The sign-in consent docs recommend using this error to show users how to contact their admin and your support team about a possible phishing attempt. A generic "something went wrong" page is the wrong answer here. The user just told you about a login they didn't recognize, and that report is worth more than the failed session.
Don't fold it into your access_denied branch either. The two errors come from different places and need different follow-up:
The state parameter comes back exactly as you sent it, so use it to tie the denial back to whatever you know about the session that started the sign-in.
How does it relate to IdP-initiated logins?
IdP-initiated logins are where the screen matters most, because a login that starts at the identity provider has no request from your application to match against. That's why the docs say the screen always appears for IdP-initiated flows if the user hasn't approved it before.
WorkOS also gives you a second tool for these logins: a sign-in endpoint. If you configure one for your application in the dashboard, an IdP-initiated login is sent to that endpoint, and your application starts a standard SP-initiated request from there. WorkOS appends a connection_id query parameter identifying the connection the login came from, and that parameter is only present on IdP-initiated logins:
Both tools answer the same problem from different sides. The sign-in endpoint gives the login an origin your application controls, and the consent screen gives the user a chance to check who signed them in. If you route IdP-initiated logins with a RelayState configured in the identity provider, only client_id and redirect_uri are supported and any other values are ignored, so the destination stays inside what you configured.
What should you check in your branding first?
The docs ask you to review the primary button color and logos before enabling the feature, and the reason is behavioral rather than cosmetic. A security page that looks nothing like the rest of your login is a page users click through without reading, or abandon.
The screen inherits your Admin Portal branding and is served through your custom Authentication API domain if you have one. With AuthKit enabled, it follows your AuthKit branding instead. Before you enable it, or before your next enterprise customer goes live, check:
- Which branding applies. The screen uses the environment's branding. If you've customized branding per application, those application-level changes don't reach the consent screen, so keep the environment brand neutral enough for every product in it.
- Colors in both modes. Page background, button background, button text and link color are configurable separately for light and dark mode. The button color is where the user's eye lands when deciding, and the one most likely to look borrowed if you skip this.
- Logo assets. A full logo, a square logo icon and a favicon. The logo is the first thing a user will recognize, or fail to, next to an unfamiliar identity provider origin.
- The right environment. Global styles apply across AuthKit, transactional emails and the Admin Portal, and they're set per environment. Look at the production environment directly before you rely on it there.
If you've configured a custom Authentication API domain, it acts as the ACS URL once verified, so the consent page appears under a hostname your users have seen before rather than a WorkOS one.
What doesn't the screen do?
Sign-in consent is one layer in a set. WorkOS pairs it with strict redirect validation, session binding, cookie isolation policies and a Content Security Policy, as described in our login CSRF post. The layering matters because login CSRF happens before a session exists, which is exactly when defenses tied to an authenticated session don't apply. The screen's contribution is to require a deliberate action from the user, which breaks the automatic login chain.
What it can't do is verify anything on the user's behalf. It shows an email address and an origin and asks a person to recognize them. A user who clicks confirm on reflex gets no benefit from it. That's the argument for branding the page well, and for treating a denial as a report worth investigating rather than a failed request to retry.
What should you do next?
The work comes down to two things: handle the signin_consent_denied branch in your callback, and look at the page in your production branding before a customer does. The sign-in consent docs cover the settings, and the login flows guide covers sign-in endpoints for IdP-initiated SSO. If you're on an environment created before the default changed, the checkbox in the Authentication settings is the place to start.