How to sync users from Entra ID to your app using Node and WorkOS
Step-by-step tutorial that walks you through the necessary steps to add automated user provisioning to your app using SCIM, Entra ID, Node, and WorkOS, with just a few lines of code.
If you're building for the enterprise, SSO is just half the story—automated user provisioning is the other half. Without it, you're stuck manually managing accounts, opening the door to delays, mistakes, and security gaps. With provisioning in place, users get instant access when they need it—and lose it the moment they leave. That’s where SCIM comes in. It’s the industry-standard protocol for syncing users between identity providers and applications—securely, reliably, and automatically.
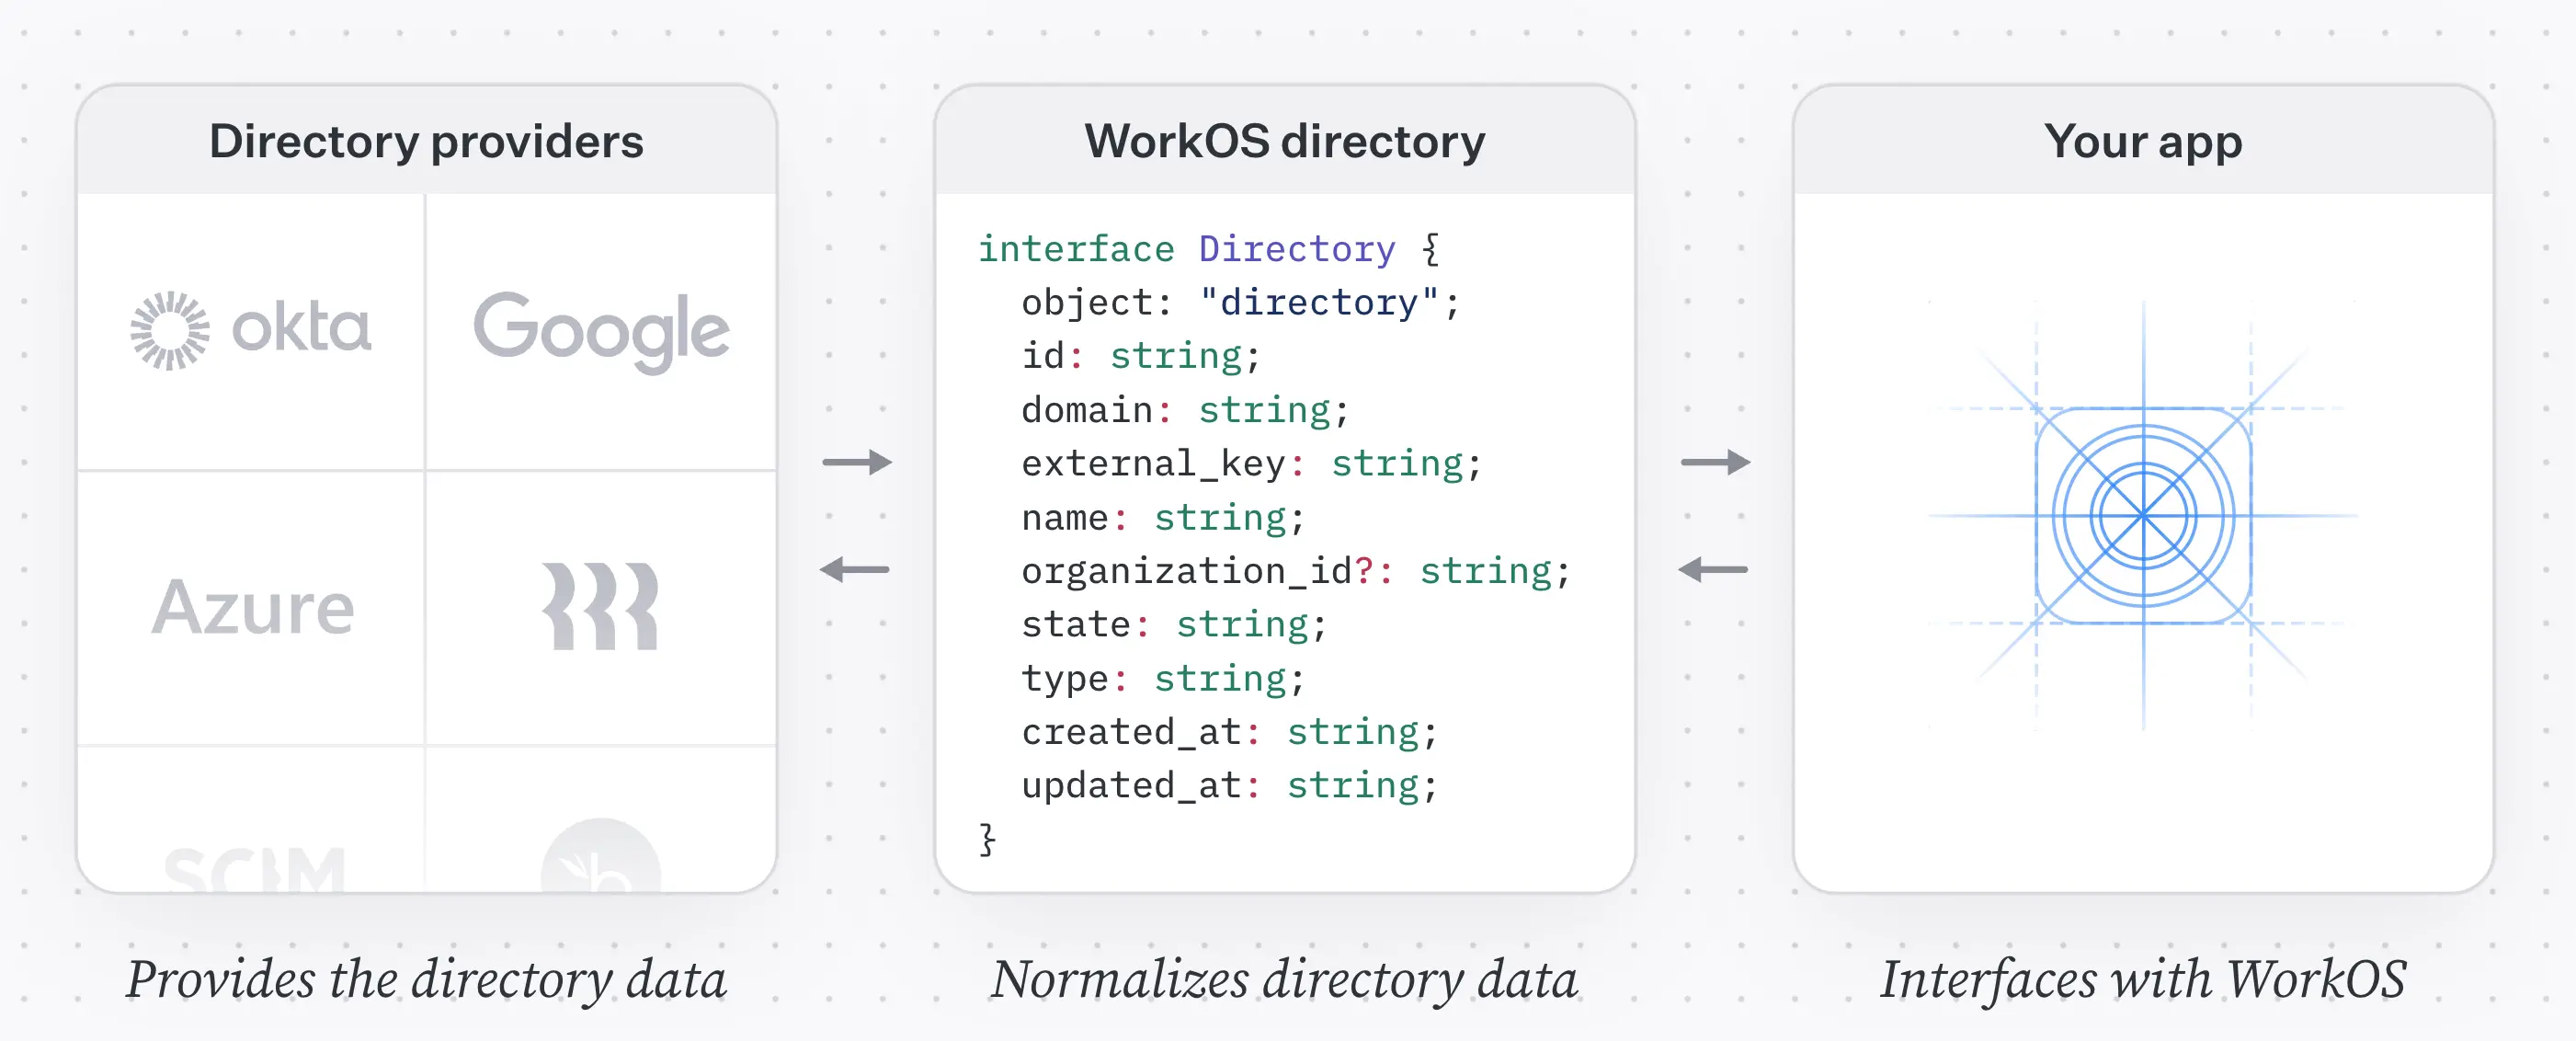
In this tutorial, we’ll walk through how to sync users from Microsoft Entra ID (formerly Azure AD) into your app using SCIM, Node.js, and WorkOS. You’ll learn how to provision, update, and deprovision users in your app automatically—without having to build a SCIM server from scratch.
While going through this tutorial, remember that some things might get outdated as products evolve. Dashboards change, and new SDK versions are released every week. If, while you follow this tutorial, something is not working for you, please refer to these docs for the most up-to-date guidance:
!!If you want to integrate with a different directory provider or use a different SDK see our Directory Sync quickstart.!!
Prerequisites
To follow this tutorial, you will need the following:
Step 1: Install the SDK
Install the WorkOS Node SDK to your app.
- Using npm:
npm install @workos-inc/node - Using yarn:
yarn add @workos-inc/node - Using pnpm:
pnpm add @workos-inc/node
Step 2: Set secrets
To make calls to WorkOS, you must authenticate using the WorkOS API key and client ID. Copy these values from the WorkOS dashboard.
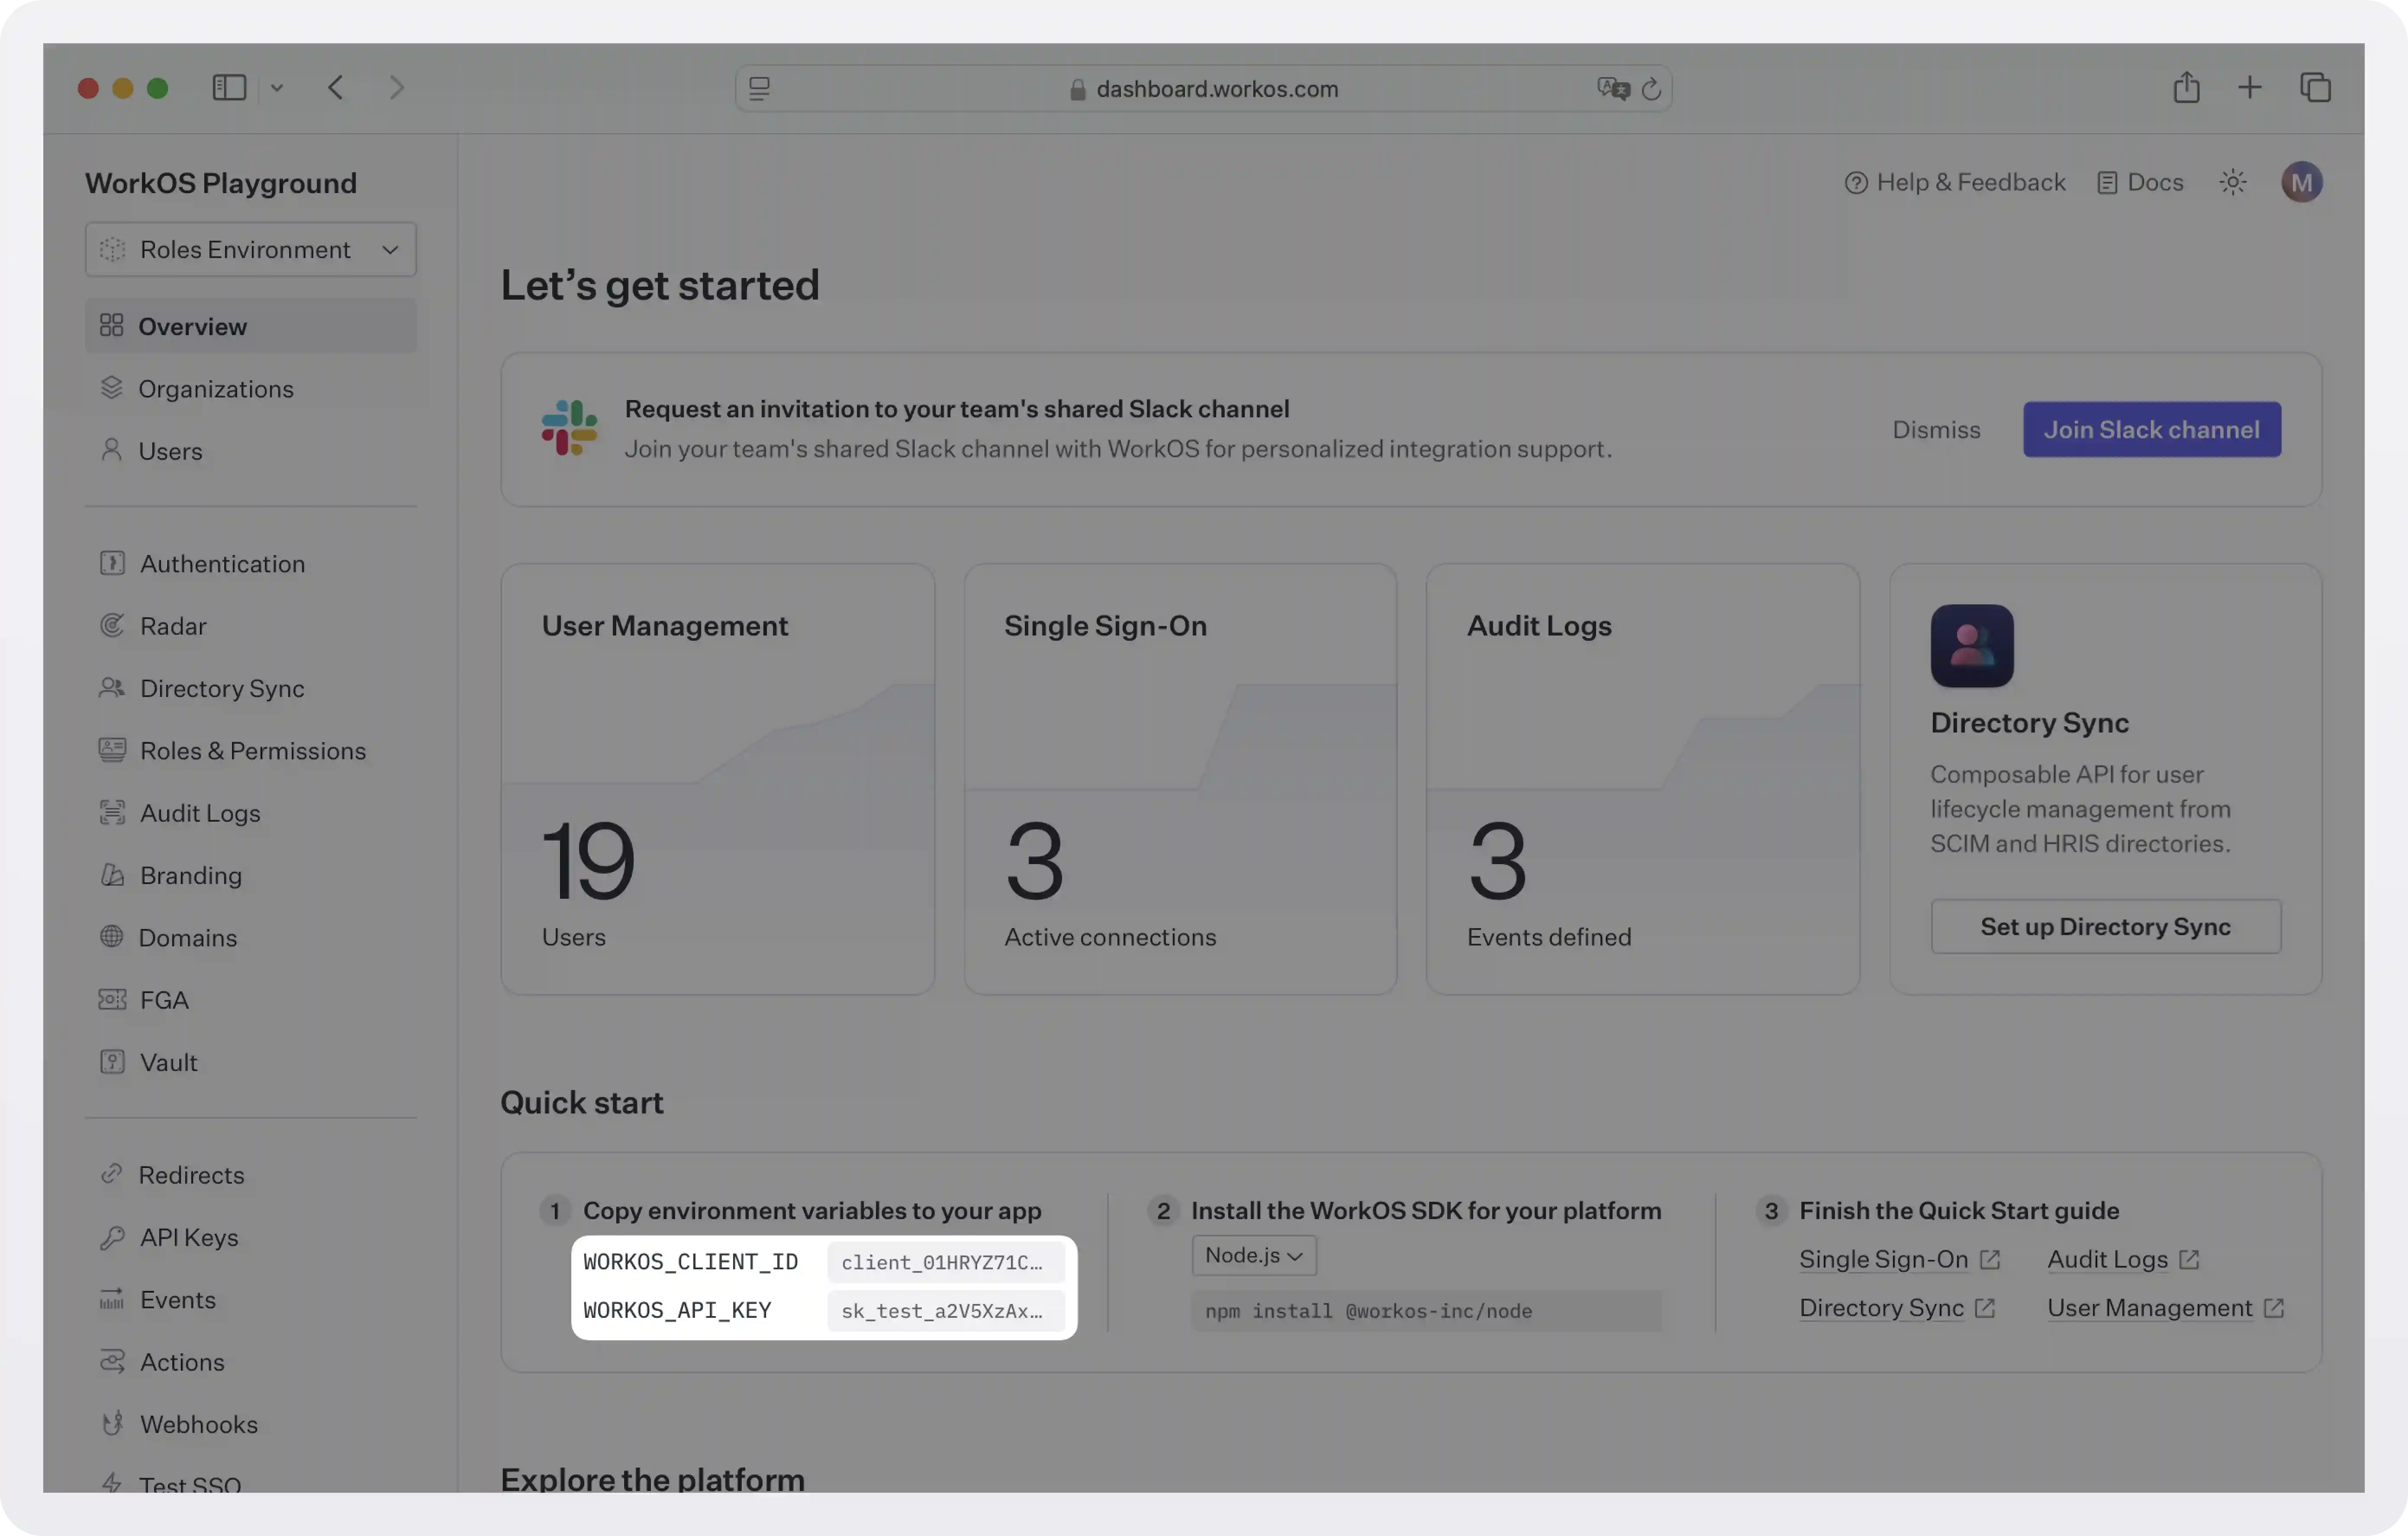
Store the values as managed secrets and pass them to the SDK as environment variables:
Environment variables example:
!!For more information on safely handling secrets, see Best practices for secrets management.!!
Step 3: Configure the Entra ID connection
The first step to connecting with a directory is creating an organization in the WorkOS dashboard. You will then be able to create a new connection to the organization’s directory.
!!An organization is a collection of users that also acts as a container for enterprise features (like SSO). By enabling an SSO connection for a specific organization, you enable the feature for all users who are members of this organization. This way, you can enable features like forcing all users that use a specific email domain to use a specific SSO connection. For more information on organizations and how to use them, see Model your B2B SaaS with organizations.!!
First, we will configure Entra ID SCIM at the WorkOS dashboard, and then we will move on to the Entra ID admin dashboard to finish the configuration.
WorkOS configuration
- Go to the WorkOS dashboard and select Organizations from the left-hand navigation bar.
- Pick (or create) the organization for which you’d like to configure an Entra ID SCIM connection.
- Select “Configure manually” under the “Directory Sync” section and enter a name for the directory.
- Click “Create Directory”.
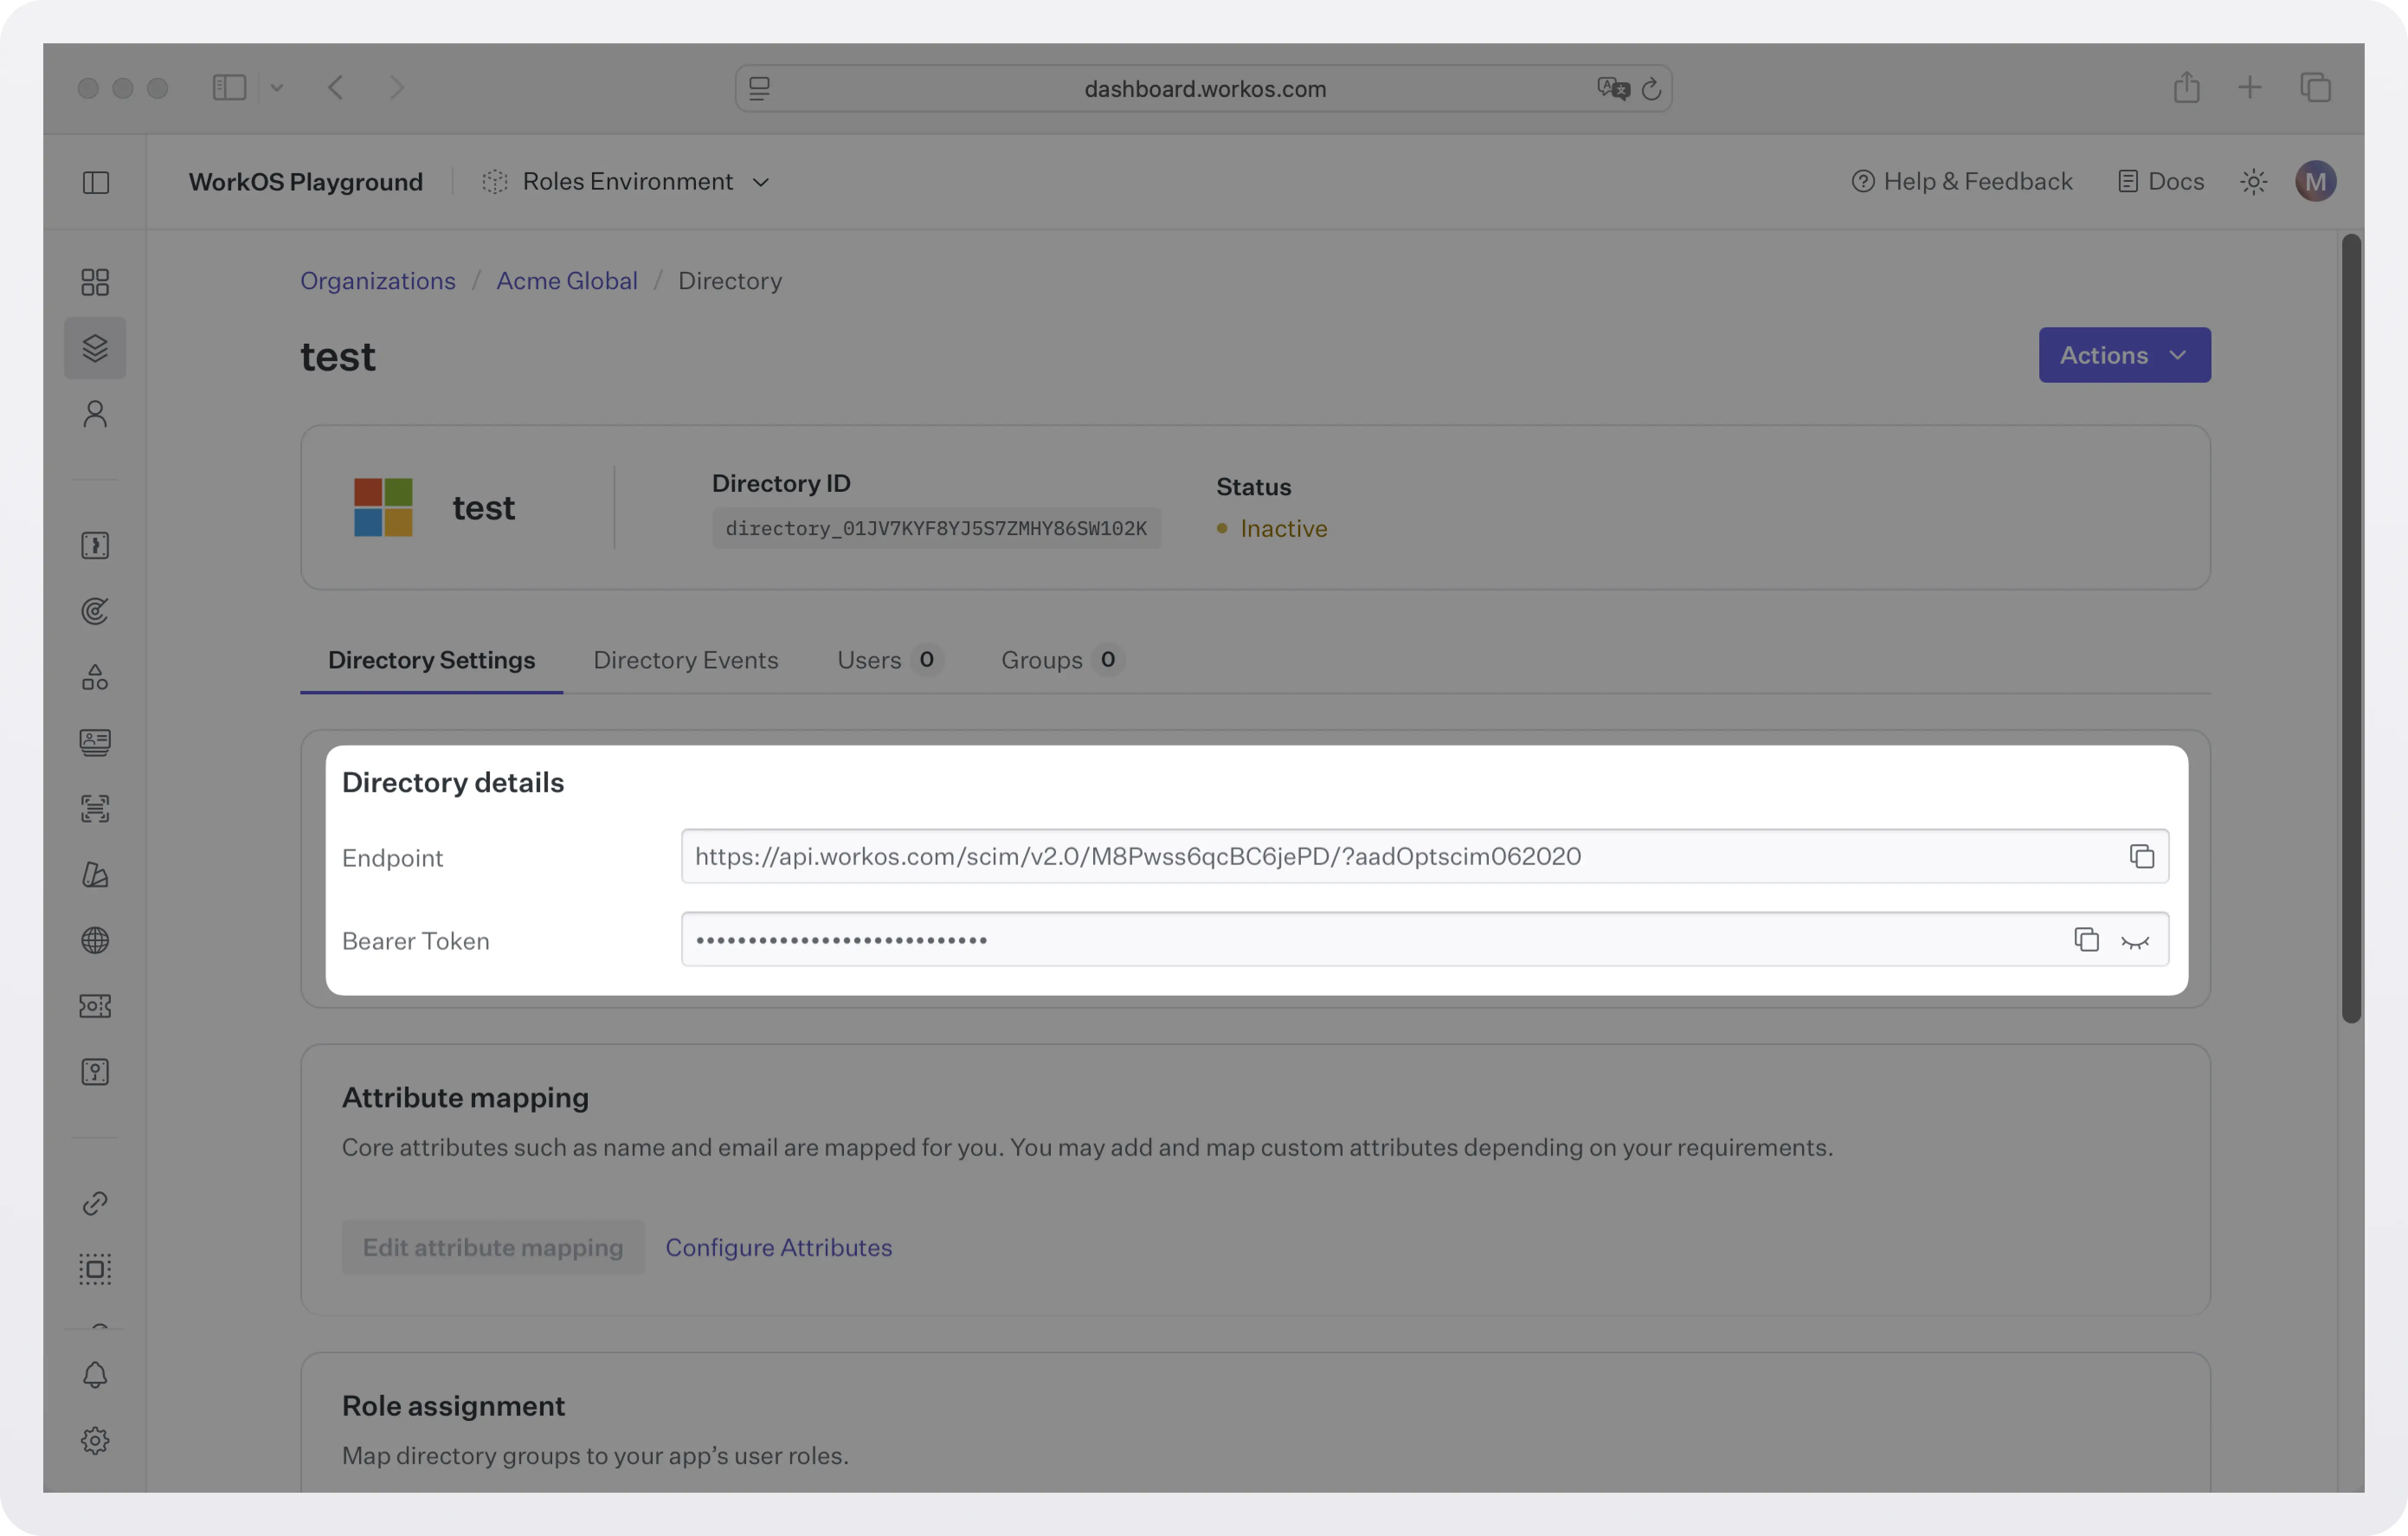
Your Entra ID directory sync has now been created successfully with an Endpoint and Bearer Token.
Entra ID configuration
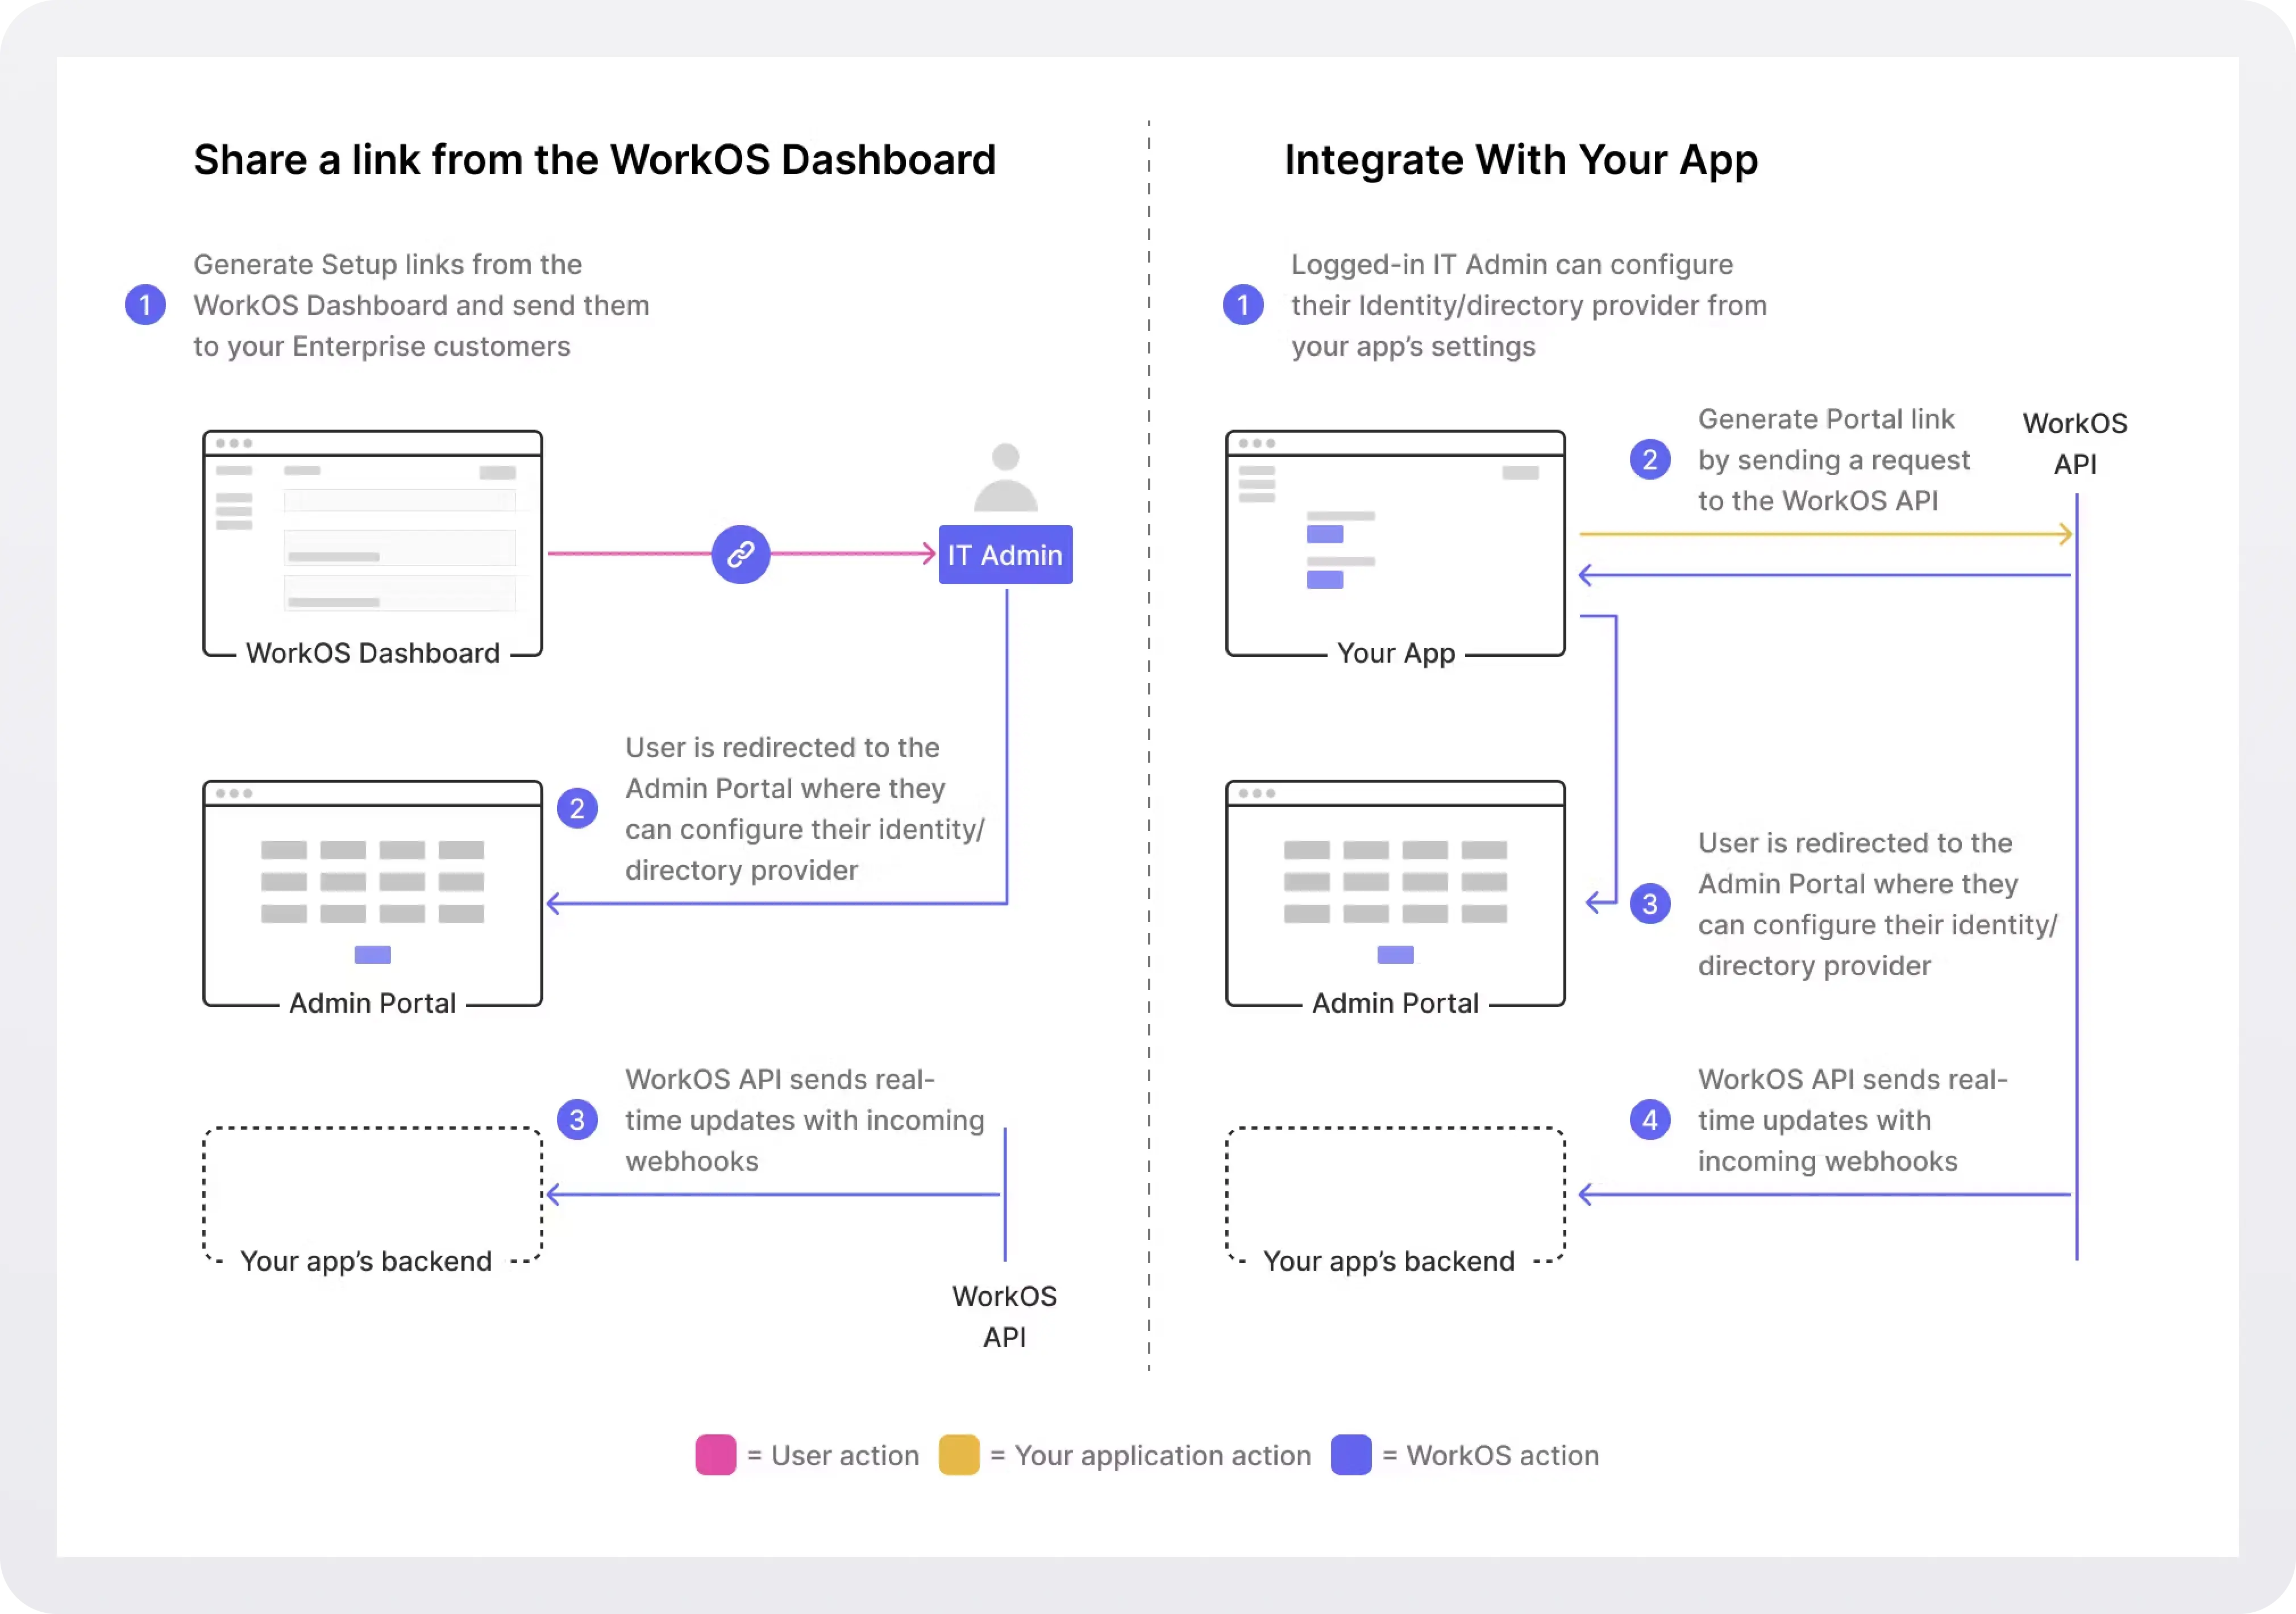
!!Instead of doing this yourself or sending the instructions to the admin responsible for the connection, use the WorkOS Admin Portal, an out-of-the-box UI for IT admins to configure SSO and Directory Sync connections. You can integrate it into your app or get a link from the WorkOS dashboard and send it to the admin. For more, see the docs.!!
To configure the connection on Entra ID’s side, follow these steps:
- Log in: Log in to the Entra ID Active Directory Admin dashboard.
- Select “Enterprise Applications” from the list of Azure services.
- If your application is already created, select it from the list of applications and continue to step 5.
- If you haven’t created a SCIM application in Azure, select “New Application”. Give your application a descriptive name, and select the “Integrate any other application you don’t find in the gallery (Non-gallery)” option, then click “Create”.
- Select “Provisioning” from the “Manage” section found in the navigation menu.
- Click the “Get Started” button.
- Select the “Automatic” Provisioning Mode from the dropdown menu.
- In the “Admin Credentials” section, copy and paste the Endpoint from your WorkOS Dashboard in the “Tenant URL” field.
- Copy and paste the Bearer Token from your WorkOS Dashboard into the Secret Token field.
- Click “Test Connection” to receive confirmation that your connection has been set up correctly. Then, select “Save” to persist the credentials.
- Expand the “Mappings” section.
- Make sure the group and user attribute mappings are enabled, and are mapping the correct fields. The default mapping should work, but your specific Azure setup may require you to add a custom mapping.
- Make sure that you are mapping
objectIdtoexternalIdwithin the Attribute Mapping section. - In order for your users and groups to be synced, you will need to assign them to your Entra ID SCIM Application. Select “Users and groups” from the “Manage” section of the navigation menu.
- Select “Add user/group” from the top menu.
- Select “None selected” under the “Users and Groups”. In the menu, select the users and groups that you want to add to the SCIM application, and click “Select”.
- Select “Assign” to add the selected users and groups to your SCIM application.
- In the Provisioning menu, confirm the “Provisioning Status” is set to “On” and that the “Scope” is set to “Sync only assigned users and groups”.
- Begin provisioning users and groups and witness realtime changes in the Events page of your WorkOS dashboard.
!!For more details and screenshots, see the Entra ID SCIM integration guide.!!
Step 4: Sync users and groups to your app
Once you've connected Entra ID to WorkOS, any time a directory-related resource—like a user or group—is created, updated, or deleted in Entra ID, WorkOS will generate a corresponding event. These events allow your app to stay in sync with the identity provider in real time, ensuring user data is always up to date.
About events
Each WorkOS event has the following structure.
For example, this is an event about the creation of a new user:
The different directory events are:
!!For details and sample payloads on each event, see Understanding the events lifecycle.!!
Sync events to your app
After WorkOS generates these events, your app needs to consume them to stay in sync with the latest changes. You can do this in one of two ways: by polling the Events API for new events, or by setting up webhooks to receive them automatically in real time. Either approach ensures that your app reflects the current state of the directory.
With the events API, your application retrieves events from WorkOS. It provides a consistent, ordered stream of immutable events via a paginated endpoint, allowing your application to pull and process changes at its own pace. This architecture not only ensures data integrity and easier error recovery, but also simplifies debugging and audit logging.
With webhooks, WorkOS automatically notifies your app when an event occurs by invoking an endpoint hosted within your application. Although webhooks are popular, they are also prone to issues like missed deliveries, out-of-order events, and scalability bottlenecks (for more, see Why you should rethink your webhook strategy). We recommend using the events API instead.
Option 1: Sync data using the events API
To start consuming events, you first need to pick a starting place in the data set. For that, you need a cursor.
A cursor is a bookmark to track your app’s position in the events list. The very first call to the events API won’t have a cursor. Subsequent requests to WorkOS should include the updated cursor using the after parameter. You will need to update and store your cursor after processing an event.
Determine the event types you want to pull, and call the listEvents method. In this example, we are pulling the first 100 events:
This is an example response (one user created, and one updated):
In all subsequent calls, you have to use list_metadata.after for pagination. You'd pass that value as a after parameter to get the next page of results, and then update it to the new value contained in the API's response.
For more info, see the Sync data using the Events API quickstart.
Option 2: Sync data using webhooks
If you prefer not to poll the WorkOS Events API, you can keep your application up-to-date by receiving updates through webhooks. Whenever users or groups change in the upstream directory, WorkOS will send an HTTPS POST to your application with the full object payload, allowing you to upsert or delete records without additional API calls. Your endpoint should validate the request, enqueue the payload for background processing, and respond immediately with HTTP 200 OK. WorkOS automatically retries failed deliveries with exponential backoff, so responding quickly helps prevent unnecessary retries.
To sync events using webhooks:
1. Create a public endpoint that WorkOS can send events to. This endpoint should use HTTPS and should accept POST requests with the workos-signature header. Flask example:
Set and save the webhook URL in the WorkOS Dashboard > Webhooks, so WorkOS knows where to deliver the events. Your webhook endpoints should only be configured to receive the ones required by your integration. Receiving all event types can put undue strain on your servers and is not recommended.
2. Process events async. In order to avoid unnecessary retry requests hitting your webhook handler, we recommend using two concurrent processes for handling events: one for receiving the event, and the other for processing it.
- Respond with HTTP 200 OK: On receiving an event, you should respond with an
HTTP 200 OKto signal to WorkOS that the event was successfully delivered. Otherwise, WorkOS will consider the event delivery a failure and retry up to 12 times, with exponential backoff over 3 days. - Validate the requests: To ensure that requests originate from WorkOS, validate the webhook signature before you trust the event payload. WorkOS signs each request using an HMAC SHA-256 hash and includes:
- A timestamp
- A signature hash
- Both contained in the
WorkOS-Signatureheader
3. Test the endpoint: Use the Send test event button on WorkOS Dashboard > Webhooks to verify your integration. If you would like to test against your local development environment, we recommend using a tool like ngrok to create a secure tunnel to your local machine, and sending test webhooks to the public endpoint generated with ngrok. See our blog post to get more details on how you may want to test webhooks locally with ngrok.
For more complete examples, signature validation details, and best practices, see the official WorkOS webhook documentation.
Step 5 (optional): Get specific users and groups
The API offers some more endpoints you can use for specific use cases.
Get a user
To get the details of an existing directory user:
The response looks like this:
List users
You can get directory users for a given directory or directory group:
The response is an array of users. You can use this to build an onboarding experience that allows an admin to select who to invite and create accounts for.
Get a group
To get the details of an existing directory group:
List groups
To get directory groups for a given directory or directory user:
!!Use the optional limit, before, and after parameters to paginate through results. See the API Reference for details.!!
Step 6 (optional): Stream events to Datadog
WorkOS supports real-time streaming of events to Datadog. By analyzing WorkOS activity directly in Datadog, you are able to:
- View trends in user sign-ins, user growth, new SSO connections and more.
- Debug customer issues related to sign-in, email verification, password resets and more.
- Generate reports of user activity per customer organization.
- Set alerts for unexpected activity, such as sudden spike in failed password attempts.
.webp)
To set up real-time streaming of WorkOS events to Datadog, follow these steps:
- Create a new Datadog API key to give WorkOS permission to send event activity as logs to your Datadog account.
- Configure event streaming in the WorkOS dashboard using the Datadog API key.
- Add the WorkOS Datadog dashboard to your Datadog account.
For detailed instructions and screenshots, see the docs: Stream events to Datadog.
Next steps
- Example apps: Check out our sample apps hat demonstrate how to use the WorkOS SDKs to power Directory Sync.
- Handle inactive users: Learn why inactive users are deleted from directories by default and how to configure this behavior.
- User attributes: Configure how attributes map from directory providers to Directory Users.
- Using WorkOS with On-prem Customers: Best practices for using WorkOS with on-prem customers.
- Identity Provider Role Assignment: Learn how to map role data from identity providers to roles in your app with Directory Sync.