How to add auth to your Replit app with WorkOS
A step-by-step tutorial to adding authentication to your Replit app with WorkOS AuthKit.
Replit Agent is one of the fastest ways to go from idea to deployed app. Describe what you want to build, and Replit's AI writes the code, sets up the database, and publishes it, all without leaving your browser. It's genuinely impressive for getting prototypes off the ground quickly.
But there's one thing most Replit apps need before you can share them with real users: proper authentication. Replit ships its own built-in option (Replit Auth) which is great if you're exploring an idea or building a prototype you might throw away. It wires up automatically with a single Agent prompt, with no external accounts or configuration required.
The moment your app is real, though, Replit Auth starts to show its limits. It has no support for enterprise SSO, no audit logs, no directory sync, and it's coupled to Replit's infrastructure, so if you ever move off the platform, your auth doesn't come with you. For a B2B app in particular, enterprise customers will ask about SSO with their Okta or Azure AD tenant before they ever talk pricing.
WorkOS AuthKit gives you a production-ready auth layer with email/password, social login, passwordless auth, and enterprise SSO; all without rebuilding your app from scratch. In this tutorial, we'll walk through adding it to a Replit-generated Node.js/Express app step by step.
Prerequisites
- A Replit app. We'll use Node.js/Express stack for this tutorial but the same WorkOS concepts apply to other stacks. See WorkOS's other SDKs for Python, Go, Ruby, and more.
- A WorkOS account (free for up to 1 million active users, no credit card required).
Step 1: Install the WorkOS Node SDK
Open the Shell tab in your Replit workspace and install the WorkOS Node SDK:
Also install cookie-parser for session management, and dotenv if your app doesn't already use it:
Step 2: Configure your WorkOS dashboard
Before writing any code, you need to configure two things in the WorkOS dashboard.
- Set a redirect URI → this is the callback endpoint WorkOS will redirect to after a user authenticates. Go to the Redirects section of the Dashboard and add:
http://localhost:3000/callback - Set a sign-in endpoint → this tells AuthKit where to send users if they land on the hosted sign-in page directly (e.g. from a bookmarked link or a password reset email). In the same Redirects section, set your sign-in endpoint to:
http://localhost:3000/login
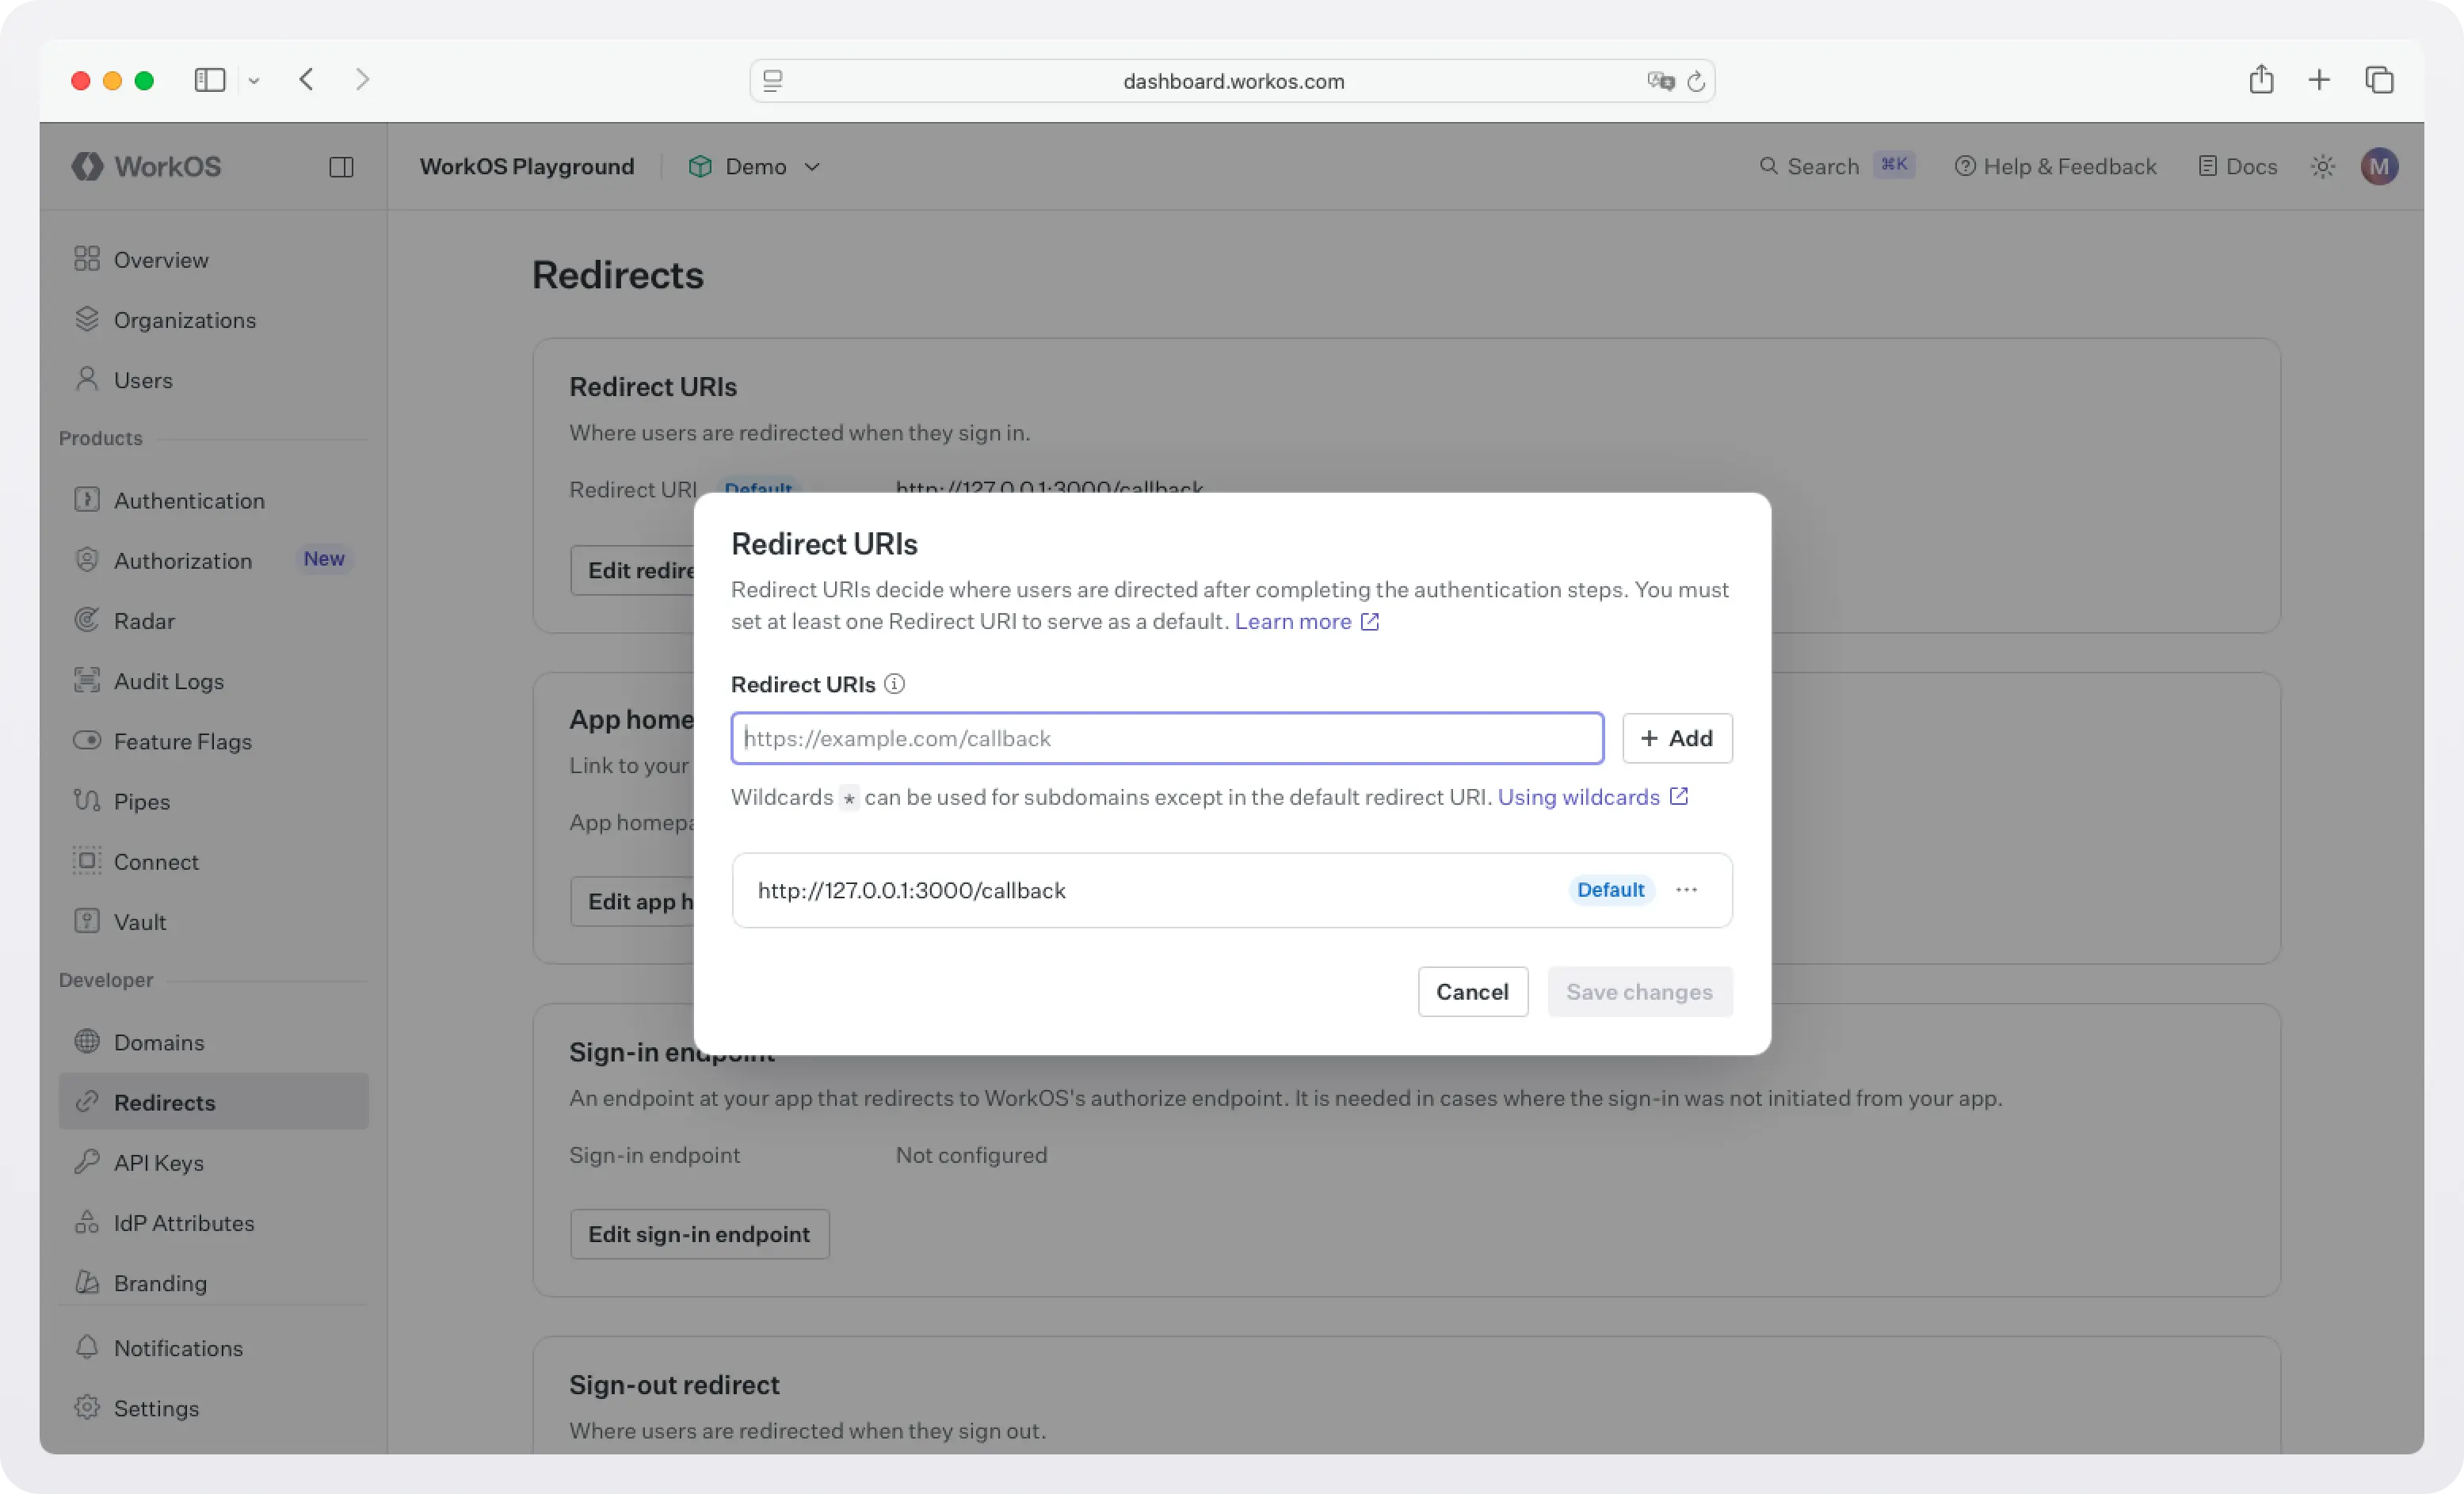
You'll update both of these to your production domain before deploying.
Step 3: Add your secrets
Grab your API key and client ID from the WorkOS dashboard.
In Replit, never put credentials in your code. Use the Secrets tab in the left sidebar (the padlock icon) to add the following:
WORKOS_COOKIE_PASSWORD encrypts the session cookie and must be exactly 32 characters. Generate one in the Shell:
Replit automatically injects Secrets as environment variables at runtime, so process.env.WORKOS_API_KEY will work in your code without any extra configuration.
Step 4: Initialize the WorkOS client
At the top of your main server file (typically index.js or server.js), initialize the WorkOS client and set up cookie parsing:
Step 5: Add the login route
This route generates an AuthKit authorization URL and redirects the user to WorkOS's hosted sign-in page:
Also add WORKOS_REDIRECT_URI to your Replit Secrets:
Step 6: Add the callback route
After a user authenticates, WorkOS redirects them to your callback route with an authorization code. Exchange it for a session and store it in an encrypted cookie:
Step 7: Create an auth middleware
This middleware reads the session cookie on every request. If the session is valid, it attaches the user to req. If the session has expired, it attempts to refresh it automatically. If there's no session at all, it redirects to login:
Step 8: Protect your routes
Apply the withAuth middleware to any route that requires a signed-in user. Use loadSealedSession to retrieve the user object inside the route:
Step 9: Add a logout route
End the session by getting the logout URL from WorkOS, clearing the cookie, and redirecting:
!!Make sure you've configured a Sign-out redirect in the WorkOS Dashboard under Redirects. Without it, users will see an error after signing out.!!
Testing it in Replit
Click Run in your Replit workspace. In the web preview, navigate to /login. You'll be redirected to the WorkOS-hosted AuthKit sign-in page. Create an account and you'll land back in your app as an authenticated user.
To confirm it's all wired up, open the WorkOS Dashboard and check the Users section. Your newly created account should appear there.
Deploying to production
When you're ready to deploy, click Deploy in Replit. Once you have your .replit.app URL, do two things:
Update your Replit Secrets with your production values:
In the WorkOS Dashboard under Redirects:
- Add
https://your-app.replit.app/callbackas an allowed redirect URI. - Update the sign-in endpoint to
https://your-app.replit.app/login. - Configure a sign-out redirect for after users log out.
What you get for free
Once AuthKit is wired up, you're not just getting a login form. WorkOS handles:
- Email + password auth: Automatic password strength and leak detection.
- Social login (Google, GitHub, Microsoft, etc.) with a single toggle in the dashboard.
- Magic auth for passwordless sign-in.
- Multi-Factor Auth (MFA): Additional authentication with TOTP and SMS.
- Biometric / Passkey Auth: Passwordless authentication with passkeys.
- CLI Authentication: Quickly add auth to your command-line tools.
- Email verification: Verify user email addresses with magic codes.
- Organization auth policies: Restrict domains, MFA, and SSO per organization.
- Just-in-time (JIT) user provisioning: Automatic provisioning based on email or SSO.
- Role-Based Access Control (RBAC) and Fine-Grained Authorization (FGA): Powerful and flexible permissions for your users.
- Admin Portal: A self-serve UI your enterprise customers can use to configure SSO themselves.
- And more.
Next steps
With proper auth in place, your Replit app is ready for real users. If you're targeting businesses or enterprise customers, WorkOS also gives you:
- Enterprise SSO: When an enterprise customer wants to sign in with Okta, Azure AD, or Google Workspace, WorkOS handles the full SAML/OIDC flow automatically.
- Directory Sync: Automatically provision and deprovision users from Okta, Azure AD, and more.
- Audit Logs: A tamper-proof record of every action in your app.
- Radar: Realtime protection against bots, fraud, and abuse.
- Feature Flags: Manage rollout of new features for specific users and organizations.
- And more.
All of these can be added incrementally as your needs grow.