The developer’s guide to SAML authentication
A developer-focused walkthrough of SAML SSO for developers who want to understand all the moving parts without needing a PhD in XML sorcery.
If you’re a developer building software for enterprise customers, you’ve likely come across the term SAML (Security Assertion Markup Language) and maybe even felt a little intimidated. Good news: this guide unpacks SAML, gives you code samples, shows how everything fits together, and helps you avoid the classic pitfalls.
We’ll cover what SAML is, how it works under the hood, jargon you’ll need to know, certificate & metadata essentials, common errors, security considerations, and even how to implement it using WorkOS. Let’s dive right in.
What is SAML?
SAML is an XML-based open standard that enables users to sign in once and access multiple applications without signing in again (what is commonly known as Single Sign-On or SSO). It does this by passing information about a user between a SAML service provider (your SaaS app) and an identity provider (like Okta or Ping).
In simpler terms:
- Your app (SP) asks the user’s enterprise login system (IdP): “Hey, is this user who they say they are?”
- The IdP verifies the user’s identity and responds with an XML message (that we call an assertion) that the user is indeed authenticated.
- Your app trusts that and logs them in.
The standard is mature (SAML 2.0 has been around for years) and widely supported across enterprise IdPs.
SAML glossary
SAML has its own jargon so before we move ahead let’s clarify what is what. Here are some key SAML terms you must know:
- Identity Provider (IdP): The system that authenticates the user (for example - Okta, Azure AD).
- Service Provider (SP): A website or app that provides services to users. If you’re building an app, the SP is you (or, more specifically, your app).
- Assertion: The XML message the IdP sends to the SP containing user identity/attributes and authentication event. (We’ll go deeper into this in its own section.)
- AuthnRequest: The request from the SP to the IdP to initiate the authentication flow.
- ACS URL (Assertion Consumer Service URL): The endpoint on the SP where the IdP sends the SAML response.
- Entity ID (SP Entity ID / IdP Entity ID): Unique identifier (typically a URI) for each party in the SAML exchange.
- Bindings & Profiles: The transport methods (HTTP-Redirect, HTTP-POST, SOAP) and usage-patterns/profiles (e.g., Web Browser SSO) used by SAML.
- Metadata: XML files that describe the configuration of IdP or SP (endpoints, certificates, etc.).
How SAML authentication works
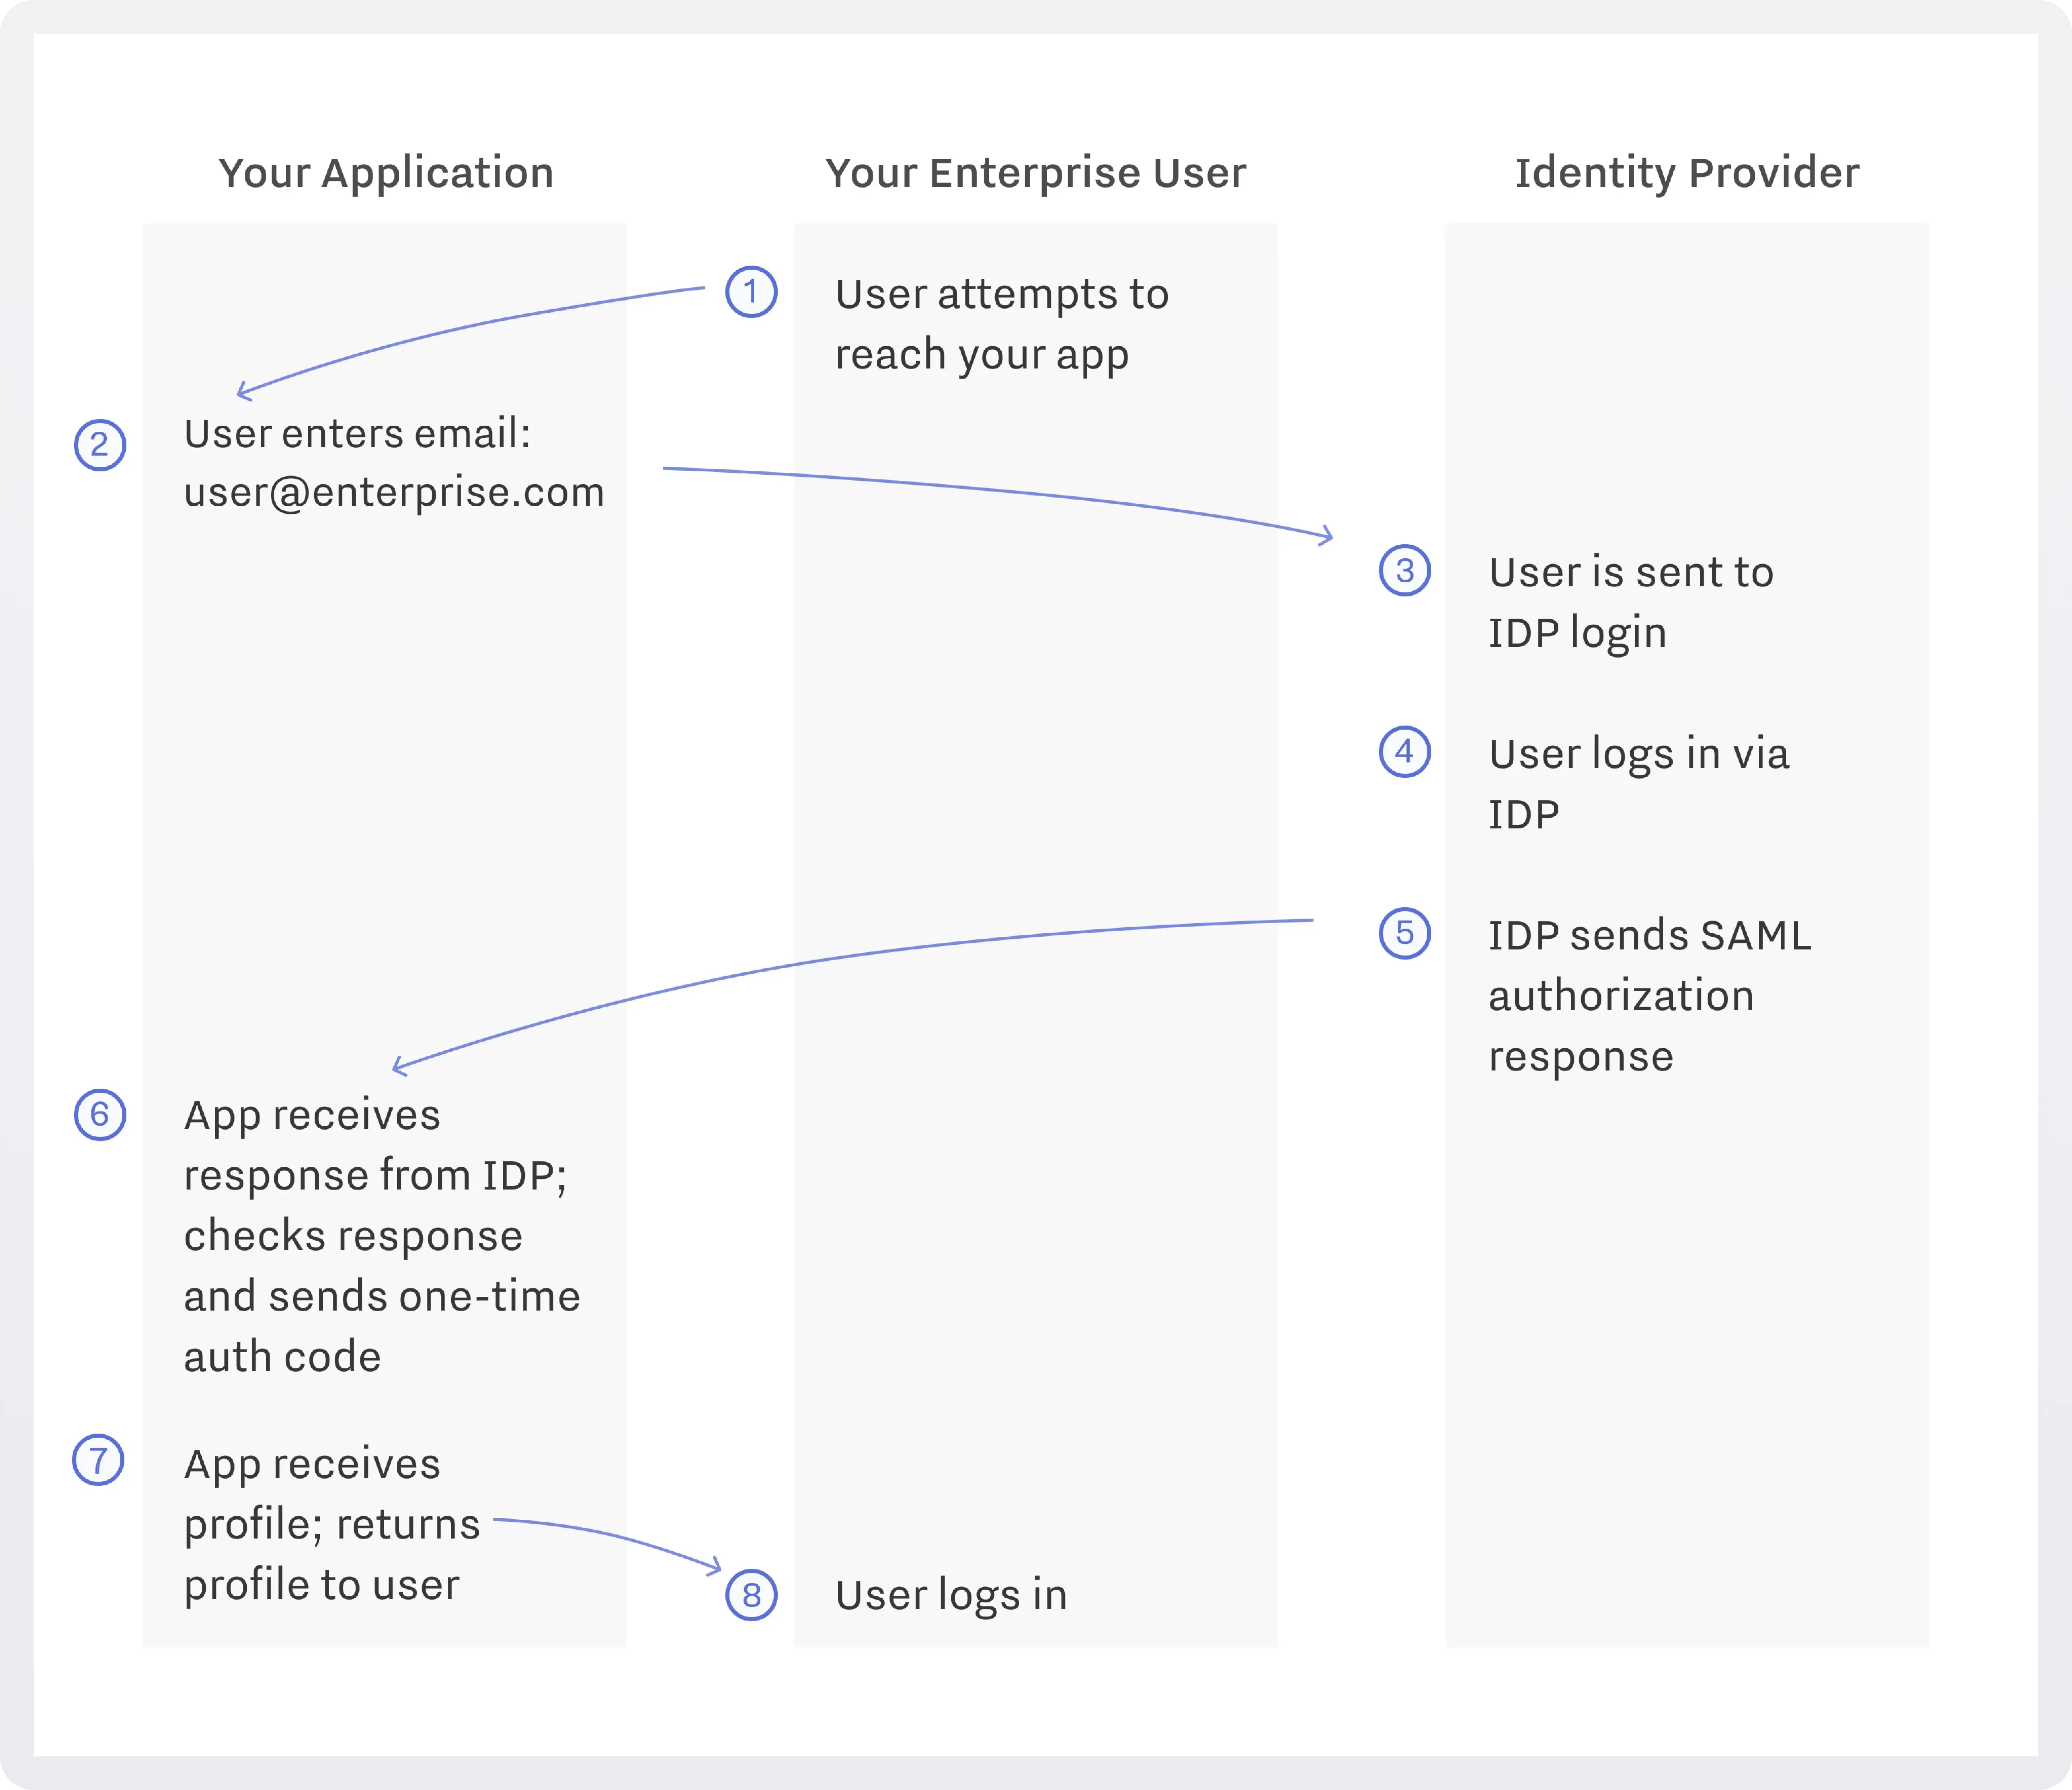
Here’s a typical flow simplified:
- User tries to access a protected resource on your app (SP).
- User enters their email on the SP.
- SP generates an AuthnRequest, possibly signs it (more on this later on), and redirects the user (browser) to the IdP’s SSO endpoint, including that request.
- The IdP authenticates the user (login page, MFA, etc).
- Once successful, IdP builds a SAML Response containing one or more assertions (authentication statement + attributes) and sends it (via browser) to the SP’s ACS URL (often via HTTP-POST binding).
- SP receives the response, verifies signatures/encryption, extracts the assertion, checks conditions (timestamps, audience, etc), then establishes a session and user identity.
- SP extracts the profile information and customizes the app for the user (roles, etc.).
- User is logged into your app.
SP-initiated vs IdP-initiated SSO
The flow we just saw is “SP-initiated“. As the name suggests, SP-initiated SSO starts from the SP’s side. With “Sign In With” type of identity providers like Apple or Google, the SP typically exposes a login button, which, when clicked redirects the user to the IdP for authentication.
More commonly, in enterprise settings, the SP usually has an input box where the user is asked to enter their email address. Upon entering their email, the SP determines which IdP (if any) the user uses and redirects them to it. SP-initiated SSO is ideal if you want to offer multiple login options to different IdPs.
The alternative is IdP-initiated SSO. Unlike in SP-initiated SSO, IdP-initiated SSO is initiated from the IdP. Once a user logs in to their IdP, they can select the specific app they want to log in from a list of several SPs, to which the IdP redirects them. This could be a corporate login portal or any other system that the organization uses to manage user app access.
Here’s how it works:
- The user first logs into the IdP's portal (or into their corporate device).
- After authentication, the user selects the service (SP) they wish to access from the IdPs dashboard or menu.
- The IdP generates a token that includes the user's identity and possibly other attributes like roles or permissions.
- The IdP sends the user, along with the token, directly to the SP.
- The SP receives the token, validates it, and grants access to the user without further login prompts.
IdP-initiated SSO is mostly used in enterprise environments where employees access a suite of apps through a corporate IdP. For example, you log in to the Okta Dashboard, and there you can see the list of apps you have access to, depending on your role in the company.

!!See also: UI/UX best practices for IdP & SP-Initiated SSO.!!
SAML assertions
SAML uses XML documents called assertions to pass information about a user between domains.
Assertions are the heart of the SAML message: they carry the “who” (subject), “when” (authentication event), and “what” (attributes) statements. They are issued by an IdP, consumed by the SP, and transmitted over protocols like HTTP POST or HTTP Redirect, usually encoded in Base64 and embedded in an HTML form. Assertions can also be transmitted over SOAP (used in some back-channel communications).
Here’s how an assertion looks like:
Inside a SAML assertion
Each assertion is an XML document that follows this hierarchy:
- Envelope: <saml:Assertion>
- Contains metadata like ID, IssueInstant, Version, and Issuer.
- Assertions carry a unique ID and are short-lived to prevent reuse.
- Subject:
- Identifies the user (via <saml:NameID>).
- Includes <saml:SubjectConfirmation> elements for verification.
- Statements: There are three primary types of statements that can be included in an assertion:
- AuthenticationStatement: Details about when/how the user authenticated.
- AttributeStatement: Provide key-value pairs with user data (e.g., email, department, groups). It’s used by the SP for access control and personalization.
- AuthorizationDecisionStatement: Specifies what the user can do (e.g., “Permit” for Read or Write). Less common but useful for fine-grained authorization.
- Conditions:
- Time-bound validity (NotBefore, NotOnOrAfter).
- Audience restrictions ensuring only the intended SP can consume it.
- Signature:
- XML Digital Signature that ensures integrity and authenticity. Typically uses RSA with SHA-256.
!!To learn more about SAML assertions, common errors, and best practices, see our SAML assertions guide.!!
SAML assertion vs SAML response
SAML assertions carry user identity and authorization information.
A SAML response is the message wrapper that delivers assertions from the Identity Provider (IdP) to the Service Provider (SP). It’s an XML document and contains one or more assertions. A response can indicate either success (with assertions included) or failure (with error status codes). It’s signed by the IdP and sent to the SP’s Assertion Consumer Service (ACS) endpoint.
A SAML assertion is the actual security token with authentication, attributes, and authorization decisions, while a SAML response is the envelope that contains assertions, along with status info.
Think of it like an email (response) that contains an attachment (assertion).
SAML request signing and response encryption
Messages in a SAML flow travel across network hops and often through intermediaries. Simply using HTTPS may not be enough to guarantee the integrity and confidentiality of the XML payloads. That’s where request signing and response encryption come in.
!!TL;DR Request signing ensures the IdP that the request indeed came from the SP, by having the SP attach a digital signature to the request, generated using the SP’s private key. Response encryption ensures that only the SP can read the IdP’s response by having the IdP encrypt parts (or all) of the response (assertion) so that only the intended SP (holding the private key) can decrypt it.!!
What is request signing?
In a standard SAML flow, the SP initiates authentication by sending an AuthnRequest to the IdP. If that request isn’t signed, the IdP must simply trust that it came from a legitimate SP instance. Request Signing solves this problem by attaching a digital signature generated using the SP’s private key.
When the IdP receives the request, it:
- Retrieves the SP’s public key from its metadata.
- Verifies that the signature matches the content of the request.
- Confirms that the request hasn’t been tampered with and originated from the expected SP.
If the signature is valid, the IdP processes the request; if not, it rejects it.
Request signing provides integrity and authenticity for messages traveling from the SP to the IdP. It ensures that:
- The authentication request is genuine and not forged by an attacker.
- The content hasn’t been modified.
- The IdP can trust the SP even if HTTPS is terminated early in the network path.
What is response encryption?
Once the user successfully authenticates, the IdP issues a SAML Response that includes one or more Assertions. These assertions often contain personally identifiable information (PII) such as email, full name, or role assignments.
Response encryption ensures that these assertions can only be read by the SP they’re intended for. The process looks like this:
- The IdP retrieves the SP’s public encryption certificate (provided in metadata).
- Before sending the response, the IdP encrypts the assertion (or specific attributes within it) using that public key.
- The SP uses its private key to decrypt the assertion after receiving it.
This encryption process can use different algorithms depending on configuration (for example, AES for the data and RSA for the key exchange).
Encryption protects the confidentiality of user attributes during transmission. Even if an encrypted SAML response were intercepted, only the SP with the correct private key could decrypt it.
!!When to use what: Request signing should be enabled when the IdP requires it or when there are intermediary network hops; encryption is advisable when assertions contain sensitive data. To learn more, see Understanding SAML Request Signing and Response Encryption.!!
SAML certificates
Certificates are foundational to SAML’s trust model. They are based on the X.509 standard and act like digital keys. They let IdPs and SPs prove the messages really came from them (signing) and, when necessary, keep sensitive data private (encryption and decryption). Without certificates, there would be no reliable way for one side to know that the other is genuine.
How SAML certificates work:
- SP and IdP exchange metadata which contains X.509 public keys/certificates.
- SP signs an AuthnRequest using its private key; IdP verifies using the public certificate.
- IdP signs the assertion/response using its private key; SP verifies using the IdP’s public certificate.
- If encryption is used, IdP encrypts assertion using SP’s public key; SP decrypts with private key.
Structure of a SAML certificate
Certificates are Base64-encoded and usually shared in PEM format:
This is a text-based representation of the certificate, which we can decode to view details like the subject, issuer, validity period, and the public key.
Here’s an example of a decoded, human-readable X.509 certificate. This is what you would see if you run a PEM certificate through a tool like openssl x509 -in cert.pem -text -noout:
!!For more on SAML certificates, see SAML certificates explained: How they work and how to manage them.!!
Managing SAML certificates
All certificates have a validity period. Once a certificate expires, signatures created with it are rejected. This means if an IdP forgets to rotate its signing certificate, or an SP does not update the metadata with a new certificate, users will suddenly lose the ability to log in.
Rotation is not only about expiration, though. Organizations may rotate keys earlier for security policies, to move to stronger algorithms, or in response to a potential compromise.
Managing certificate lifecycle is one of the most error-prone parts of SAML. Some best practices include:
- Track certificate expiration dates.
- Use metadata URLs (instead of manual cert uploads) where possible so rotations are automated.
- Provide clear process for your enterprise customers to rotate their certificates without downtime.
- Test certificate updates in a staging environment before production.
- If using both signing & encryption certificates, separate them (though many use the same cert for both). Separation improves security and reduces blast radius.
For more on this topic, see Managing SAML X.509 Certificates.
SAML security considerations
Security matters big time in SAML. Make sure you always follow these rules:
- Always verify digital signatures (assertions + responses) to ensure authenticity and integrity.
- Use encryption for assertions containing sensitive info.
- Disable or carefully control XML external entities (XXE) and other XML parser vulnerabilities.
- Ensure timestamps (
NotBefore,NotOnOrAfter) are validated so replay attacks are mitigated. - Validate that
RelayState(if used) doesn’t result in open redirect vulnerabilities. - Prefer using well-maintained SAML libraries rather than rolling your own parser/validator.
See also:
SAML metadata: The usual suspect when SSO breaks
While it’s often treated as a static configuration file, SAML metadata is more like a living contract between the IdP and SP. Both sides need to agree on exactly what’s in it, and if anything’s out of sync, things fall apart fast.
For example, if the IdP updates its certificate and the SP doesn’t fetch the latest metadata, every assertion it sends will start failing signature validation. Or if an ACS URL changes on the SP side but isn’t updated in the IdP’s metadata, users might get a successful login but be redirected to a dead endpoint.
SAML metadata is a critical runtime dependency that keeps your SSO flow healthy and secure.
Some common metadata issues to look out for:
- Expired or rotated certificates in metadata not propagated → SSO breaks.
- Endpoint URLs (ACS, SSO) changed but metadata wasn’t updated → SSO breaks.
- Identity Provider uses deprecated algorithms or non-trusted certificates that are still accepted.
- Manual metadata uploads introduce human error. Use metadata URLs when possible for automatic refresh.
For more on this, see The hidden pitfalls of SAML metadata: How to avoid downtime.
Common SAML errors
Here are common errors you’ll encounter as a developer:
- Invalid destination or recipient: The
DestinationorSubjectConfirmationData RecipientURL in response doesn’t match your SP ACS URL. Fix by aligning your SP metadata and IdP config. - Clock skew / assertion expired: If server clocks are out of sync, assertions are considered invalid. Ensure NTP sync and validate NotBefore/NotOnOrAfter.
- Signature verification failed: Signature element is missing or certified by unknown key. Ensure correct public certificate and algorithm.
- Audience restriction failed: The
Audiencein assertion doesn’t match your SP Entity ID. Ensure metadata uses correct Entity ID. - Certificate expired / invalid: The IdP’s signing certificate or SP encryption certificate is expired or rotated. Track expiry and use metadata URLs for automation.
For full deep dive on these errors and details on how to fix them, see Decoding and solving the five most common SAML errors.
Common SAML security vulnerabilities
The SAML world has known footguns. Some vulnerabilities with mitigation strategies:
- Assertion manipulation: If an assertion isn’t signed/encrypted, attacker could modify attributes (e.g., change user to admin). Defend by enforcing assertion signing.
- XML Signature Wrapping: Attacker crafts fake XML nodes that bypass signature validation. Use secure XML parsing libraries, check full document signature.
- Replay attacks: Captured assertion reused by attacker. Use timestamps + nonces + single-use tokens.
- Insecure metadata: Out-of-date certs/endpoints, untrusted chains. Use metadata URLs, monitor expiry.
- Open redirect via RelayState: Attacker uses RelayState to send user to malicious site. Whitelist redirect URLs.
For more on this, see Common SAML security vulnerabilities and how to defend against them.
Debugging SAML
Debugging a SAML flow can feel like reading tea leaves: Base64-encoded, wrapped XML, lots of moving parts.
Here are some tips:
- Decode the SAML Response (Base64 → XML) and inspect it manually (e.g., check Issuer, Destination, Audience, Conditions).
- Check browser redirections: Is the
SAMLRequest/SAMLResponsepresent? What binding is used? - Check for errors in IdP logs (e.g., signature invalid, unknown EntityID, certificate expired).
- Verify metadata values: ACS URL, Entity ID, certificate fingerprints match what SP expects.
- Enable verbose logging in your SAML library; capture raw request/response.
- Use tools like SAML tracer (browser extension) to inspect the flow.
- When certificate rotation occurs, test SP and IdP with old/new certs in staging.
For more details, see our step-by-step debugging guide.
The easiest and safest way to implement SAML
Implementing SAML is a serious undertaking: the concepts are simple (user logs in via IdP → your app trusts that), but the details (XML, assertions, signing, encryption, metadata, certificates, error handling, security) are quite complex. If you ignore any piece, you run the risk of broken SSO flows, or worse, security breaches.
If possible, avoid SAML altogether. Choose OpenID Connect (OIDC) instead, which is more secure and avoids the pitfalls we just saw. If SAML is a hard requirement (and it will be if you plan to sell to enterprise customers), consider using a vendor, like WorkOS, instead of building in-house.
This way, you can support any IdP with only one integration, and sleep calmly at night knowing that your integration is secure.
Here are the steps to adding SAML to your app using WorkOS:
- Configure the SAML connection to the WorkOS dashboard. Select the provider you want to connect to from the list of available integrations or choose the custom SAML connection if you’re connecting to a generic provider. Then follow the provided configuration instructions. Alternatively, you can have your customer’s admin do this work, using the Admin Portal.
- Install the WorkOS SDK in your app. If you don’t see an SDK you need, contact us and ask for it.
- Add 2 endpoints to your app:
- One to initiate SSO.
- One to handle the callback from WorkOS.
- Test your connection and you are good to go!
Final thoughts
SSO might seem simple at first, but it’s not, and it gets more tricky the more identity providers and protocols you have to use. You can get many details wrong, and they can cost you and your users dearly.
For more info on how complex building authentication and authorization on your own can be, see our Build vs Buy series.
Don’t try to reinvent the wheel unless you absolutely have to. Many providers have already solved SSO and implemented authorization servers using best practices. Some are open source, others not.
Using a third-party service like WorkOS will save your engineering team a lot of time and effort to focus on what’s important: building your product.