Model Context Protocol
How to use AuthKit as the OAuth authorization server for your MCP server.
Model Context Protocol (MCP) is a new protocol that standardizes how LLM-based clients can programmatically interact with applications. This includes querying data, in the form of resources, or taking direct actions in the application in the form of tools.
This guide is intended for application developers implementing an MCP server that requires authentication. WorkOS and AuthKit can provide a secure way to manage access to your MCP server with minimal effort.
The MCP specification builds on industry-standard protocols like OAuth 2.0 in order to secure access to an MCP server. It makes the following distinctions between entities in the authorization flow:
- Resource Server – This is your MCP server, which you may choose to build using the official Model Context Protocol SDKs.
- Authorization Server – This is AuthKit, which is a spec-compatible OAuth authorization server. While the spec allows the authorization and resource server to be the same, it can be architecturally simpler to delegate to an existing authorization server like AuthKit.
Support for MCP authorization is built on top of WorkOS Connect, which provides all of the necessary OAuth API endpoints MCP clients will use to authenticate. You can view your AuthKit metadata by making a request to its /.well-known/oauth-authorization-server endpoint:
AuthKit handles the authentication flow so your MCP server only needs to implement the following concerns:
- Verifying access tokens issued by AuthKit for your MCP server.
- Direct clients to AuthKit using standardized metadata endpoints.
MCP clients often have no prior relationship with your MCP server. The MCP protocol specifies that authorization servers (AuthKit) should support Client ID Metadata Document (CIMD) to allow MCP clients to identify themselves.
Client ID Metadata Document is off by default, but you should enable it in the WorkOS Dashboard under Connect → Configuration.
Client ID Metadata Document was added to the MCP specification in November 2025. You can enable the previous approach, Dynamic Client Registration (DCR), in the WorkOS Dashboard for backwards compatibility with MCP clients that don’t yet support Client ID Metadata Document.
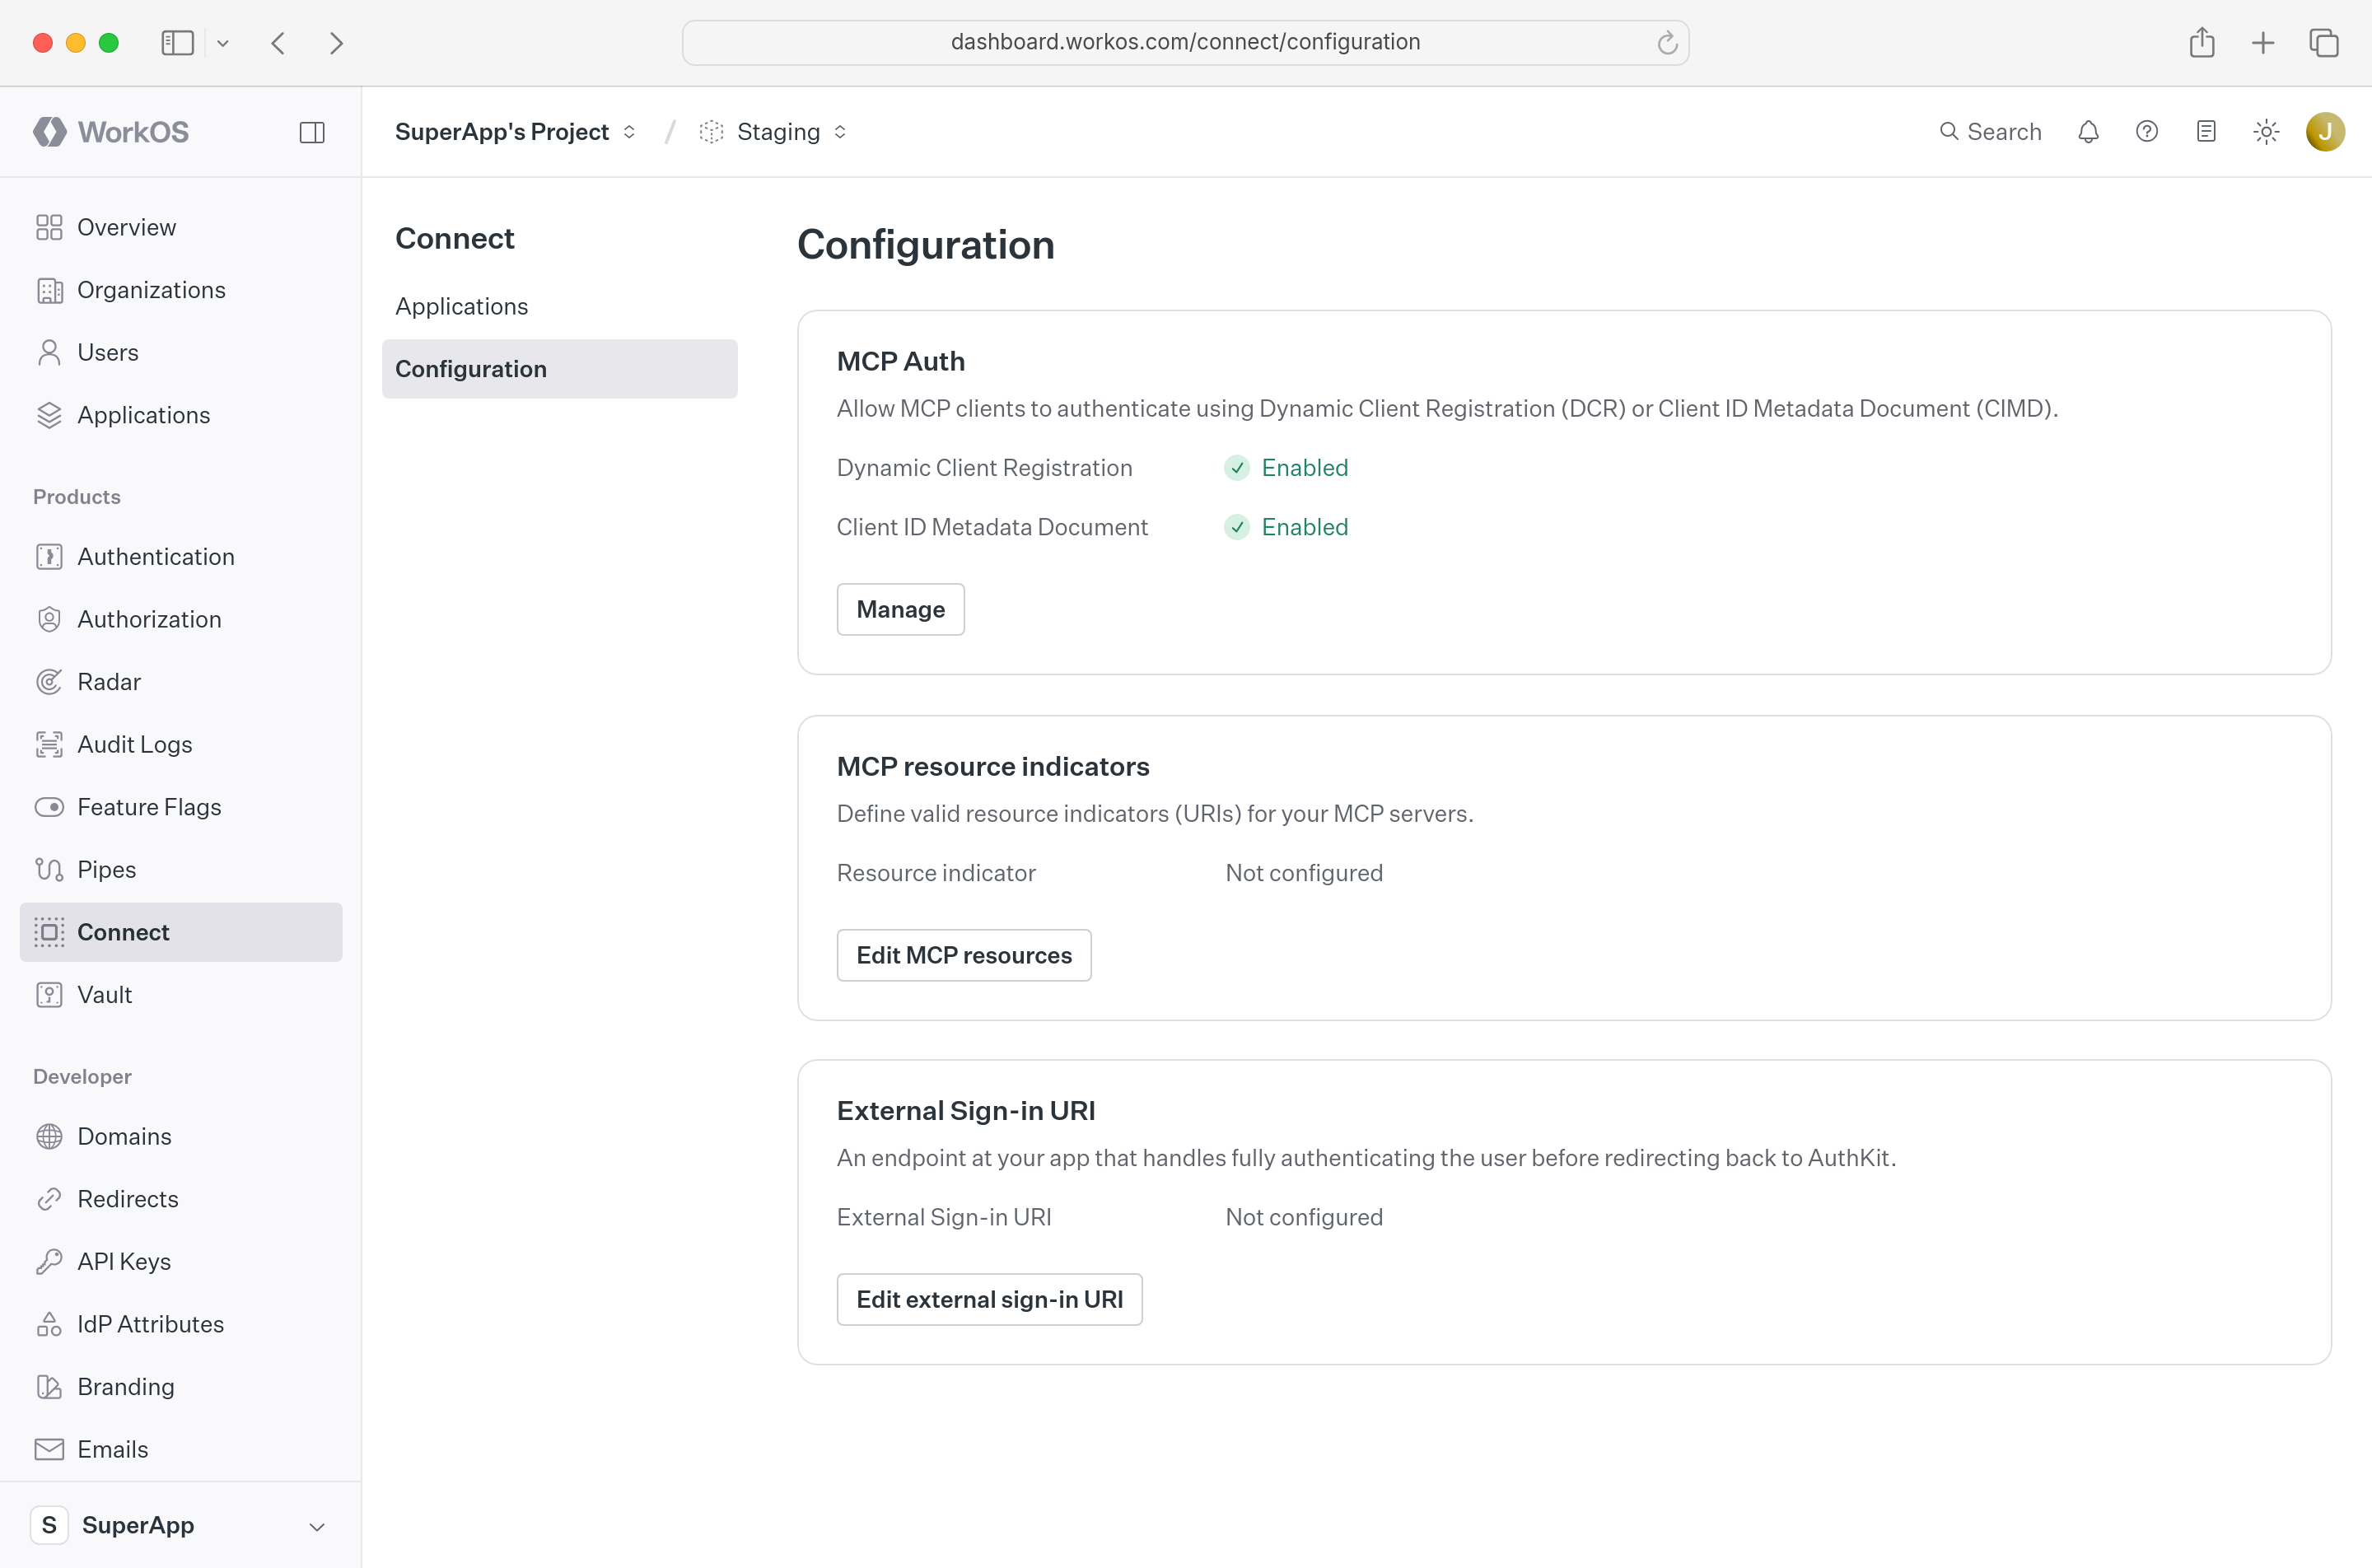
Add the URL of your MCP endpoint as a valid “Resource Indicator” in the WorkOS dashboard. MCP clients will send this value as the resource parameter during the authorization flow. This should be the same value as the resource field in your server’s metadata endpoint.
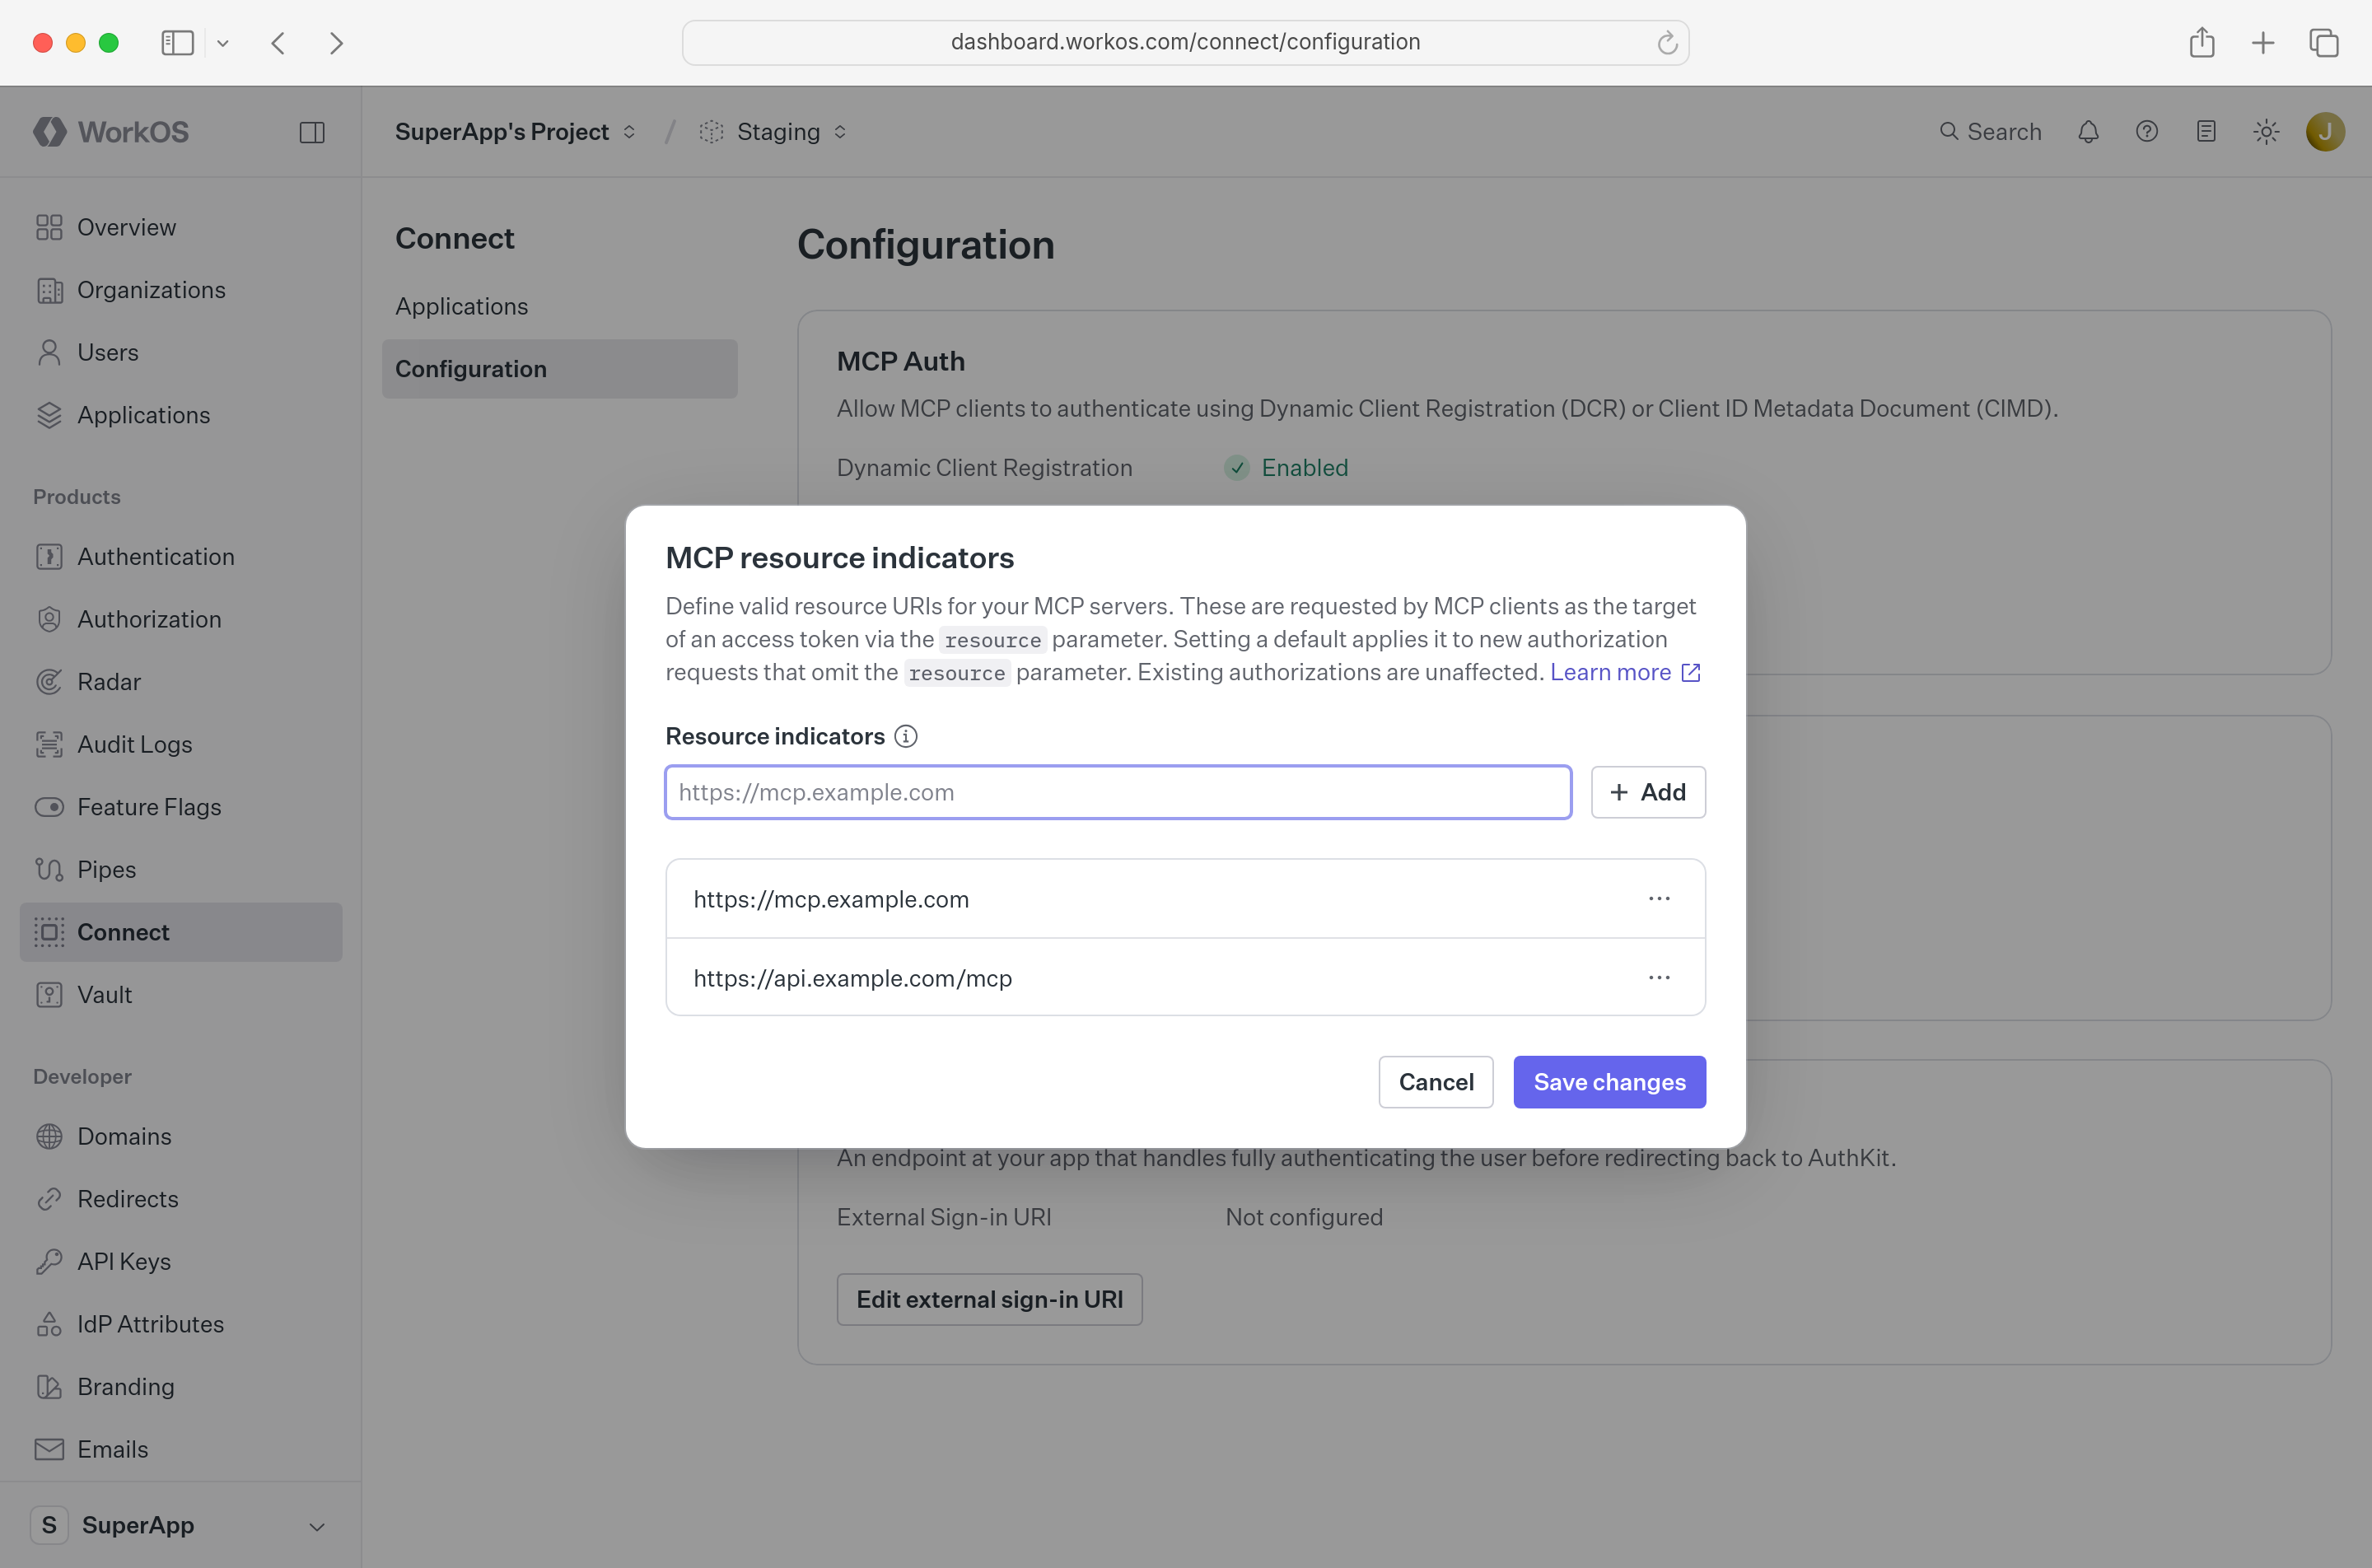
Multiple resource URLs can be added, in case you are building multiple MCP servers or need to account for different environments.
aud claim that matches the requested resource. If you don’t configure any Resource Indicators in the WorkOS Dashboard, then a default aud value unique to your WorkOS Environment will be used instead, with the resource parameter then ignored. This value is the environment’s client ID, found in the WorkOS Dashboard under Developer → API Keys.
Some MCP clients don’t implement Resource Indicators and omit the resource parameter from the authorization request. Rather than falling back to the environment’s client ID as the audience, one of the configured Resource Indicators can be designated as the default. Open the “…” menu next to a Resource Indicator and select Set as default.
Once a default is set:
- Authorization requests that omit
resourceare treated as if the default had been requested, and the resulting access tokens carry anaudclaim matching the default Resource Indicator. - Authorization requests that include
resourceare unaffected. The requested value is still validated against the configured Resource Indicators and used as the audience, even when it isn’t the default. - The default is only used by clients that register themselves through Client ID Metadata Document or Dynamic Client Registration, which is how MCP clients typically obtain credentials. OAuth and M2M Connect applications created by hand in the WorkOS Dashboard never use the default.
- Existing authorizations are unaffected. Access tokens minted from refresh tokens issued before the default was set keep their original audience.
Setting a default is optional. When it’s unset and a client omits resource, the resulting access token uses the environment’s client ID as its audience.
A Resource Indicator can contain a single wildcard character (*) to cover a family of MCP servers with one registration. The wildcard can be placed in one of two positions:
- Hostname wildcard: in the subdomain furthest from the root domain, for MCP servers deployed on dynamic subdomains such as per-branch preview deployments. For example, registering
https://*.preview.example.com/mcpallows clients to requesthttps://pr-42.preview.example.com/mcpas theresource. - Path wildcard: as the final path segment, for MCP gateways that expose many servers under one host. For example, registering
https://app.example.com/mcp/*allows clients to requesthttps://app.example.com/mcp/org/acme/server/crmas theresource.
All wildcard Resource Indicators follow these rules:
- The URI must not contain more than one wildcard, so a URI cannot combine a hostname and a path wildcard (e.g.,
https://*.example.com/*will not work). - A wildcard Resource Indicator cannot be set as the default.
Hostname wildcards follow these rules:
- The wildcard must be located in the subdomain furthest from the root domain (e.g.,
https://*.preview.example.com/mcpwill work, buthttps://preview.*.example.com/mcpwill not). - A wildcard may be prefixed and/or suffixed within its subdomain label (e.g.,
https://pr-*-app.example.com/mcp). - A wildcard will not match across multiple subdomain levels (e.g.,
https://*.example.comwill not matchhttps://sub1.sub2.example.com). - The wildcard will match letters, digits, hyphens, and underscores.
- The rest of the URI, including the path, must match the requested
resourceexactly. - In production environments, hostname wildcards cannot be used with public suffix domains (e.g.,
https://*.ngrok-free.appwill not work). Preview URLs from Vercel (https://my-site-*-team.vercel.app) and Firebase (https://my-site--*.web.app) are supported.
Path wildcards follow these rules:
- The wildcard must be the entire final path segment (e.g.,
https://app.example.com/mcp/*will work, buthttps://app.example.com/mcp-*andhttps://app.example.com/*/mcpwill not). - The wildcard will match one or more trailing path segments (e.g.,
https://app.example.com/mcp/*matches bothhttps://app.example.com/mcp/aandhttps://app.example.com/mcp/a/b/c), but it will not match the bare prefix (https://app.example.com/mcporhttps://app.example.com/mcp/). - The pattern must not contain a query string, and a requested
resourcewith a query string will not match. - The scheme, hostname, and path prefix must match the requested
resourceexactly. Because the hostname is literal, path wildcards can be used with any domain in production, including public suffix domains (e.g.,https://my-app.web.app/*).
When a client requests a resource that matches a wildcard Resource Indicator, the access token’s aud claim is the concrete URI the client requested, never the wildcard pattern itself. If both a literal and a wildcard Resource Indicator match the requested resource, the literal one takes precedence.
Your app needs to gate access to the MCP endpoints by verifying access tokens issued by AuthKit for your MCP server. This process is very similar to the way any Connect JWT is verified, with one important addition:
Note the addition of a WWW-Authenticate header with the resource_metadata challenge parameter containing a /.well-known/oauth-protected-resource URL. This allows clients to dynamically discover the appropriate authorization server, enabling zero-config interoperability between different MCP clients and servers.
Your MCP server should implement /.well-known/oauth-protected-resource endpoint mentioned in the previous section, returning the following minimal JSON response:
MCP clients that support metadata discovery will automatically fetch this metadata when they initially encounter a 401 Unauthorized error from the middleware implemented above. Since AuthKit is included in the metadata under authorization_servers the MCP client will redirect the user to AuthKit in order for them to sign in.
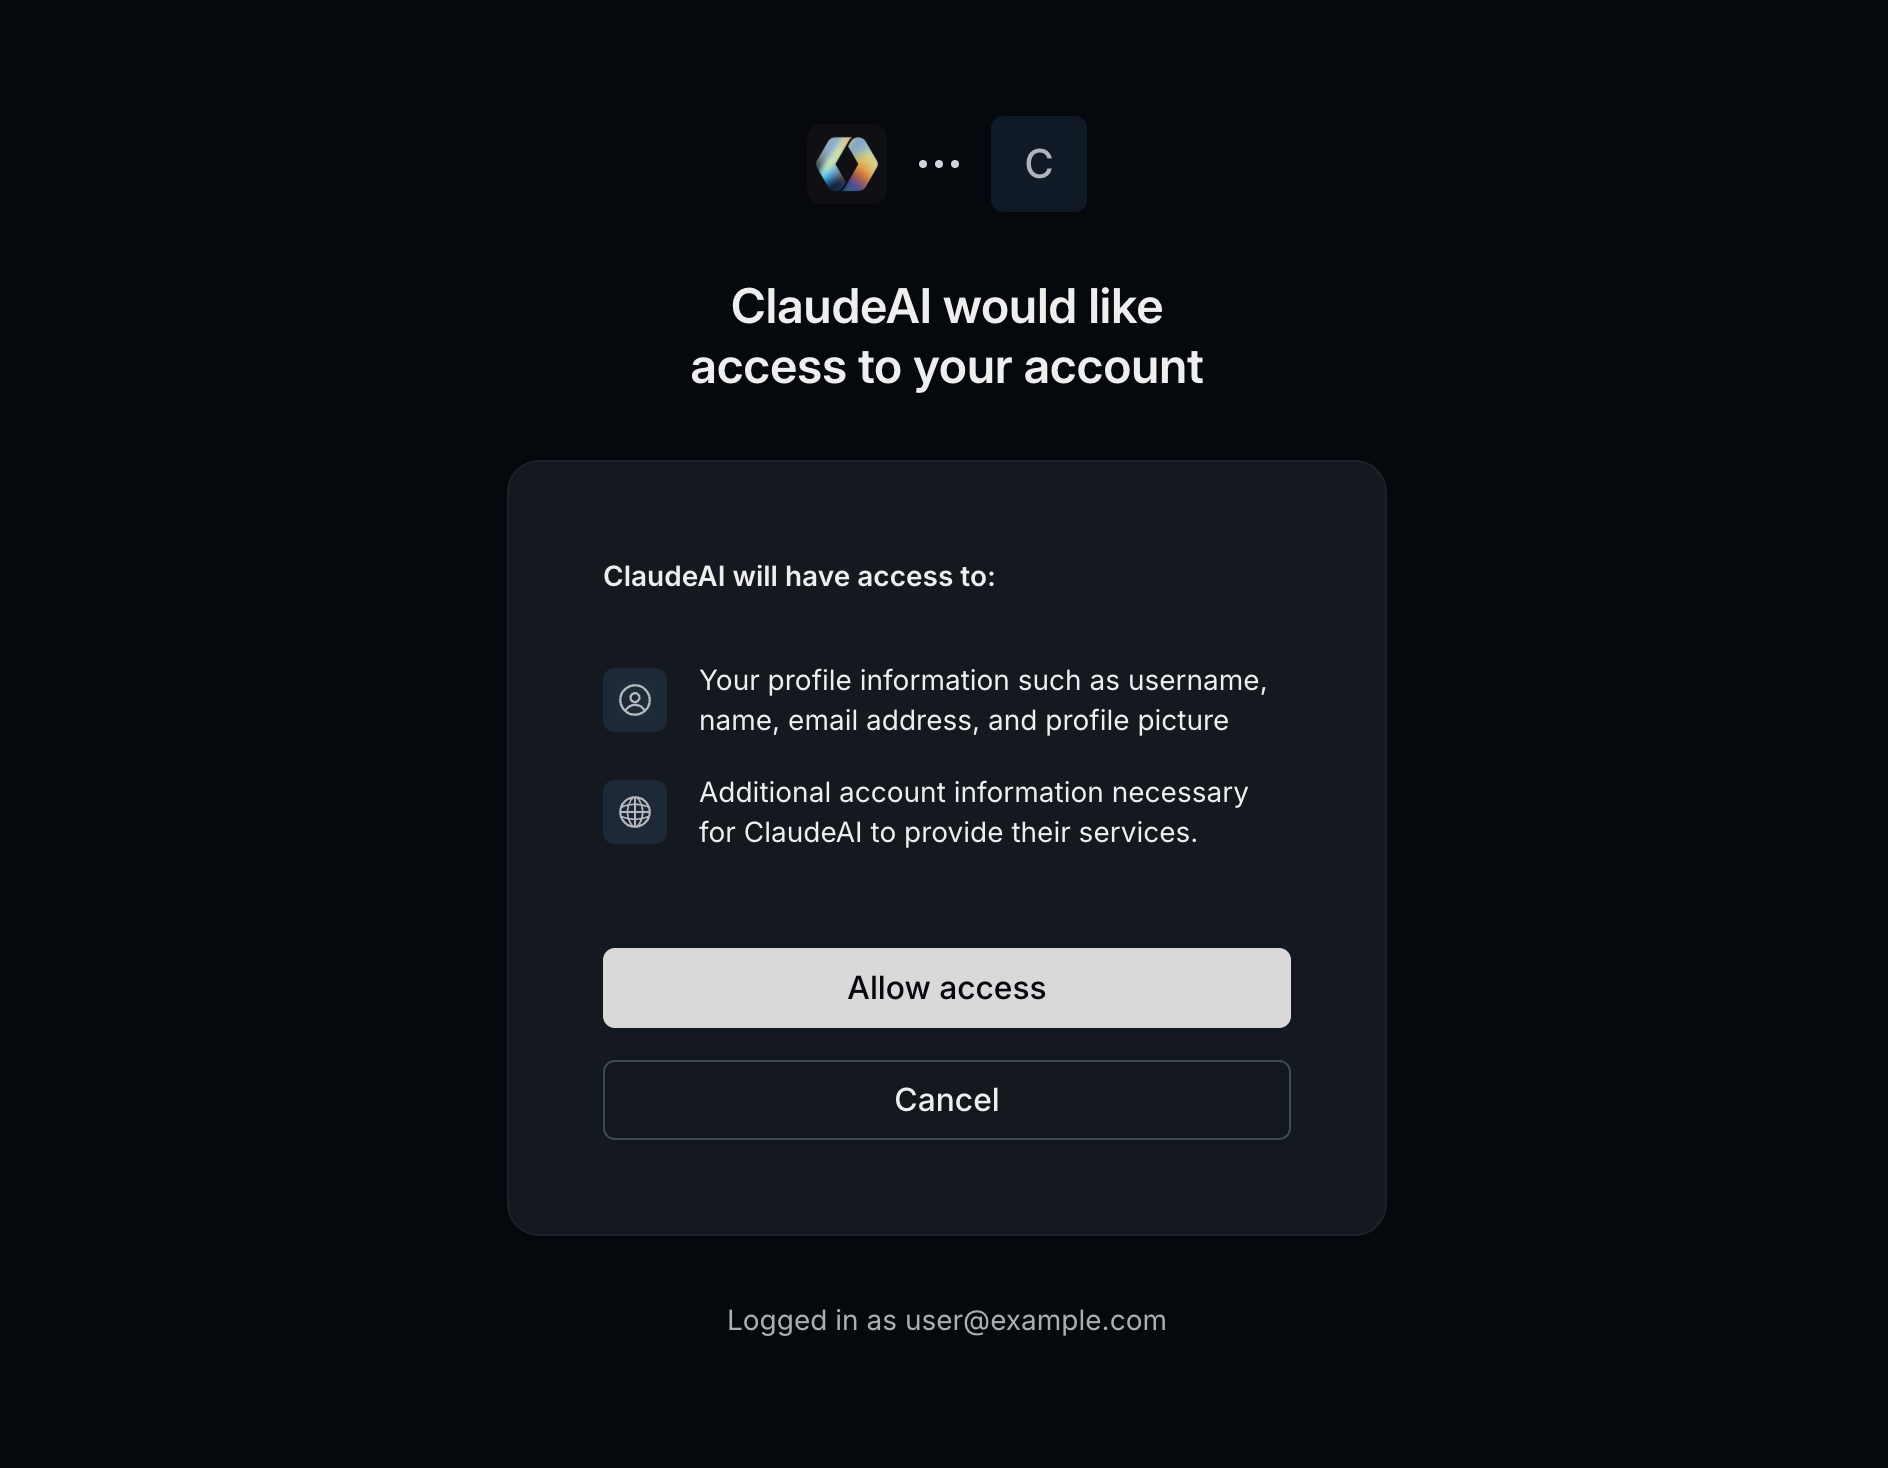
Behind the scenes, AuthKit implements the necessary authorization and token endpoints so that your application doesn’t need to. You can read more in the latest version of the MCP authorization spec but most apps can consider them implementation details of AuthKit as the authorization server.
Upon successful authentication the client will receive credentials and can start making requests to your application’s MCP endpoints.
Connect authorizes an MCP client through an application authorization (consent), not an AuthKit login session. These rules apply to MCP clients registered through Client ID Metadata Document (CIMD) or Dynamic Client Registration (DCR), including Standalone MCP Auth. They do not define the lifetime of your MCP server’s transport connections or of any sessions your application manages itself.
Access tokens expire at the time in their exp claim. The token response’s expires_in field reports the access token lifetime in seconds, not the refresh token’s lifetime. Connect currently uses the Access token duration configured on the environment’s default AuthKit application, which defaults to five minutes and is set in the application’s Sessions tab. When an access token expires, a client that holds a usable refresh token needs a refresh, not another sign-in.
Connect refresh tokens are tied to the user’s authorization for the client. Request the offline_access scope to receive one; AuthKit also issues one to a CIMD or DCR client that does not request the openid scope. Refresh tokens currently have no automatic maximum lifetime or inactivity expiry. The AuthKit application’s Maximum session length and Inactivity timeout settings do not limit Connect refresh tokens, and Connect does not currently offer a maximum or idle lifetime for these authorizations, or per-client or per-resource access token lifetime settings.
For example, a nightly job does not require users to reconnect solely because a seven-day AuthKit session limit has elapsed or they have been away. The client can continue refreshing while its refresh token and authorization remain valid.
By default, public clients rotate refresh tokens when they exchange them; confidential clients reuse their refresh token. CIMD clients are public. DCR clients are public when they register with a token_endpoint_auth_method of none, and confidential when they register with client_secret_basic or client_secret_post.
Always save the latest refresh_token returned by a successful refresh, even if its value is unchanged. Rotation happens when the token is used; it does not impose an idle timeout. An older, rotated token can stop working without ending the authorization. If the client’s latest refresh token is rejected with invalid_grant, start a new authorization flow to reconnect.
Revoking a user’s AuthKit sessions in the dashboard or through the Sessions API does not revoke their Connect authorizations or refresh tokens.
To disconnect a user from a client, list the user’s authorized applications and delete the authorization using the user ID and the application’s ID or client ID. This removes all authorizations and refresh tokens for that user and client, including authorizations for different organizations or resources. It preserves the client registration and other users’ authorizations. The endpoint does not select an individual refresh token or device. Deleting the user, the application, or an associated resource indicator also removes the affected authorizations.
The client must start a new authorization flow to reconnect. If the user still has an AuthKit session in their browser, they may be able to authorize again without signing in. Already-issued access tokens can still pass local JWT verification until they expire. For an online validity check, use Token introspection. Public CIMD and DCR clients cannot authenticate to that endpoint, so your MCP server calls it with the credentials of a first-party application in the environment.
The MCP space is rapidly evolving and not every client may support the latest version of the specification.
Clients that don’t send the resource parameter can be accommodated by setting a default Resource Indicator for the environment.
In particular, some clients may not support OAuth 2.0 Protected Resource Metadata and its /.well-known/oauth-protected-resource endpoint, instead attempting to fetch OAuth 2.0 Authorization Server Metadata directly from your application’s MCP server.
For these clients, your server can implement a metadata endpoint as a proxy with AuthKit as the upstream source of truth:
Clients will use AuthKit as the authorization server and the rest of the flow will be identical.
Cross App Access (XAA), supported in MCP through the Enterprise-Managed Authorization (EMA) extension, allows users who use SSO in two applications to authenticate from one to the MCP server of the other via their IdP, without needing to go through an OAuth flow. For example, a user signed in to one application can seamlessly access an MCP server belonging to a different application within the same organization.
MCP Auth with AuthKit supports Identity Assertion JWT Authorization Grant (ID-JAG) token exchange by default, so no additional implementation work is needed on your end. Once Cross App Access is enabled for your environment, users authenticated in one application can exchange their token for an access token scoped to your MCP server.
If you are an agent platform provider looking to add Cross App Access for your SSO connections, contact us to get started. Once implemented, your users can leverage XAA with MCP servers in your product.
Claude-issued auth enables Claude auto-connect by letting Claude issue an ID-JAG directly instead of relying on the organization’s identity provider. Claude vouches for each signed-in member of the organization directly, so no IdP changes are needed.
When a member of the organization uses your MCP server in Claude, Claude signs an ID-JAG for them and exchanges it at AuthKit’s token endpoint. AuthKit verifies the ID-JAG against the Claude issuer registered on the organization, matches the user by email, and returns an access token for your MCP server. Your MCP server verifies the access token as it does for any other client.
Claude-issued auth is enabled separately from other Cross App Access. Reach out via email or Slack with the organizations that will use it. The Claude Enterprise-Managed Auth card appears in the WorkOS Dashboard once it’s enabled.
Then, to register an organization’s Claude issuer:
- Ask the organization’s Claude admin for their issuer URL. In Claude, they open Organization settings → Connectors, select your connector, and open the Configuration tab. Next to Managed authorization, they select Set up, then choose Claude-issued under Identity source and copy the issuer URL. It looks like
https://identity.anthropic.com/issuers/<id>. - In the WorkOS Dashboard, go to Organizations, open the organization, and select the Settings tab.
- On the Claude Enterprise-Managed Auth card, select Configure issuer.
- Enter the Issuer URL, turn on Enable, and select Add issuer.
- Ask the Claude admin to return to Claude to test and enable the connection and choose which roles get the connector. See Claude’s setup guide for details.
An organization trusts one Claude issuer, and it must have at least one verified domain before you can add it. Each organization uses either Claude-issued auth or its IdP for Cross App Access, not both. If one of your customers needs both, reach out via email or Slack and we’ll work on it with you.
AuthKit issues an access token only when the domain of the user’s email is verified on the organization and the user is an active member of the organization with a verified email address.
If the ID-JAG includes an aud_tenant claim, it must name the organization that trusts the Claude issuer, either by its organization ID or by the organization’s external_id. AuthKit rejects the exchange if aud_tenant names a different organization or matches more than one, such as when one organization’s external_id equals another organization’s ID.
If you already have an existing authentication system in your application, you can use Standalone Connect to integrate AuthKit’s OAuth capabilities with your MCP server while preserving your current authentication stack.
Standalone Connect is particularly useful for MCP scenarios where you:
- Want to add MCP support to an application with existing user authentication.
- Need to maintain consistency with your current login experience and user management.
- Require custom authentication logic.
With Standalone Connect for MCP, the authentication flow works differently from the standard AuthKit integration described above:
- MCP clients initiate the OAuth flow for your MCP server with AuthKit as your authorization server.
- AuthKit redirects users to your application’s Login URI instead of showing AuthKit’s login page.
- Your application authenticates users using your existing authentication system.
- Your application calls AuthKit’s completion API to complete the OAuth flow.
- AuthKit handles the OAuth consent, token issuance, and returns control to the MCP client.
This approach allows you to maintain full control over the user authentication experience while leveraging AuthKit’s OAuth infrastructure for MCP client authorization.
When using Standalone Connect with MCP:
- You’ll still need to enable Client ID Metadata Document to support MCP clients that register themselves.
- Token verification works identically – your MCP server validates tokens using the same JWT verification process.
- The metadata endpoints remain the same, ensuring MCP clients can discover and interact with your server.
- Your Login URI must be configured in the WorkOS Dashboard and handle the
external_auth_idparameter from AuthKit.
The key difference is in the authentication step: instead of users signing in through AuthKit’s interface, they authenticate with your existing system, and AuthKit handles only the OAuth authorization and token issuance portions of the flow.
For detailed implementation steps and code examples, see the Standalone Connect documentation.